# Welcome to Pagerly

## Introduction

[Pagerly](https://www.pagerly.io/) is a Slack-first platform to manage oncalls, rotations, incidents, and status pages — without your team ever leaving Slack.

Priced per team, not per user, Pagerly keeps your whole oncall workflow where your engineers already are.

## What you can do with Pagerly

**📅 Oncall & Rotations**

* Create round-robin rotations and schedules natively in Pagerly, or sync existing schedules from PagerDuty, Opsgenie, Datadog, and JSM Operations
* Keep a Slack usergroup (like `@sre-oncall`) always pointing at the current oncall
* Swap shifts, set overrides, import holiday calendars, and get handover reminders

**💬 Slack Superpowers**

* Mention the current oncall in any conversation and find who-is-oncall instantly
* Auto-update channel topics, Slack statuses, and post rotation-change notifications
* Run daily oncall standups and unify messages across channels

**🚨 Incidents & Response**

* Page oncall engineers via phone calls — even in Do Not Disturb mode
* Create incidents from alerts (CloudWatch, Grafana, Datadog, Sentry, Prometheus, and more) or via Slack emojis
* Spin up war-room channels and manage the full incident lifecycle in Slack

**🌐 Status Pages**

* Publish beautiful public status pages on your own domain, with components, incident updates, maintenance notices, and subscribers

**🤖 SRE AI Agent**

* Investigate incidents with an AI agent connected to 40+ data sources (Grafana, Datadog, Kubernetes, AWS, and more), including a remote MCP server

**🔌 Deep Integrations**

* 2-way sync with Jira, Linear, PagerDuty, Opsgenie, Google Calendar, and automation via API, Zapier, Make, and n8n

## Get Started

{% content-ref url="/pages/VX6oDrD8mmrjOaXTXzD2" %}
[Get Started](/getting-started/get-started)
{% endcontent-ref %}

{% content-ref url="/pages/H88MvcbBh0W2kVkU9gii" %}
[Overview](/oncall-and-rotations/overview)
{% endcontent-ref %}

{% content-ref url="/pages/fRMsM9aXCVmWnX5j7dkc" %}
[Create Round Robin Rotations](/oncall-and-rotations/create-round-robin-rotations)
{% endcontent-ref %}

{% content-ref url="/pages/4zsSUQP8cwbKH3tTSwQk" %}
[Sync Team Schedule from Tools (Pagerduty, Opsgenie etc)](/oncall-and-rotations/sync-team-schedule-from-tools-pagerduty-opsgenie-etc)
{% endcontent-ref %}

{% content-ref url="/pages/WygDPxN2aD0PdY5sL7uv" %}
[Integrating with Your Paging Tool](/integrations/integrating-with-your-paging-tool)
{% endcontent-ref %}

## Explore the Products

{% content-ref url="/pages/OxmhxxYqxtgCrqdlHv8B" %}
[Pagerly Incident Response](/incident-response/pagerly-incidence-response)
{% endcontent-ref %}

{% content-ref url="/pages/RHIaHTPG1wd8EYdnME0v" %}
[Public Status Pages](/status-pages-and-monitoring/public-status-pages)
{% endcontent-ref %}

{% content-ref url="/pages/QA51AnMzvdICz94ayUre" %}
[Overview](/sre-ai-agent/sre-ai-agent)
{% endcontent-ref %}

## Need Help?

{% content-ref url="/pages/b606Ntxzk6GPNiizKmOl" %}
[Help and Support](/getting-started/help-and-support)
{% endcontent-ref %}


# Get Started

### 1-click Installation

To set up Pagerly in your Slack workspace, add the Pagerly app from the Slack app directory or. You can do this by navigating to [Pagerly](https://pagerly.io) and clicking on "Add to Slack."

### Onboarding through Slack

1\. Click "Add to Slack".

![](https://ajeuwbhvhr.cloudimg.io/https://colony-recorder.s3.amazonaws.com/files/2025-06-04/647635c2-588a-4d9a-a39e-b0a09645ca64/ascreenshot.jpeg?tl_px=310,222\&br_px=1293,772\&force_format=jpeg\&q=100\&width=983\&wat_scale=87\&wat=1\&wat_opacity=0.7\&wat_gravity=northwest\&wat_url=https://colony-recorder.s3.us-west-1.amazonaws.com/images/watermarks/FB923C_standard.png\&wat_pad=317,406)

2\. Select the workspace.

![](https://ajeuwbhvhr.cloudimg.io/https://colony-recorder.s3.amazonaws.com/files/2025-06-04/34086988-96f1-439d-a105-75feff9d5b97/ascreenshot.jpeg?tl_px=680,0\&br_px=1541,480\&force_format=jpeg\&q=100\&width=860\&wat_scale=76\&wat=1\&wat_opacity=0.7\&wat_gravity=northwest\&wat_url=https://colony-recorder.s3.us-west-1.amazonaws.com/images/watermarks/FB923C_standard.png\&wat_pad=760,92)

3\. Authorize Pagerly to your Slack Account to Initiate the OAuth Flow.

![](https://ajeuwbhvhr.cloudimg.io/https://colony-recorder.s3.amazonaws.com/files/2025-06-04/e53f9f23-ca1c-4ffb-b92b-ce36d44e151d/ascreenshot.jpeg?tl_px=382,353\&br_px=1242,834\&force_format=jpeg\&q=100\&width=860\&wat_scale=76\&wat=1\&wat_opacity=0.7\&wat_gravity=northwest\&wat_url=https://colony-recorder.s3.us-west-1.amazonaws.com/images/watermarks/FB923C_standard.png\&wat_pad=433,282)

4\. Add the purpose of using Pagerly and click "Save".

![](https://ajeuwbhvhr.cloudimg.io/https://colony-recorder.s3.amazonaws.com/files/2025-06-04/06808cdf-d5cf-4e9d-9209-e86011e2fc81/ascreenshot.jpeg?tl_px=405,235\&br_px=1265,716\&force_format=jpeg\&q=100\&width=860\&wat_scale=76\&wat=1\&wat_opacity=0.7\&wat_gravity=northwest\&wat_url=https://colony-recorder.s3.us-west-1.amazonaws.com/images/watermarks/FB923C_standard.png\&wat_pad=449,313)

5\. Click "Purpose added successfully."

![](https://ajeuwbhvhr.cloudimg.io/https://colony-recorder.s3.amazonaws.com/files/2025-06-04/3a8ff0fe-cb5c-4e5b-90de-df8343728a41/ascreenshot.jpeg?tl_px=852,534\&br_px=1541,919\&force_format=jpeg\&q=100\&width=688\&wat_scale=61\&wat=1\&wat_opacity=0.7\&wat_gravity=northwest\&wat_url=https://colony-recorder.s3.us-west-1.amazonaws.com/images/watermarks/FB923C_standard.png\&wat_pad=402,285)

6\. Pagerly app is added in your Slack.

![](https://ajeuwbhvhr.cloudimg.io/https://colony-recorder.s3.amazonaws.com/files/2025-06-04/73f17a83-394f-4f9d-8bfb-fa294b0e4ffc/ascreenshot.jpeg?tl_px=7,29\&br_px=1336,771\&force_format=jpeg\&q=100\&width=1120.0\&wat=1\&wat_opacity=0.7\&wat_gravity=northwest\&wat_url=https://colony-recorder.s3.us-west-1.amazonaws.com/images/watermarks/FB923C_standard.png\&wat_pad=805,267)

7\. Click "Manage On-call & Sync" to go to Pagerly web apps dashboard.

![](https://ajeuwbhvhr.cloudimg.io/https://colony-recorder.s3.amazonaws.com/files/2025-06-04/e5e8fc16-722b-44f5-8bdb-c4f9694b89bc/ascreenshot.jpeg?tl_px=394,0\&br_px=1541,640\&force_format=jpeg\&q=100\&width=1120.0\&wat=1\&wat_opacity=0.7\&wat_gravity=northwest\&wat_url=https://colony-recorder.s3.us-west-1.amazonaws.com/images/watermarks/FB923C_standard.png\&wat_pad=915,167)

8\. Click "Go to Status Page"

![](https://ajeuwbhvhr.cloudimg.io/https://colony-recorder.s3.amazonaws.com/files/2025-06-04/3dd311f0-7e64-405c-8370-12ca7f99557b/ascreenshot.jpeg?tl_px=394,39\&br_px=1541,680\&force_format=jpeg\&q=100\&width=1120.0\&wat=1\&wat_opacity=0.7\&wat_gravity=northwest\&wat_url=https://colony-recorder.s3.us-west-1.amazonaws.com/images/watermarks/FB923C_standard.png\&wat_pad=966,277)


# Setup Team Access

In case you want to allow only some users to read/edit Teams in Pagerly, you can set-up access control within the Pagerly App

The same users can edit the team access.

<figure><img src="/files/nYCmPee4cIo15bmGZdg3" alt=""><figcaption><p>Pagerly Slack Acces</p></figcaption></figure>

### Setup Team Access in the following Steps

<details>

<summary>Step 1 :Go To Pagerly Slack App and go to Edit Team</summary>

<img src="/files/0n6EFdlmida0MTtqqfwR" alt="" data-size="original">

</details>

<details>

<summary>Step 2: Add all users who can have access to read/team. Click on Add</summary>

<img src="/files/nYCmPee4cIo15bmGZdg3" alt="" data-size="original">

</details>

<details>

<summary>Step 3: Test. In case someone who is not part of the list will not be able to edit/read team.</summary>

<img src="/files/IamtA3Em3NOLaEUfKyab" alt="" data-size="original">

</details>


# Playing with Pagerly

This section covers how you can utilise Pagerly after your setup is completed

Congratulations!! Your team setup is done. You are good to go!!

Now, you can use Pagerly for the following cases ( we discuss each of these cases in details in following sections)

* Mention or Tag the team's current oncall on any Slack thread
* Fetch your team's oncall schedule
* Override your team's oncall schedule
* Take over the current oncall
* Let everyone know who is the current oncall for this team


# Mention Current Oncall on any Slack Conversation

With Pagerly, anyone can tag your team's oncall on any conversation. This helps anyone to manage any slack conversation. Similarly, you can find out who is the current oncall using the same mechanism.

You just need to use `@Pagerly <team>` to fetch the current oncall for Team \<team>

<figure><img src="/files/4SDE3mg9mW4jrQ0n19pX" alt=""><figcaption><p>Utilize Pagerly command to manage Slack conversations</p></figcaption></figure>

With Automated Responses, you can put SOPs, Troubleshooting docs, etc in automated replies. This would help in saving precious oncall time since some of the queries can be automatically taken care of :moneybag::moneybag:

You can Alternatively use Usergroup i.e. `@dev-on-call` if you have configured it.

<figure><img src="/files/bcXKTmTL2LrNulg3TteT" alt=""><figcaption><p>Directly use usergroup @dev-on-call to tag the current oncall</p></figcaption></figure>


# Fetch your team's oncall schedule

With Pagerly, you can fetch and view your team's oncall within Slack itself.\
Just use `/schedule <team>` to view the oncall schedule.\ <br>

<figure><img src="/files/iIJJaepbFwguGZBG6HF5" alt=""><figcaption><p>This is how you can see the team's oncall schedule</p></figcaption></figure>

You can view who is the current oncall, who will be next the oncall.<br>

### Check Schedule for Some Other Time Period

On clicking `Check other time` you can see oncall schedule of some time period too

<br>

<figure><img src="/files/iKeSFpIoHtFesWr4ScgI" alt=""><figcaption></figcaption></figure>


# Overriding Team's Schedule

With Pagerly, you can override / modify / assign current to some other user from Slack itself

With this feature, any Slack user can take over the current oncall too

For overriding any oncall schedule:

* Fetch the current schedule using `/schedule <team>` command as discussed in the previous section
* Choose the oncall user to want to override

<figure><img src="/files/Xqy89LfZZQhcUaoiZWMl" alt=""><figcaption></figcaption></figure>

* Now, you can override that oncall user with a different assignee and customized time period

<figure><img src="/files/68OW4TrjKfnkCBi6HJJw" alt=""><figcaption></figcaption></figure>

You can see the Team Name, Schedule Id and Current Schedule. You can override with :

1. New Assignee -> Select the user from your workspace to be oncall for the new time period

{% hint style="warning" %}
Please select only that user which is part of that oncall schedule. Otherwise, you would face some issues
{% endhint %}

2. Choose the start and end date for this oncall time period of this new assignee

* Submit by clicking on `Override Schedule`\
  \
  Voila!! You have successfully changed your Oncall Schedule. You would automatically see the updated schedule.


# Let everyone know who is the Current Oncall of your Team

Pagerly automatically updates the current oncall and notifies the team channel in 2 ways

* Slack topic update

<figure><img src="/files/3xqHbA0RwkRMvaCDfEaT" alt=""><figcaption></figcaption></figure>

* Oncall Handover Message Notification

<figure><img src="/files/5j9JuECHv0kt4PYBf1Iy" alt=""><figcaption></figcaption></figure>


# Help and Support

This sections covers how you can reach out to us!

In case of any Queries/Feedback/Support to Pagerly , you can

* Send the mail to <hello@pagerly.io>
* Submit your query from Pagerly Slack App itself
* Collaborate on Slack Connect

<figure><img src="/files/3jCYM8JJ2L03SRrsVgy0" alt=""><figcaption></figcaption></figure>

<figure><img src="/files/OQyqTd9PaWeaZKquRmv3" alt=""><figcaption></figcaption></figure>


# Overview

## On-Call Scheduling in Pagerly

Pagerly supports creating and managing on-call schedules directly within its platform, giving teams full flexibility to design shifts, round-robins, and custom rotations without relying on external tools. At the same time, Pagerly can sync with external scheduling tools like PagerDuty, Opsgenie, and Jira Service Management, ensuring that Slack usergroups, calendars, and tasks always reflect the latest on-call roster.

This dual approach allows teams to either:

* **Build and manage schedules directly in Pagerly**, or
* **Sync existing schedules from external systems**

All while keeping everything visible and actionable within Slack.

{% hint style="info" %}
For enabling paging and call , go to incident and oncall section. ([link](/incidents-and-alerting/oncall-paging-and-phone-numbers))
{% endhint %}

***

### ✅ Create & Manage Schedules in Pagerly

Pagerly lets you create and operate fair, flexible, and transparent scheduling right inside Slack.

#### 🔄 Create Round Robin Schedules

* Build recurring, fair rotations natively within Pagerly.
* Automatically rotate duties among team members.
* Support both single-team and multi-team scheduling.
* Easily configure rotation intervals and time zones.

#### 🔗 Sync Pagerly Schedules to Other Tools

* **Slack Usergroup Sync**\
  Keep your `@oncall` usergroup in Slack updated in real time with the current on-call roster.
* **Google Calendar Integration**\
  Export on-call shifts to shared team calendars for visibility and coordination.
* **Linear Sync**\
  Ensure that on-call data reflects correctly in task assignment and ownership workflows.

#### 🔄 Manage Overrides (Temporary Replacements)

* Instantly swap scheduled engineers with another team member.
* Changes are reflected across Slack, Google Calendar, and any connected integrations.
* Every override is logged for transparency, auditability, and compliance.

#### 👥 Multi-Team and Multi-Rotation Support

* Manage independent rotations for each function: frontend, backend, infrastructure, etc.
* Easily visualize and switch between different team schedules.
* Support for complex on-call escalation policies and multi-layer coverage.

#### 🔁 Swap Rotations (Shift Exchange)

* Allow team members to swap on-call shifts without breaking the rotation.
* Select a target rotation and exchange it with another user’s scheduled shift.
* Swaps apply only to the selected rotation window.
* All connected systems (Slack usergroups, channel updates, calendars) update instantly.

#### 🎄 Import Holiday Calendars

* Import regional or company holiday calendars into Pagerly.
* Automatically account for holidays when generating or viewing schedules.
* Avoid assigning on-call duties on public or company-wide holidays.
* Supports multiple regions and teams with different holiday rules.

#### ⏰ Set On-Call Reminders

* Send automatic reminders before a shift starts.
* Notify engineers when their on-call duty is about to end.
* Reminders can be delivered via Slack (DM or channel).
* Reduce missed handoffs and ensure smooth transitions.

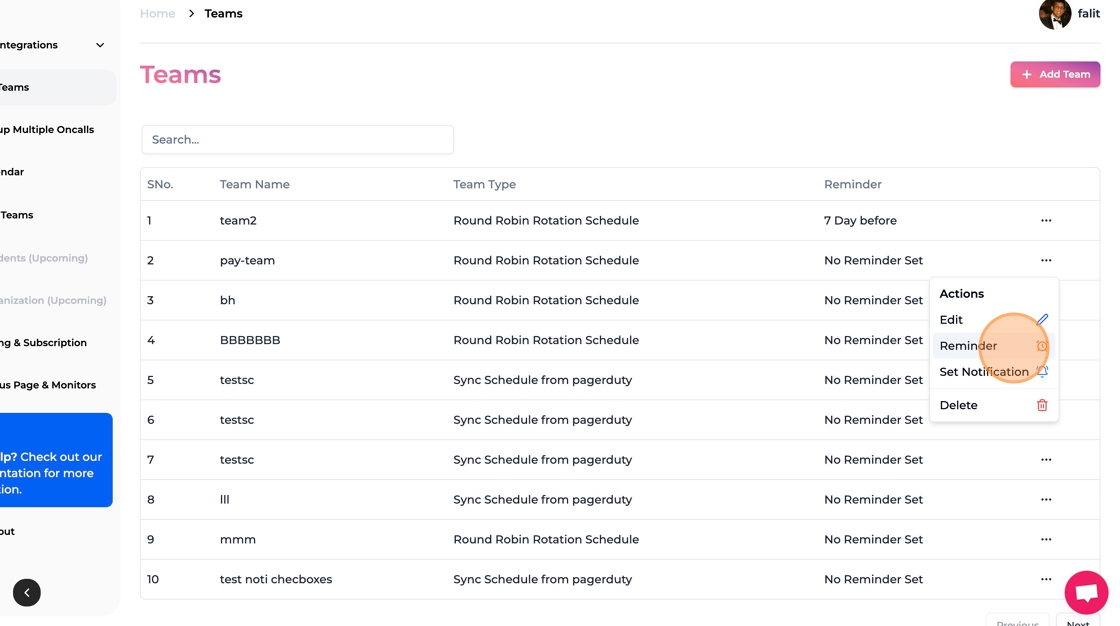
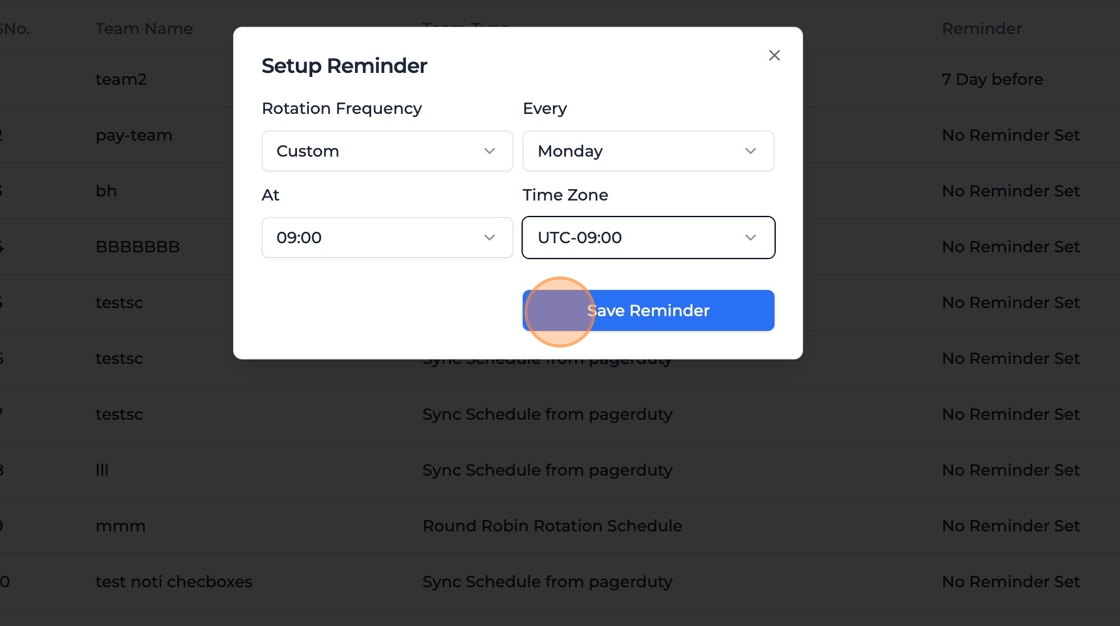
***

### Need Help?

Check out detailed guides on:

* Creating a Schedule in Pagerly
* Syncing PagerDuty with Slack
* Managing Overrides

Or reach out via the Pagerly dashboard for assistance.


# Create & Manage Schedules in Pagerly

Pagerly lets you **own your on-call schedules directly inside Slack**. Instead of relying on external schedulers, teams can create and manage their rotations, shifts, and overrides within Pagerly.

This section covers how to:

* Create Round Robin schedules
* Create Shift schedules
* Sync Schedule and Oncall to Slack usergorup like @oncall
* Sync schedules to Slack, Google Calendar, and Linear
* Manage Overrides (temporary replacements)
* Handle Multi-Team and Multi-Rotation setups

***

### 🔄 Create Round Robin Schedule

Round Robin schedules distribute on-call duties evenly among team members. Pagerly rotates responsibility automatically, removing the need for manual updates.

***

### ⏰ Create Shift Schedule

Shift schedules assign users to specific time blocks (e.g., day/night, weekday/weekend). This is useful for distributed teams or time-sensitive operations.

#### 📅 Multiple Schedule Types<br>

#### Pagerly supports creating different types of schedules to fit your team’s workflow:

Day-wise – assign daily on-call engineers.

Week-wise – set weekly rotations for fairness.

Month-wise – long rotations for larger teams.

Custom day-wise – tailor schedules to specific weekdays (e.g., Mon/Wed/Fri).

For even more complex requirements, [Pagerly supports AI-generated rotations. Simply provide your team size, preferences, and constraints — Pagerly AI can suggest optimized schedules automatically.](/oncall-and-rotations/create-rotations-using-ai)

***

### 🔗 Sync Pagerly Schedules to Other Tools

Once created, Pagerly schedules can sync automatically to external tools:

* **Slack Usergroup** → Keeps a group (e.g., `@oncall`) updated with the current engineer.
* **Google Calendar** → Creates calendar events for visibility.
* **Linear** → Ensures tasks are always assigned to the correct on-call engineer.

***

### 🔄 Manage Overrides (Temporary Replacements)

Overrides allow you to swap one engineer for another in the active schedule. The replacement is reflected across Pagerly, Slack, Google Calendar, and integrations.

***

### 👥 Multi-Team / Multi-Rotation Handling

Pagerly supports multiple teams and complex scheduling:

* Create separate rotations for different teams (e.g., Backend, Infra).
* Escalate incidents across multiple rotations if not acknowledged.<br>

### Follow the following steps to Add Rotation / Shift Schedule in Pagerly

1\. Navigate to <https://workspace.pagerly.io/teams>

![](https://ajeuwbhvhr.cloudimg.io/https://colony-recorder.s3.amazonaws.com/files/2025-05-30/ba60d5b3-d1d7-466d-9157-14405628d3a8/ascreenshot.jpeg?tl_px=0,0\&br_px=1528,854\&force_format=jpeg\&q=100\&width=1120.0\&wat=1\&wat_opacity=0.7\&wat_gravity=northwest\&wat_url=https://colony-recorder.s3.us-west-1.amazonaws.com/images/watermarks/FB923C_standard.png\&wat_pad=194,257)

2\. Click "Add Team"

![](https://ajeuwbhvhr.cloudimg.io/https://colony-recorder.s3.amazonaws.com/files/2025-05-30/632f51e1-306f-428a-b1bb-2e4d3955bfc3/ascreenshot.jpeg?tl_px=1689,0\&br_px=2940,699\&force_format=jpeg\&q=100\&width=1120.0\&wat=1\&wat_opacity=0.7\&wat_gravity=northwest\&wat_url=https://colony-recorder.s3.us-west-1.amazonaws.com/images/watermarks/FB923C_standard.png\&wat_pad=899,193)

3\. Select 'Create Time-wise Round-Robin Schedule' OR 'Oncall Schedule'\
for creating a time based self rotation team.

![](https://ajeuwbhvhr.cloudimg.io/https://colony-recorder.s3.amazonaws.com/files/2025-05-30/64f52b4c-a531-431c-bd6a-dadb4728de07/ascreenshot.jpeg?tl_px=974,0\&br_px=2940,1098\&force_format=jpeg\&q=100\&width=1120.0\&wat=1\&wat_opacity=0.7\&wat_gravity=northwest\&wat_url=https://colony-recorder.s3.us-west-1.amazonaws.com/images/watermarks/FB923C_standard.png\&wat_pad=950,157)

4\. 1. Select to rotate users or usergroups.\
2\. Select rotation frequency.\
3\. Select rotation day. (Can only select multiple days if frequency is set to 'Daily')

{% hint style="warning" %}
For more complex rotations, use Custom Options which create [Rotations using AI.](/oncall-and-rotations/create-rotations-using-ai)
{% endhint %}

\
4\. Select time.\
5\. Select timezone.\
6\. Select users to be included in rotation. (Select users or usergroups based on the type of rotation selected in Step 1)

![](https://ajeuwbhvhr.cloudimg.io/https://colony-recorder.s3.amazonaws.com/files/2025-05-30/975b8fd0-1afd-4259-8551-161cc9eb5018/ascreenshot.jpeg?tl_px=188,55\&br_px=2940,1594\&force_format=jpeg\&q=100\&width=1120.0\&wat=1\&wat_opacity=0.7\&wat_gravity=northwest\&wat_url=https://colony-recorder.s3.us-west-1.amazonaws.com/images/watermarks/FB923C_standard.png\&wat_pad=830,305)

5\. Click "Generate Preview" to see a preview of how your rotation will be set.

![](https://ajeuwbhvhr.cloudimg.io/https://colony-recorder.s3.amazonaws.com/files/2025-05-30/dbaf7285-9064-416e-b6c5-13ed0cab204e/ascreenshot.jpeg?tl_px=974,468\&br_px=2940,1567\&force_format=jpeg\&q=100\&width=1120.0\&wat=1\&wat_opacity=0.7\&wat_gravity=northwest\&wat_url=https://colony-recorder.s3.us-west-1.amazonaws.com/images/watermarks/FB923C_standard.png\&wat_pad=649,277)

6\. Rotation preview is generated.

![](https://ajeuwbhvhr.cloudimg.io/https://colony-recorder.s3.amazonaws.com/files/2025-05-30/c9a069a3-7de8-487a-a853-980a60dd5840/ascreenshot.jpeg?tl_px=974,392\&br_px=2940,1491\&force_format=jpeg\&q=100\&width=1120.0\&wat=1\&wat_opacity=0.7\&wat_gravity=northwest\&wat_url=https://colony-recorder.s3.us-west-1.amazonaws.com/images/watermarks/FB923C_standard.png\&wat_pad=715,276)

7\. Click "Next"

![](https://ajeuwbhvhr.cloudimg.io/https://colony-recorder.s3.amazonaws.com/files/2025-05-30/bf2309a7-6320-49c5-afb6-f7078914367e/ascreenshot.jpeg?tl_px=974,495\&br_px=2940,1594\&force_format=jpeg\&q=100\&width=1120.0\&wat=1\&wat_opacity=0.7\&wat_gravity=northwest\&wat_url=https://colony-recorder.s3.us-west-1.amazonaws.com/images/watermarks/FB923C_standard.png\&wat_pad=779,554)

8\.

1.[ Add team name.](#team-name-settings)\
2\. [Add usergroup to mention the current on-call/rotated user (optional).](#usergroup-settings)\
3\. [Add permanent users (optional).](#usergroup-settings)\
4\. [Set automated reply (optional).](#automated-replies)\
5\. [Set the team channel to get rotation updates.](#team-channel)\
6\. [Check the box to receive update notifications.](#team-channel-notifications-and-channel-topic)\
7\. Click the "Save" button.

![](https://ajeuwbhvhr.cloudimg.io/https://colony-recorder.s3.amazonaws.com/files/2025-05-30/0c294608-100e-45bd-b679-b34aec3503b8/ascreenshot.jpeg?tl_px=188,55\&br_px=2940,1594\&force_format=jpeg\&q=100\&width=1120.0\&wat=1\&wat_opacity=0.7\&wat_gravity=northwest\&wat_url=https://colony-recorder.s3.us-west-1.amazonaws.com/images/watermarks/FB923C_standard.png\&wat_pad=875,513)

9\. Team added successfully!

![](https://ajeuwbhvhr.cloudimg.io/https://colony-recorder.s3.amazonaws.com/files/2025-05-30/ecb66fe0-5805-4603-9257-b8123c7930f1/ascreenshot.jpeg?tl_px=207,59\&br_px=2172,1158\&force_format=jpeg\&q=100\&width=1120.0\&wat=1\&wat_opacity=0.7\&wat_gravity=northwest\&wat_url=https://colony-recorder.s3.us-west-1.amazonaws.com/images/watermarks/FB923C_standard.png\&wat_pad=524,460)

***

### Each Team has the following properties:

### Team Name Settings

This is your team name and the slack command that would be used to mention the current oncall, fetch oncall schedule, etc. i.e. You can use

* `@Pagerly <team>` : To mention the current oncall on any Slack Thread
* `/schedule <team> : To fetch the team's oncall schedule. You can then manage( view, override ) from Slack itself`<br>

{% hint style="warning" %}
There are some gotchas to keep in mind when selecting the team name :

Single word only: You can only put a single word while choosing the command name. You can combine long names with underscores, hyphens, etc

You can use names like : `dev-on-call , dev, dev_on_call`

* You cannot use names like : `dev on call`, `payments team 2`
* Cannot use the name `help : This is due to slack limitation of keeping help as a reserved keyword . You can use ``@pagerly help`` for help needed in the command`
  {% endhint %}

### Usergroup Settings

With Pagerly you can sync the Oncall Schedule with Slack Usergroup

You can sync with External Schedule like Pagerduty, Opsgenie, Google Calendar etc

You can also sync with Pagerly Round-Robin Schedule

\
**Pagerly would automatically fetch the latest oncall(s) and add the users in the usergroup and remove others**

{% hint style="info" %}
For Usergroup to work : Pagerly App uses Slack's User Group feature to create an @mention for every Please make sure you have it enabled for everyone in the [workspace settings](https://my.slack.com/admin/settings#user_group_restrictions) .
{% endhint %}

<figure><img src="/files/kADGibMXzH9QvuSag5UF" alt=""><figcaption></figcaption></figure>

* **Usergroup**: If you want to have a custom command like `@dev-on-call` instead of `@Pagerly dev-on-call` or If you already have a usergroup and you want the current oncall(s) to be automatically added to the usergroup, you can use this property.\
  **Pagerly would automatically fetch the latest oncall(s) and add the users in the usergroup and remove others**
* **Permanent Users in the user group (optional) :** These are the members who you need as permanent members of the usergroup

<figure><img src="/files/5YWja7ERO6SdDxZQ5Lj3" alt=""><figcaption></figcaption></figure>

### Automated Replies

**Automated Reply:** To add a fixed reply when your oncall is mentioned. Works only with `@Pagerly commands`. You can put SOPs, Troubleshooting docs, etc in automated replies. This would help in saving precious oncall time since some of the queries can be automatically taken care of :moneybag::moneybag:

<figure><img src="/files/4SDE3mg9mW4jrQ0n19pX" alt=""><figcaption></figcaption></figure>

***

### Team Channel, Notifications and Channel Topic

#### T**eam Channel**

The slack channel which would subscribe for any oncall handover / oncall rotation change. On any change in oncall rotation, you would receive 2 notifications on this slack channel

* **Channel Topic Update** : Your slack channel topic would be automatically updated with the current oncall.\
  It would look something like this 👇🏻
* **Channel Message** : Your channel would receive a notification on the oncall change

([Customize Notification Here](https://docs.pagerly.io/how-to-work-with-pagerly/custom-change-notification-on-slack))👇🏻

<figure><img src="/files/OaeuPo0PPARSDb43SivH" alt=""><figcaption></figcaption></figure>

<figure><img src="/files/5j9JuECHv0kt4PYBf1Iy" alt=""><figcaption></figcaption></figure>

#### **Notification && Topic Setting**s

You can choose to receive if you want to receive notifications on oncall/rotation change as well topic updates.

* Update Channel with Topic Name -> If you want your channel topic to be updated with latest oncall
* Show Change Notification on Channel -> If you want to receive the Notification whenever there is a change in oncall / rotation ([Customize Notification Here](https://docs.pagerly.io/how-to-work-with-pagerly/custom-change-notification-on-slack))

<figure><img src="/files/ISVcTfzEiG124RdHV6YZ" alt=""><figcaption></figcaption></figure>

\
\
\
The next section would be how to setup the team with all other fields


# Create Round Robin Rotations

In case, for some of teams, tasks you want to avoid creating schedules in PagerDuty, OpsGenie, etc.\
With Pagerly. you can create these rotations within Slack itself.

**With Pagerly, you can rotate User as well as UserGroups**

**Rotation Teams would have the same features as other Teams .**<br>

## **Rotate Users in Round-Robin**

### Use cases

Here are some common use cases

* Customer Support : Manage rotations for their IT or technical support teams. This ensures that employees share the workload of addressing technical issues, providing prompt assistance to users or internal staff.
* Pull Request Reviewer Rotation: Facilitate rotations among team members for the role of pull request reviewers. By assigning reviewers on a rotating basis, the workload is evenly distributed, ensuring that no one person becomes a bottleneck and that code reviews are conducted by multiple perspectives.
* Social Event Planning Rotation: Companies often organize social events or team-building activities. With your app, employees can take turns planning and organizing these events, ensuring that the responsibility is shared and that different perspectives and ideas are incorporated.

### Cost Effective

Pagerly Rotations is a cost-effective solution for team management. Unlike PagerDuty,OpsGenie which charges per user, our app offers a per-team pricing model. With flexible and affordable pricing, companies can scale their rotations without worrying about excessive costs, making it an ideal choice for businesses of all sizes. Say goodbye to user-based charges and embrace a budget-friendly solution that maximizes efficiency and collaboration.

## Rotate UserGroups

Pagerly also provides ability to rotate UserGroups. This would help to create round-robin rotation for the entire team i.e. Each Team would be on rotation.<br>

### Use cases

Here are some common use cases for Rotating UserGroups

* TimeZone Support: Setup different teams for support based on time-zones.
* De-stress your oncall support

<br>


# How To Add Rotation in Pagerly

This section covers creating round-robin rotations in Pagerly without Paging Tool

Video Reference

{% embed url="<https://scribehow.com/embed-preview/Creating_self_rotation_team__pdf-Bx2KQ12tARsWWYtpXA?as=video&size=flexible>" %}

### Follow these steps to Add Rotation / Shift / Turn Schedule in Pagerly

1\. Navigate to <https://workspace.pagerly.io/teams>

![](https://ajeuwbhvhr.cloudimg.io/https://colony-recorder.s3.amazonaws.com/files/2025-05-30/ba60d5b3-d1d7-466d-9157-14405628d3a8/ascreenshot.jpeg?tl_px=0,0\&br_px=1528,854\&force_format=jpeg\&q=100\&width=1120.0\&wat=1\&wat_opacity=0.7\&wat_gravity=northwest\&wat_url=https://colony-recorder.s3.us-west-1.amazonaws.com/images/watermarks/FB923C_standard.png\&wat_pad=194,257)

2\. Click "Add Team"

![](https://ajeuwbhvhr.cloudimg.io/https://colony-recorder.s3.amazonaws.com/files/2025-05-30/632f51e1-306f-428a-b1bb-2e4d3955bfc3/ascreenshot.jpeg?tl_px=1689,0\&br_px=2940,699\&force_format=jpeg\&q=100\&width=1120.0\&wat=1\&wat_opacity=0.7\&wat_gravity=northwest\&wat_url=https://colony-recorder.s3.us-west-1.amazonaws.com/images/watermarks/FB923C_standard.png\&wat_pad=899,193)

3\. Select 'Create Time-wise Round-Robin Schedule' for creating a time based self rotation team.

![](https://ajeuwbhvhr.cloudimg.io/https://colony-recorder.s3.amazonaws.com/files/2025-05-30/64f52b4c-a531-431c-bd6a-dadb4728de07/ascreenshot.jpeg?tl_px=974,0\&br_px=2940,1098\&force_format=jpeg\&q=100\&width=1120.0\&wat=1\&wat_opacity=0.7\&wat_gravity=northwest\&wat_url=https://colony-recorder.s3.us-west-1.amazonaws.com/images/watermarks/FB923C_standard.png\&wat_pad=950,157)

4\.

4.1. Select to rotate users or usergroups. 4.2. Select rotation frequency. 4.3. Select rotation day. (Can only select multiple days if frequency is set to 'Daily')

{% hint style="warning" %}
For more complex rotations, use Custom Options which create [Rotations using AI.](/oncall-and-rotations/create-rotations-using-ai)
{% endhint %}

4.4. Set the rotation start and end time (end time is optional; if not provided, a 24-hour rotation is assumed). 4.5. Select timezone. 4.6. Set On-call type as **'Single user on-call'**.

{% hint style="info" %}
For Multi user on-call, check out [Multi User On-call Rotation.](/oncall-and-rotations/create-round-robin-rotations/how-to-add-multi-user-rotation-in-pagerly)
{% endhint %}

4.7. Select users to be included in rotation. (Select users or usergroups based on the type of rotation selected in Step 1)

![](https://colony-recorder.s3.amazonaws.com/files/2026-04-09/1089c243-7e81-4f7a-92dc-eb3e1faee53e/ascreenshot_f5fef02152fc43e3a7343de0da92778a_text_export.jpeg)

5\. Click "Generate Preview" and verify the rotation. If satisfied, click "Next".

![](https://colony-recorder.s3.amazonaws.com/files/2026-04-09/270bfdee-375f-4133-a1b6-f222cb217d36/ascreenshot_4341074c8d5e4bebb6fa12fdc89059af_text_export.jpeg)

6\.

6.1.[ Add team name.](#team-name-settings)\
6.2. [Add usergroup to mention the current on-call/rotated user (optional).](#usergroup-settings)\
6.3. [Add permanent users (optional).](#usergroup-settings)\
6.4. [Set automated reply (optional).](#automated-replies)\
6.5. [Set the team channel to get rotation updates.](#team-channel)\
6.6. [Check the box to receive update notifications.](#team-channel-notifications-and-channel-topic)\
6.7. Click the "Save" button.

![](https://ajeuwbhvhr.cloudimg.io/https://colony-recorder.s3.amazonaws.com/files/2025-05-30/0c294608-100e-45bd-b679-b34aec3503b8/ascreenshot.jpeg?tl_px=188,55\&br_px=2940,1594\&force_format=jpeg\&q=100\&width=1120.0\&wat=1\&wat_opacity=0.7\&wat_gravity=northwest\&wat_url=https://colony-recorder.s3.us-west-1.amazonaws.com/images/watermarks/FB923C_standard.png\&wat_pad=875,513)

7\. Team added successfully!

![](https://ajeuwbhvhr.cloudimg.io/https://colony-recorder.s3.amazonaws.com/files/2025-05-30/ecb66fe0-5805-4603-9257-b8123c7930f1/ascreenshot.jpeg?tl_px=207,59\&br_px=2172,1158\&force_format=jpeg\&q=100\&width=1120.0\&wat=1\&wat_opacity=0.7\&wat_gravity=northwest\&wat_url=https://colony-recorder.s3.us-west-1.amazonaws.com/images/watermarks/FB923C_standard.png\&wat_pad=524,460)

***

### Each Team has the following properties:

### Team Name Settings

This is your team name and the slack command that would be used to mention the current on-call, fetch on-call schedule, etc. For example:

* `@Pagerly <team>` : To mention the current on-call on any Slack Thread
* `/schedule <team>` : To fetch the team's on-call schedule. You can then manage( view, override ) from Slack itself<br>

{% hint style="warning" %}
Keep the following in mind when selecting a team name :

Single word only: Use a single word for the command name. You can combine long names with underscores, hyphens, etc

* You can use names like : `dev-on-call , dev, dev_on_call`
* You cannot use names like : `dev on call`, `payments team 2`
* Cannot use the name `help : This is due to slack limitation of keeping help as a reserved keyword . You can use ``@pagerly help`` for help needed in the command`
  {% endhint %}

### Usergroup Settings

* With Pagerly, you can sync the on-call Schedule with Slack Usergroup
* You can sync with External Schedule like Pagerduty, Opsgenie, Google Calendar etc
* You can also sync with Pagerly Round-Robin Schedule

\
**Pagerly would automatically fetch the latest on-call(s) and add the users in the usergroup and remove others**

{% hint style="info" %}
For Usergroup to work : Pagerly App uses Slack's User Group feature to create an @mention for every usergroup. Please make sure you have it enabled for everyone in the [workspace settings](https://my.slack.com/admin/settings#user_group_restrictions) .
{% endhint %}

<figure><img src="/files/kADGibMXzH9QvuSag5UF" alt=""><figcaption></figcaption></figure>

* **Usergroup**: If you want to have a custom command like `@dev-on-call` instead of `@Pagerly dev-on-call` or If you already have a usergroup and you want the current on-call(s) to be automatically added to the usergroup, you can use this property.\
  **Pagerly would automatically fetch the latest on-call(s) and add the users in the usergroup and remove others**
* **Permanent Users in the user group (optional) :** These are the members who you need as permanent members of the usergroup

<figure><img src="/files/5YWja7ERO6SdDxZQ5Lj3" alt=""><figcaption></figcaption></figure>

### Automated Replies

**Automated Reply:** To add a fixed reply when your on-call is mentioned. Works only with `@Pagerly commands`. You can put SOPs, Troubleshooting docs, etc in automated replies. This helps save precious on-call time since some of the queries can be automatically taken care of :moneybag::moneybag:

<figure><img src="/files/4SDE3mg9mW4jrQ0n19pX" alt=""><figcaption></figcaption></figure>

***

### Team Channel, Notifications and Channel Topic

#### Team Channel

The slack channel which would subscribe for any on-call handover / on-call rotation change. On any change in on-call rotation, you would receive 2 notifications on this slack channel

* **Channel Topic Update** : Your slack channel topic would be automatically updated with the current on-call. \\
* **Channel Message** : Your channel would receive a notification on the on-call change

It would look something like this 👇🏻

[Customize Notification Here](https://docs.pagerly.io/how-to-work-with-pagerly/custom-change-notification-on-slack)

<figure><img src="/files/OaeuPo0PPARSDb43SivH" alt=""><figcaption></figcaption></figure>

<figure><img src="/files/5j9JuECHv0kt4PYBf1Iy" alt=""><figcaption></figcaption></figure>

#### Notification && Topic Settings

Choose whether to receive notifications on on-call/rotation changes and topic updates.

* Update Channel with Topic Name -> If you want your channel topic to be updated with latest on-call
* Show Change Notification on Channel -> If you want to receive the Notification whenever there is a change in on-call / rotation ([Customize Notification Here](https://docs.pagerly.io/how-to-work-with-pagerly/custom-change-notification-on-slack))

<figure><img src="/files/ISVcTfzEiG124RdHV6YZ" alt=""><figcaption></figcaption></figure>

\
\
\
The next section would be how to setup the team with all other fields

<br>


# How To Add Multi User Rotation in Pagerly

This section covers creating multi-user on-call round-robin rotations in Pagerly without Paging Tool.

{% embed url="<https://scribehow.com/embed-preview/Multi-user_on-call_round-robin_schedules__rCz6dn_VQv6GDhJp2AsIkQ?as=video&size=flexible>" %}

### Follow these steps to Add Multi-user Rotation / Shift / Turn Schedule in Pagerly

1\. Navigate to <https://workspace.pagerly.io/teams>

![](https://colony-recorder.s3.amazonaws.com/files/2026-04-09/b0032535-886e-4cf0-9993-552acd242e5e/ascreenshot_a61fb85bb0174e629d0962797996f135_text_export.jpeg)

2\. Click "Add Team".

![](https://colony-recorder.s3.amazonaws.com/files/2026-04-09/c61b0da8-9a8e-4199-ac2d-04e3faaf1c38/ascreenshot_1bb17808b908465ab543174a996f0be1_text_export.jpeg)

3\. Select "Create Time-wise Round-Robin Schedule" and click Next.

![](https://colony-recorder.s3.amazonaws.com/files/2026-04-09/58e59605-fa8c-461d-a037-f8e2bbcf2940/ascreenshot_028a0e9b57b64480b4fbb49a3f821d30_text_export.jpeg)

4\.

4.1. Select to rotate users or user groups. 4.2. Select rotation frequency. 4.3. Select rotation day. (Can only select multiple days if frequency is set to 'Daily')

{% hint style="warning" %}
For more complex rotations, use Custom Options which create [Rotations using AI.](/oncall-and-rotations/create-rotations-using-ai)
{% endhint %}

4.4. Set the rotation start and end time (end time is optional; if not provided, a 24-hour rotation is assumed). 4.5. Select timezone. 4.6. Set On-call type as **'Multi user on-call'**.

{% hint style="info" %}
For Single user on-call, check out [Single User On-call Rotation.](/oncall-and-rotations/create-round-robin-rotations/how-to-add-rotation-in-pagerly)
{% endhint %}

4.7. Select users to be included in rotation. Each row represents the set of users/groups that will be on-call together at a given time.

![](https://colony-recorder.s3.amazonaws.com/files/2026-04-09/c369f50f-6568-4f38-9a05-e00e5bc400fe/ascreenshot_c9c2ed76895c4596b8da6324e578de1a_text_export.jpeg)

5\. Click "Generate Preview" and verify the rotation. If satisfied, click "Next".

![](https://colony-recorder.s3.amazonaws.com/files/2026-04-09/97838cd6-d238-457a-8fa1-3b46c2b1ba21/ascreenshot_8db118496d894fe0afe99f3c32cc493e_text_export.jpeg)

6\.

6.1.[ Add team name.](/oncall-and-rotations/create-round-robin-rotations/how-to-add-rotation-in-pagerly#team-name-settings)\
6.2. [Add usergroup to mention the current on-call/rotated user (optional).](/oncall-and-rotations/create-round-robin-rotations/how-to-add-rotation-in-pagerly#usergroup-settings)\
6.3. [Add permanent users (optional).](/oncall-and-rotations/create-round-robin-rotations/how-to-add-rotation-in-pagerly#usergroup-settings)\
6.4. [Set automated reply (optional).](/oncall-and-rotations/create-round-robin-rotations/how-to-add-rotation-in-pagerly#automated-replies)\
6.5. [Set the team channel to get rotation updates.](/oncall-and-rotations/create-round-robin-rotations/how-to-add-rotation-in-pagerly#team-channel)\
6.6. [Check the box to receive update notifications.](/oncall-and-rotations/create-round-robin-rotations/how-to-add-rotation-in-pagerly#team-channel-notifications-and-channel-topic)\
6.7. Click the "Save" button.

![](https://colony-recorder.s3.amazonaws.com/files/2026-04-09/db493ecc-0b8c-48e0-9cdf-a007fa4ce61c/ascreenshot_74b895f0721a4acd9db0cb5e809d2245_text_export.jpeg)

7\. Multi user on-call team created successfully!

![](https://colony-recorder.s3.amazonaws.com/files/2026-04-09/3cde5473-b4a5-4403-b7aa-cbd9e1c6e72f/ascreenshot_83fa6c2a0eed449daa1a2a8f17fd7fc4_text_export.jpeg)

8\. To view the schedule on calendar, click the "Calendar" icon beside the team name.

![](https://colony-recorder.s3.amazonaws.com/files/2026-04-09/a3e6d4f0-8b44-408f-8d68-4470c1c57aff/ascreenshot_2d477e7273874b4ea8d63ada7aaecdbe_text_export.jpeg)

9\. View the on-call rotation for that team on the calendar.

![](https://colony-recorder.s3.amazonaws.com/files/2026-04-09/78aa3ea2-0a5d-4e4d-a082-39b0e9a246d0/ascreenshot_d3c8ff6dda194212ad1b0b24f21b2a0a_text_export.jpeg)

#### [Made with Scribe](https://scribehow.com/shared/Multi-user_on-call_round-robin_schedules__rCz6dn_VQv6GDhJp2AsIkQ)

***

### Each Team has the following properties:

### Team Name Settings

This is your team name and the slack command that would be used to mention the current on-call, fetch on-call schedule, etc. For example:

* `@Pagerly <team>` : To mention the current on-call on any Slack Thread
* `/schedule <team>` : To fetch the team's on-call schedule. You can then manage( view, override ) from Slack itself<br>

{% hint style="warning" %}
Keep the following in mind when selecting a team name:

Single word only: Use a single word for the command name. You can combine long names with underscores, hyphens, etc

* You can use names like : `dev-on-call , dev, dev_on_call`
* You cannot use names like : `dev on call`, `payments team 2`
* Cannot use the name `help : This is due to slack limitation of keeping help as a reserved keyword . You can use ``@pagerly help`` for help needed in the command`
  {% endhint %}

### Usergroup Settings

* With Pagerly, you can sync the on-call schedule with Slack Usergroup
* You can sync with external schedules like PagerDuty, Opsgenie, Google Calendar, etc.
* You can also sync with Pagerly Round-Robin Schedule

\
**Pagerly would automatically fetch the latest on-call(s) and add the users in the usergroup and remove others**

{% hint style="info" %}
For Usergroup to work : Pagerly App uses Slack's User Group feature to create an @mention for every usergroup. Please make sure you have it enabled for everyone in the [workspace settings](https://my.slack.com/admin/settings#user_group_restrictions) .
{% endhint %}

<figure><img src="/files/kADGibMXzH9QvuSag5UF" alt=""><figcaption></figcaption></figure>

* **Usergroup**: If you want to have a custom command like `@dev-on-call` instead of `@Pagerly dev-on-call` or If you already have a usergroup and you want the current on-call(s) to be automatically added to the usergroup, you can use this property.\
  **Pagerly would automatically fetch the latest on-call(s) and add the users in the usergroup and remove others**
* **Permanent Users in the user group (optional) :** These are the members who you need as permanent members of the usergroup

<figure><img src="/files/5YWja7ERO6SdDxZQ5Lj3" alt=""><figcaption></figcaption></figure>

### Automated Replies

**Automated Reply:** To add a fixed reply when your on-call is mentioned. Works only with `@Pagerly commands`. You can put SOPs, Troubleshooting docs, etc in automated replies. This helps save precious on-call time since some of the queries can be automatically taken care of :moneybag::moneybag:

<figure><img src="/files/4SDE3mg9mW4jrQ0n19pX" alt=""><figcaption></figcaption></figure>

***

### Team Channel, Notifications and Channel Topic

#### Team Channel

The slack channel which would subscribe for any on-call handover / on-call rotation change. On any change in on-call rotation, you would receive 2 notifications on this slack channel

* **Channel Topic Update** : Your slack channel topic would be automatically updated with the current on-call. \\
* **Channel Message** : Your channel would receive a notification on the on-call change

  It would look something like this 👇🏻

[Customize Notification Here](https://docs.pagerly.io/how-to-work-with-pagerly/custom-change-notification-on-slack)

<figure><img src="/files/OaeuPo0PPARSDb43SivH" alt=""><figcaption></figcaption></figure>

<figure><img src="/files/5j9JuECHv0kt4PYBf1Iy" alt=""><figcaption></figcaption></figure>

#### Notification && Topic Settings

Choose whether to receive notifications on on-call/rotation changes and topic updates.

* Update Channel with Topic Name -> If you want your channel topic to be updated with latest on-call
* Show Change Notification on Channel -> If you want to receive the Notification whenever there is a change in on-call / rotation ([Customize Notification Here](https://docs.pagerly.io/how-to-work-with-pagerly/custom-change-notification-on-slack))

<figure><img src="/files/ISVcTfzEiG124RdHV6YZ" alt=""><figcaption></figcaption></figure>


# Create Rotations using AI

This section covers creating complex rotation schedules using AI

## Creating custom rotation using AI chat

1\. Navigate to <https://workspace.pagerly.io/teams>

![](https://ajeuwbhvhr.cloudimg.io/https://colony-recorder.s3.amazonaws.com/files/2025-07-17/e42a90d1-e46e-4eaa-9ab7-5239b24a3c51/ascreenshot.jpeg?tl_px=0,0\&br_px=1528,854\&force_format=jpeg\&q=100\&width=1120.0\&wat=1\&wat_opacity=0.7\&wat_gravity=northwest\&wat_url=https://colony-recorder.s3.us-west-1.amazonaws.com/images/watermarks/FB923C_standard.png\&wat_pad=211,262)

2\. Click "Add Team"

![](https://ajeuwbhvhr.cloudimg.io/https://colony-recorder.s3.amazonaws.com/files/2025-07-17/00236e9a-ac52-4e31-b5c8-af6dbc7a4925/ascreenshot.jpeg?tl_px=1689,0\&br_px=2940,699\&force_format=jpeg\&q=100\&width=1120.0\&wat=1\&wat_opacity=0.7\&wat_gravity=northwest\&wat_url=https://colony-recorder.s3.us-west-1.amazonaws.com/images/watermarks/FB923C_standard.png\&wat_pad=872,199)

3\. Select "Create Time-wise Round-Robin Schedule" and click "Next".

![](https://ajeuwbhvhr.cloudimg.io/https://colony-recorder.s3.amazonaws.com/files/2025-07-17/b94cd3a7-ebe4-49f7-9f64-068300747c17/ascreenshot.jpeg?tl_px=1411,0\&br_px=2940,854\&force_format=jpeg\&q=100\&width=1120.0\&wat=1\&wat_opacity=0.7\&wat_gravity=northwest\&wat_url=https://colony-recorder.s3.us-west-1.amazonaws.com/images/watermarks/FB923C_standard.png\&wat_pad=597,235)

4\. Set the rotation frequency to "Custom".

![](https://ajeuwbhvhr.cloudimg.io/https://colony-recorder.s3.amazonaws.com/files/2025-07-17/30f63400-bb0d-4f98-9f94-53d2e9f946c0/ascreenshot.jpeg?tl_px=1411,17\&br_px=2940,871\&force_format=jpeg\&q=100\&width=1120.0\&wat=1\&wat_opacity=0.7\&wat_gravity=northwest\&wat_url=https://colony-recorder.s3.us-west-1.amazonaws.com/images/watermarks/FB923C_standard.png\&wat_pad=752,491)

5\. Set timezone and click "Next"

![](https://ajeuwbhvhr.cloudimg.io/https://colony-recorder.s3.amazonaws.com/files/2025-07-17/c6dedb98-7ba1-404d-8413-044b0cf67e13/ascreenshot.jpeg?tl_px=718,400\&br_px=2247,1255\&force_format=jpeg\&q=100\&width=1120.0\&wat=1\&wat_opacity=0.7\&wat_gravity=northwest\&wat_url=https://colony-recorder.s3.us-west-1.amazonaws.com/images/watermarks/FB923C_standard.png\&wat_pad=598,337)

6\. AI chatbox will open.

![](https://ajeuwbhvhr.cloudimg.io/https://colony-recorder.s3.amazonaws.com/files/2025-07-17/3d8cfc3d-f6ac-4008-8c3b-ef409877f861/ascreenshot.jpeg?tl_px=0,21\&br_px=2752,1560\&force_format=jpeg\&q=100\&width=1120.0\&wat=1\&wat_opacity=0.7\&wat_gravity=northwest\&wat_url=https://colony-recorder.s3.us-west-1.amazonaws.com/images/watermarks/FB923C_standard.png\&wat_pad=510,277)

7\. Example text: Create a \<weekly, bi-weekly, monthly> rotation with the following users: \<Enter user emails>

![](https://ajeuwbhvhr.cloudimg.io/https://colony-recorder.s3.amazonaws.com/files/2025-07-17/785885a1-eb61-43a4-9a41-cc4abea6ba8a/ascreenshot.jpeg?tl_px=265,668\&br_px=1921,1594\&force_format=jpeg\&q=100\&width=1120.0\&wat=1\&wat_opacity=0.7\&wat_gravity=northwest\&wat_url=https://colony-recorder.s3.us-west-1.amazonaws.com/images/watermarks/FB923C_standard.png\&wat_pad=981,490)

8\. Checkout the rotation schedule preview.

![](https://ajeuwbhvhr.cloudimg.io/https://colony-recorder.s3.amazonaws.com/files/2025-07-17/27eedab4-08bd-406a-858e-85b8eaf7c235/ascreenshot.jpeg?tl_px=352,63\&br_px=2318,1162\&force_format=jpeg\&q=100\&width=1120.0\&wat=1\&wat_opacity=0.7\&wat_gravity=northwest\&wat_url=https://colony-recorder.s3.us-west-1.amazonaws.com/images/watermarks/FB923C_standard.png\&wat_pad=369,400)

9\. If the generated rotation schedule is correct then click "Yes, I'm satisfied"

![](https://ajeuwbhvhr.cloudimg.io/https://colony-recorder.s3.amazonaws.com/files/2025-07-17/09d0fba1-4eac-4b61-ac5b-324fe8e288c5/ascreenshot.jpeg?tl_px=348,626\&br_px=1877,1481\&force_format=jpeg\&q=100\&width=1120.0\&wat=1\&wat_opacity=0.7\&wat_gravity=northwest\&wat_url=https://colony-recorder.s3.us-west-1.amazonaws.com/images/watermarks/FB923C_standard.png\&wat_pad=189,415)

10\. Fill in the remaining basic team details and click "Save".

![](https://ajeuwbhvhr.cloudimg.io/https://colony-recorder.s3.amazonaws.com/files/2025-07-17/05ac0927-8e7f-4e87-89c6-ce48c583e625/ascreenshot.jpeg?tl_px=188,55\&br_px=2940,1594\&force_format=jpeg\&q=100\&width=1120.0\&wat=1\&wat_opacity=0.7\&wat_gravity=northwest\&wat_url=https://colony-recorder.s3.us-west-1.amazonaws.com/images/watermarks/FB923C_standard.png\&wat_pad=870,554)

11\. Team created successfully!

![](https://ajeuwbhvhr.cloudimg.io/https://colony-recorder.s3.amazonaws.com/files/2025-07-17/2670fff0-e334-418c-93db-d22a0c6dcf81/ascreenshot.jpeg?tl_px=368,0\&br_px=1897,854\&force_format=jpeg\&q=100\&width=1120.0\&wat=1\&wat_opacity=0.7\&wat_gravity=northwest\&wat_url=https://colony-recorder.s3.us-west-1.amazonaws.com/images/watermarks/FB923C_standard.png\&wat_pad=502,462)

<br>


# Round Robin Oncall without Schedule

**Fair, Sequential, and Fast Incident Assignment—Without the Manual Overhead**

Traditional on-call setups often overload a single person when incidents come in clusters. Pagerly solves this with built-in **Round-Robin Scheduling**—an intelligent strategy where users are placed in a virtual ring and assigned incidents one after another.

This approach ensures equitable distribution, reduces burnout, and improves incident response time—especially when services experience multiple concurrent issues.

<figure><img src="/files/M6h3r3FNSuIe2XPdFWXu" alt=""><figcaption></figcaption></figure>

#### Features of Pagerly Round-Robin:

* **Sequential Assignments:** Incidents are automatically distributed in turn, not dumped on the first responder.
* **Cluster-Resilient Distribution:** Great for services that spike or see simultaneous incidents.
* **Faster Response, Lower Stress:** Reduce overload and ensure every incident gets timely attention.
* **Slack-Native Controls:** Manage everything right from Slack—no need to open external tools.

***

#### Use Cases:

* **Incident Response Teams:** Fairly distribute load during high-traffic periods or service degradation.
* **SRE Teams:** Handle alert storms more efficiently by spreading them across multiple responders.
* **Dev Support Rotations:** Ensure every engineer gets a fair share of tickets or interruptions.
* **Customer Escalation Routing:** Assign incoming escalations evenly to improve accountability.
* **Escalation Rotation Beyond On-Call:** Use for non-critical, but equally important daily responsibilities.
* **Back-to-Back Shift Mitigation:** Prevent the same responder from getting hit again right after resolving a major issue.


# How To Add Round Robin Rotation for Oncall without Schedule in Pagerly

This section covers creating round-robin rotations  wihtout schedule for picking tasks one by one

Follow the following steps to Add Rotation / Shift Schedule in Pagerly

1. Go to Pagerly App in Slack
2. Click **Add Round-Robin Rotation** and then Round-Robin Rotation for picking tasks ( without schedule)

<figure><img src="/files/FqcuXXekavMH8grVn38r" alt=""><figcaption></figcaption></figure>

<figure><img src="/files/QmoFlqXyC2caRneRS8s6" alt=""><figcaption><p>round robin shift schedule on slack</p></figcaption></figure>

3. **Choose Name / Team command**

   This is your team name and the slack command that would be used to mention the current assignee,

   * `@Pagerly <team>` : To assign the current message on any Slack Thread
4. **Add users to include in the rotation -**\
   \
   The users should be added in the order of rotation i.e. the first user would be the first assignee when the rotation is starting.

<figure><img src="/files/EZvWmZz7xSA1dUX7V7Fz" alt=""><figcaption></figcaption></figure>

<br>


# Sync Team Schedule from Tools (Pagerduty, Opsgenie etc)

Sync Teams schedule from external tools like Pagerduty, Opsgenie, Google Calendar, JSM Ops etc

1\. Navigate to <https://workspace.pagerly.io/teams>

![](https://ajeuwbhvhr.cloudimg.io/https://colony-recorder.s3.amazonaws.com/files/2025-05-30/dc05a687-6753-4bfe-9ba0-cbe84c9c6567/ascreenshot.jpeg?tl_px=0,0\&br_px=1528,854\&force_format=jpeg\&q=100\&width=1120.0\&wat=1\&wat_opacity=0.7\&wat_gravity=northwest\&wat_url=https://colony-recorder.s3.us-west-1.amazonaws.com/images/watermarks/FB923C_standard.png\&wat_pad=211,261)

2\. Click "Add Team"

![](https://ajeuwbhvhr.cloudimg.io/https://colony-recorder.s3.amazonaws.com/files/2025-05-30/0fae8900-89dd-4dbb-9189-c34fff2e1c0f/ascreenshot.jpeg?tl_px=1411,0\&br_px=2940,854\&force_format=jpeg\&q=100\&width=1120.0\&wat=1\&wat_opacity=0.7\&wat_gravity=northwest\&wat_url=https://colony-recorder.s3.us-west-1.amazonaws.com/images/watermarks/FB923C_standard.png\&wat_pad=991,153)

3\. Select "sync schedule with external tools".

![](https://ajeuwbhvhr.cloudimg.io/https://colony-recorder.s3.amazonaws.com/files/2025-05-30/13d2602c-daa3-46d0-96f2-b8a6e6655ebb/ascreenshot.jpeg?tl_px=974,0\&br_px=2940,1098\&force_format=jpeg\&q=100\&width=1120.0\&wat=1\&wat_opacity=0.7\&wat_gravity=northwest\&wat_url=https://colony-recorder.s3.us-west-1.amazonaws.com/images/watermarks/FB923C_standard.png\&wat_pad=753,230)

4\. Add Team Properties

1\. [Add team name](#team-name-settings)\
2\. [Set automated reply (optional).](#automated-replies)\
3\. [Set the team channel to receive on-call updates.](#team-channel)\
4\. [Add usergroup (optional) and permanent users to the usergroup (optional)..](#usergroup-settings)\
5\. [Select an integrated entity, then set the schedule ID for it.](#schedule-id)\
6\. [Check the box to receive update notifications.](#team-channel-notifications-and-channel-topic)

![](https://ajeuwbhvhr.cloudimg.io/https://colony-recorder.s3.amazonaws.com/files/2025-05-30/c7bb1bd0-0242-4ac9-8433-2971610054ad/ascreenshot.jpeg?tl_px=188,55\&br_px=2940,1594\&force_format=jpeg\&q=100\&width=1120.0\&wat=1\&wat_opacity=0.7\&wat_gravity=northwest\&wat_url=https://colony-recorder.s3.us-west-1.amazonaws.com/images/watermarks/FB923C_standard.png\&wat_pad=883,331)

5\. Click "Save"

![](https://ajeuwbhvhr.cloudimg.io/https://colony-recorder.s3.amazonaws.com/files/2025-05-30/20690812-5ba3-45cb-b577-dc6e68638265/ascreenshot.jpeg?tl_px=188,55\&br_px=2940,1594\&force_format=jpeg\&q=100\&width=1120.0\&wat=1\&wat_opacity=0.7\&wat_gravity=northwest\&wat_url=https://colony-recorder.s3.us-west-1.amazonaws.com/images/watermarks/FB923C_standard.png\&wat_pad=898,545)

6\. Team created successfully!

![](https://ajeuwbhvhr.cloudimg.io/https://colony-recorder.s3.amazonaws.com/files/2025-05-30/7e1a699f-431b-42d3-ae5a-cd4045994005/ascreenshot.jpeg?tl_px=211,138\&br_px=2176,1237\&force_format=jpeg\&q=100\&width=1120.0\&wat=1\&wat_opacity=0.7\&wat_gravity=northwest\&wat_url=https://colony-recorder.s3.us-west-1.amazonaws.com/images/watermarks/FB923C_standard.png\&wat_pad=524,451)

### Each Team has the following properties:

### Team Name Settings

This is your team name and the slack command that would be used to mention the current oncall, fetch oncall schedule, etc. i.e. You can use

* `@Pagerly <team>` : To mention the current oncall on any Slack Thread
* `/schedule <team> : To fetch the team's oncall schedule. You can then manage( view, override ) from Slack itself`<br>

{% hint style="warning" %}
There are some gotchas to keep in mind when selecting the team name :

Single word only: You can only put a single word while choosing the command name. You can combine long names with underscores, hyphens, etc

You can use names like : `dev-on-call , dev, dev_on_call`

* You cannot use names like : `dev on call`, `payments team 2`
* Cannot use the name `help : This is due to slack limitation of keeping help as a reserved keyword . You can use ``@pagerly help`` for help needed in the command`
  {% endhint %}

***

### <br>

### Usergroup Settings

With Pagerly you can sync the Oncall Schedule with Slack Usergroup

You can sync with External Schedule like Pagerduty, Opsgenie, Google Calendar etc

You can also sync with Pagerly Round-Robin Schedule

\
**Pagerly would automatically fetch the latest oncall(s) and add the users in the usergroup and remove others**

{% hint style="info" %}
For Usergroup to work : Pagerly App uses Slack's User Group feature to create an @mention for every Please make sure you have it enabled for everyone in the [workspace settings](https://my.slack.com/admin/settings#user_group_restrictions) .
{% endhint %}

<figure><img src="/files/kADGibMXzH9QvuSag5UF" alt=""><figcaption></figcaption></figure>

* **Usergroup**: If you want to have a custom command like `@dev-on-call` instead of `@Pagerly dev-on-call` or If you already have a usergroup and you want the current oncall(s) to be automatically added to the usergroup, you can use this property.\
  **Pagerly would automatically fetch the latest oncall(s) and add the users in the usergroup and remove others**
* **Permanent Users in the user group (optional) :** These are the members who you need as permanent members of the usergroup

<figure><img src="/files/5YWja7ERO6SdDxZQ5Lj3" alt=""><figcaption></figcaption></figure>

### Automated Replies

**Automated Reply:** To add a fixed reply when your oncall is mentioned. Works only with `@Pagerly commands`. You can put SOPs, Troubleshooting docs, etc in automated replies. This would help in saving precious oncall time since some of the queries can be automatically taken care of :moneybag::moneybag:

<figure><img src="/files/4SDE3mg9mW4jrQ0n19pX" alt=""><figcaption></figcaption></figure>

***

### Team Channel, Notifications and Channel Topic

#### T**eam Channel**

The slack channel which would subscribe for any oncall handover / oncall rotation change. On any change in oncall rotation, you would receive 2 notifications on this slack channel

* **Channel Topic Update** : Your slack channel topic would be automatically updated with the current oncall.\
  It would look something like this 👇🏻
* **Channel Message** : Your channel would receive a notification on the oncall change

([Customize Notification Here](https://docs.pagerly.io/how-to-work-with-pagerly/custom-change-notification-on-slack))👇🏻

<figure><img src="/files/OaeuPo0PPARSDb43SivH" alt=""><figcaption></figcaption></figure>

<figure><img src="/files/5j9JuECHv0kt4PYBf1Iy" alt=""><figcaption></figcaption></figure>

#### **Notification && Topic Setting**s

You can choose to receive if you want to receive notifications on oncall/rotation change as well topic updates.

* Update Channel with Topic Name -> If you want your channel topic to be updated with latest oncall
* Show Change Notification on Channel -> If you want to receive the Notification whenever there is a change in oncall / rotation ([Customize Notification Here](https://docs.pagerly.io/how-to-work-with-pagerly/custom-change-notification-on-slack))

<figure><img src="/files/ISVcTfzEiG124RdHV6YZ" alt=""><figcaption></figcaption></figure>

***

### Schedule Id

This is only required for creating teams syncing schedule with External Sources

**Schedule Id :** This is the main property of the team which maps the oncall rotation schedule in your paging tool . (more discussed in detail in further sections)

You can input the schedule id from

* Pagerduty -> [Get Schedule Id from Pagerduty](/oncall-and-rotations/sync-team-schedule-from-tools-pagerduty-opsgenie-etc/retrieving-schedule-id-for-pagerduty)
* Opsgenie -> [Get Schedule Id from Opsgenie](/integrations/integrating-with-your-paging-tool/retrieving-opsgenie-api-key)
* JSM Operations -> [Get Schedule Id from JSM Operations](/oncall-and-rotations/sync-team-schedule-from-tools-pagerduty-opsgenie-etc/schedule-for-jsm-operations)
* Google Calendar -> [Get Schedule Id from Google Calendar](/integrations/google-calendar-with-slack/retrieve-calendar-id-from-google-calendar)
* Google Sheets -> [Get Schedule Id from Google Sheets](/integrations/google-groups-to-slack-usergroups/find-sheet-id-from-google-sheets)


# Retrieving Schedule Id for PagerDuty

This section covers if you integrating PagerDuty. If you are using any other tool you can skip this section.

In Pagerduty, every team has lots of services. Each service has an escalation policy. Each escalation policy has an oncall schedule rotation associated with it.

In Pagerly, the schedule id is the id of this rotation schedule for which you want to manage the oncalls. Pagerly would fetch the current oncall from this schedule so that use mention/tag this current oncall anywhere on Slack

Your schedule Id can be found on the schedule page URL :\[https\://\<company>.pagerduty.com/schedules/#<**scheduleId**>]

\
You can fetch the schedule id as follows

1. Go to your PagerDuty account and go to People tab.\
   Go to On-call schedules\ <br>

   <figure><img src="/files/xHyYAdRktOS7wO4Uyolw" alt=""><figcaption></figcaption></figure>
2. Click on the Schedules Tab and view list of the all schedules
3. Select the schedule you want to configure.
4. Check the URL of the schedule.\
   The last part of the URL would be Schedule Id. Copy that and add in the team configuration as the Schedule Id.

For example, in the account below :point\_down: , the Schedule Id for Payments-Weekly Rotation is PCPOZ7G

\
\
\
Copy that Schedule Id and Paste it into the Schedule Id section of the Add Team Configuration.

<figure><img src="/files/8Xdv3Ray2SetMCiXObeq" alt=""><figcaption></figcaption></figure>

**Click on Create Team and Your Team setup is completed** :checkered\_flag::checkered\_flag:

**We are now ready to test and play with Pagerly for this team**


# Retrieving Schedule Id for Datadog

This section covers if you integrating PagerDuty. If you are using any other tool you can skip this section.

### ⚙️ How Pagerly Uses Datadog Schedule ID

In Pagerly:

* You provide the **Datadog Schedule ID**
* Pagerly fetches:
  * Current on-call user
  * Rotation info
* Then Pagerly can:
  * Mention/tag on Slack
  * Route incidents
  * Sync on-call info

***

### 🔍 How to Find Schedule ID in Datadog

#### Step-by-step:

#### 1. Go to Datadog On-Call

* Login to your Datadog account
* Navigate to:\
  👉 **On-Call → Schedules**

***

#### 2. View All Schedules

* You’ll see a list of all schedules
* Each schedule represents a rotation

***

#### 3. Open the Schedule

* Click on the schedule you want to configure

***

#### 4. Copy Schedule ID from URL

<figure><img src="/files/UFxQg3PV30AC98LgMLuK" alt=""><figcaption></figcaption></figure>

The URL will look like:

```
https://app.datadoghq.com/on-call/schedules/<SCHEDULE_ID>
```

👉 Example:

```
https://app.datadoghq.com/on-call/schedules/f96168be-1fc6-4103-90d4-294655e7dd2b
```

* The last part is your **Schedule ID**
* Copy this value

***

### 🧩 Add in Pagerly

* Go to **Pagerly → Add Team Configuration**
* Paste the Schedule ID
* Save / Create Team

***

### ✅ Done

* Pagerly will now:
  * Fetch current on-call from Datadog
  * Enable Slack tagging (`@oncall`)
  * Power incident routing


# Schedule for JSM Operations

This section covers if you integrating JSM Operations. If you are using any other tool you can skip this section.

We have made it easier to pick your Schedule Id for JSM Operations.

**Go to Add Team and Select your JSM Operations Schedule Name**

<figure><img src="/files/R2HWGPy54s9vHRHUuRjt" alt=""><figcaption></figcaption></figure>


# Retrieving Schedule Id for OpsGenie

This section covers if you integrating OpsGenie. If you are using any other tool you can skip this section.

In OpsGenie, every team has lots of services. Each service has an escalation policy. Each escalation policy has an oncall schedule rotation associated with it.

In Pagerly, the schedule id is the id of this rotation schedule for which you want to manage the oncalls. Pagerly would fetch the current oncall from this schedule so that use mention/tag this current oncall anywhere on Slack

Your schedule Id can be found on the schedule page URL

https\://\<company>.app.opsgenie.com/settings/schedule/detail/\<scheduleId>

\
You can fetch the schedule id as follows

1. Go to your OpsGenie account and go to the Who is on-call tab ([https://\<company>.app.opsgenie.com/schedule/whoIsOnCall](https://pagerly-2.app.opsgenie.com/schedule/whoIsOnCall))\ <br>

   <figure><img src="/files/mKR4Xjn9PLXGM2QNAQoW" alt=""><figcaption></figcaption></figure>
2. Select the schedule you want to configure.
3. Check the URL of the schedule.\
   The last part of the URL would be Schedule Id. Copy that and add in the team configuration as the Schedule Id.

For example, in the account below :point\_down: , the Schedule Id for the "payments\_schedule" Rotation is eb4109a3-75e4-443d-8efa-427dd3a9513f

<br>

<figure><img src="/files/8Xdv3Ray2SetMCiXObeq" alt=""><figcaption></figcaption></figure>

Copy that Schedule Id and Paste it into the Schedule Id section of the Add Team Configuration.

**Click on Create Team and Your Team setup is completed** :checkered\_flag::checkered\_flag:

**We are now ready to test and play with Pagerly for this team**


# Find Sheet Id from Google Sheets

This section covers if you integrating Google Sheets with Slack. If you are using any other tool you can skip this section.

\
You can fetch the calendar id as follows

1. Go to your Google Sheet .\
   The ID is the value between the "/d/" and the "/edit" in the URL of your spreadsheet.

<br>

<figure><img src="/files/OTD7LqdPdTH1IO3vp7dF" alt=""><figcaption></figcaption></figure>

2. Go the Setup Team Access and start playing pagerly.


# Retrieve Calendar Id from Google Calendar

This section covers if you integrating Google Calendar with Slack. If you are using any other tool you can skip this section.

\
You can fetch the calendar id as follows

1. Go to your google calendar . Go to your calendar on the left side and right-click\ <br>

   <figure><img src="/files/wf0cy3x7Ueb7mUcX9OqB" alt=""><figcaption></figcaption></figure>
2. Click Settings
3. Scroll below and find the Calendar Id

![](/files/9cEbAxMpkGY8807B0yD1)

4. Go the Setup Team Access and start playing pagerly.


# Sync Rotation to Slack Usergroup

Pagerly turns **Slack usergroups (like @**&#x6F;ncall / @suppor&#x74;**) into the single source of truth** for rotation ownership. Instead of manually updating groups or relying on external schedulers, Pagerly automatically keeps your Slack usergroups in sync with real-time rotations and overrides.

#### What Pagerly Can Do with Slack Usergroups

**🔁 Automatically Sync Rotations to `@oncall`**

* Link any rotation or schedule to a Slack usergroup.
* Pagerly updates the usergroup instantly as rotations change.
* No manual adds/removes, ever.

**👤 Support Permanent Usergroup Members**

* Add **always-on members** to a usergroup (e.g. managers, SRE leads, escalation contacts).
* Permanent members stay in the usergroup **even when they’re not part of the current rotation**.
* On-call users are added and removed dynamically on top of these permanent members.

***

### Go To Edit Team and Add/Update the Usergroup

### Usergroup Sync (Custom @on-call Mentions)

Pagerly lets you map any rotation or on-call schedule to a **Slack usergroup**, so your team can use a clean, familiar mention like `@dev-on-call` instead of `@Pagerly dev-on-call`.

If you already have an existing Slack usergroup, Pagerly can take over managing it automatically. It continuously fetches the **latest rotation and current on-call users**, adds the right people to the usergroup, and removes users who are no longer on rotation ensuring the group always stays accurate.

### Permanent Users in the Usergroup (Optional)

You can also define **permanent members** for a usergroup, such as managers, team leads, or escalation contacts. These users remain in the usergroup at all times, even when they are not part of the current rotation. Pagerly dynamically layers the active rotations / on-call users on top of these permanent members, without disrupting your rotation logic.

<figure><img src="/files/7HSMCoDC1pg8e9dsOcsF" alt=""><figcaption></figcaption></figure>

### Usergroup Settings

{% hint style="danger" %}
For Usergroup to work : Pagerly App uses Slack's User Group feature to create an @mention for every Please make sure you have it enabled for everyone in the [workspace settings](https://my.slack.com/admin/settings#user_group_restrictions) .
{% endhint %}

<figure><img src="/files/kADGibMXzH9QvuSag5UF" alt=""><figcaption></figcaption></figure>

<figure><img src="/files/5YWja7ERO6SdDxZQ5Lj3" alt=""><figcaption></figcaption></figure>


# Sync Pagerduty / Opsgenie/ Datadog Oncall Usergroup

Pagerly turns **Slack usergroups (like @**&#x6F;ncall / @suppor&#x74;**) into the single source of truth** for rotation ownership. Instead of manually updating groups or relying on external schedulers, Pagerly automatically keeps your Slack usergroups in sync with real-time rotations and overrides.

#### What Pagerly Can Do with Slack Usergroups

**🔁 Automatically Sync Rotations to `@oncall`**

* Link any rotation or schedule to a Slack usergroup.
* Pagerly updates the usergroup instantly as rotations change.
* No manual adds/removes, ever.

**👤 Support Permanent Usergroup Members**

* Add **always-on members** to a usergroup (e.g. managers, SRE leads, escalation contacts).
* Permanent members stay in the usergroup **even when they’re not part of the current rotation**.
* On-call users are added and removed dynamically on top of these permanent members.

***

### Go To Edit Team and Add/Update the Usergroup

### Usergroup Sync (Custom @on-call Mentions)

Pagerly lets you map any rotation or on-call schedule to a **Slack usergroup**, so your team can use a clean, familiar mention like `@dev-on-call` instead of `@Pagerly dev-on-call`.

If you already have an existing Slack usergroup, Pagerly can take over managing it automatically. It continuously fetches the **latest rotation and current on-call users**, adds the right people to the usergroup, and removes users who are no longer on rotation ensuring the group always stays accurate.

### Permanent Users in the Usergroup (Optional)

You can also define **permanent members** for a usergroup, such as managers, team leads, or escalation contacts. These users remain in the usergroup at all times, even when they are not part of the current rotation. Pagerly dynamically layers the active rotations / on-call users on top of these permanent members, without disrupting your rotation logic.

<figure><img src="/files/7HSMCoDC1pg8e9dsOcsF" alt=""><figcaption></figcaption></figure>

{% hint style="danger" %}
For Usergroup to work : Pagerly App uses Slack's User Group feature to create an @mention for every Please make sure you have it enabled for everyone in the [workspace settings](https://my.slack.com/admin/settings#user_group_restrictions) .
{% endhint %}

<figure><img src="/files/kADGibMXzH9QvuSag5UF" alt=""><figcaption></figcaption></figure>

<figure><img src="/files/5YWja7ERO6SdDxZQ5Lj3" alt=""><figcaption></figcaption></figure>


# Pagerduty Sync Slack and Workflows

##

***

### 🧩 Key Use Cases and Workflows

<table><thead><tr><th width="293.1328125">Use Case</th><th width="287.14453125">Workflow Summary</th><th>Documentation Link</th><th data-hidden>No.</th></tr></thead><tbody><tr><td><strong>Sync On-Call Schedule with Slack Usergroup</strong></td><td>Configure a Slack user group for your on-call team in Pagerly. The app will automatically sync the group membership to the current on-call user(s), updating it whenever the on-call rotation changes.</td><td><a href="https://docs.pagerly.io/how-to-work-with-pagerly/setup-team#usergroup-settings">Setup Team – Usergroup Settings</a></td><td>1</td></tr><tr><td><strong>Get Notified on On-Call Change</strong></td><td>Get automatic Slack notifications whenever the on-call person switches. Pagerly posts an on-call handover message in the designated channel to announce the new on-call assignee.</td><td><a href="https://docs.pagerly.io/how-to-work-with-pagerly/playing-with-pagerly/let-everyone-know-who-is-the-current-oncall-of-your-team">On-Call Change Notification</a></td><td>2</td></tr><tr><td><strong>Mention Current On-Call in Slack Threads</strong></td><td>Tag the current on-call member in any Slack conversation using Pagerly. Mention <code>@Pagerly &#x3C;team></code> (or a Slack usergroup handle if configured) to automatically notify the on-call person in that thread.</td><td><a href="https://docs.pagerly.io/how-to-work-with-pagerly/playing-with-pagerly/mention-current-oncall-on-any-slack-conversation">Mention Current Oncall in Slack</a></td><td>3</td></tr><tr><td><strong>Update Channel Topic with On-Call</strong></td><td>Keep your Slack channel topic up-to-date with who is on call. Pagerly can automatically insert the current on-call’s name into the channel topic and refresh it whenever the on-call rotation changes.</td><td><a href="https://docs.pagerly.io/how-to-work-with-pagerly/setup-team#team-channel-notifications-and-channel-topic">Channel Topic Auto-Update</a></td><td>4</td></tr><tr><td><strong>Group Multiple On-Calls Together</strong></td><td>Mention multiple teams’ on-call contacts at once with the MultiMention feature. This allows you to notify several on-call users (from different teams) simultaneously via a single Slack mention (useful for cross-team incidents).</td><td><a href="https://docs.pagerly.io/how-to-work-with-pagerly/mention-group-multiple-oncals">Mention/Group Multiple On-Calls</a></td><td>5</td></tr><tr><td><strong>Manage and Override On-Call Schedule from Slack</strong></td><td>Modify the on-call schedule directly from Slack. Pagerly’s interactive commands let you view the current on-call schedule and override it by assigning a new user and time period for the on-call duty.</td><td><a href="https://docs.pagerly.io/how-to-work-with-pagerly/playing-with-pagerly/overriding-teams-schedule">Override Team’s Oncall Schedule</a></td><td>6</td></tr><tr><td><strong>View Current On-Call in Slack</strong></td><td>View the on-call schedule and current on-call person from within Slack. Using the <code>/schedule &#x3C;team></code> command, you can see who is on call now and who is next without leaving Slack.</td><td><a href="https://docs.pagerly.io/how-to-work-with-pagerly/playing-with-pagerly/fetch-your-teams-oncall-schedule">View Oncall Schedule in Slack</a></td><td>7</td></tr><tr><td><strong>Send On-Call Handover Reports</strong></td><td>Send out an automatic handover summary when on-call shifts change. Pagerly will notify the team channel with a handover report message whenever one on-call period ends and the next begins, helping the team stay informed.</td><td><a href="https://docs.pagerly.io/how-to-work-with-pagerly/playing-with-pagerly/let-everyone-know-who-is-the-current-oncall-of-your-team">Oncall Handover Notification</a></td><td>8</td></tr><tr><td><strong>Auto Reminders for Rotation Changes</strong></td><td>Get automated reminders before an on-call rotation change. Pagerly can send Slack reminders (e.g. 6 hours, 12 hours, or 1 day in advance) to alert the team or next responder about an upcoming on-call handoff.</td><td><a href="https://docs.pagerly.io/how-to-work-with-pagerly/reminders-for-upcoming-rotation">Rotation Change Reminders</a></td><td>9</td></tr><tr><td><strong>Manage Incidents inside Slack</strong></td><td>Run your incident response workflow entirely in Slack with Pagerly. When an incident is declared, Pagerly spins up a dedicated Slack war-room channel, assembles the on-call responders, and manages status updates and integrations (Zoom, Jira, etc.), enabling end-to-end incident management without leaving Slack.</td><td><a href="https://docs.pagerly.io/incidence-response/overview">Incident Management Overview</a></td><td>10</td></tr><tr><td><strong>Create PagerDuty Incidents via Slack Emojis</strong></td><td>Trigger a PagerDuty incident by reacting with an emoji in Slack. Pagerly can map specific emoji reactions to create incidents in PagerDuty (for example, reacting with a 🚨 emoji could open a new PagerDuty incident).</td><td><a href="https://pagerly.io/contact-us">Contact Us</a></td><td>11</td></tr><tr><td><strong>Different Emojis for Different Severities</strong></td><td>Use distinct Slack emojis to create incidents with varying severities. For example, react with one emoji to open a Sev-1/Critical incident versus another emoji for a Sev-2, allowing Pagerly to set the appropriate severity based on which emoji was used.</td><td><a href="https://pagerly.io/contact-us">Contact Us</a></td><td>12</td></tr><tr><td><strong>Daily Report of Open and Closed Incidents</strong></td><td>Receive daily summary reports of incident activity. Pagerly can provide a daily Slack report listing which incidents were opened and which were resolved in the past day, keeping the team informed about ongoing and closed incidents.</td><td><a href="https://pagerly.io/contact-us">Contact us</a></td><td>13</td></tr></tbody></table>


# Schedule and Overrides

## Overriding Team's Schedule

1\. Navigate to <https://workspace.pagerly.io/calendar>

![](https://ajeuwbhvhr.cloudimg.io/https://colony-recorder.s3.amazonaws.com/files/2025-06-03/417b464f-c06d-4ae2-8706-b703ef8e3d08/ascreenshot.jpeg?tl_px=0,192\&br_px=1528,1047\&force_format=jpeg\&q=100\&width=1120.0\&wat=1\&wat_opacity=0.7\&wat_gravity=northwest\&wat_url=https://colony-recorder.s3.us-west-1.amazonaws.com/images/watermarks/FB923C_standard.png\&wat_pad=220,277)

2\. Select the team whose rotation you want to override.

![](https://ajeuwbhvhr.cloudimg.io/https://colony-recorder.s3.amazonaws.com/files/2025-06-03/a71fe16c-04b9-4c54-8146-adb2476e45cb/ascreenshot.jpeg?tl_px=207,174\&br_px=1736,1029\&force_format=jpeg\&q=100\&width=1120.0\&wat=1\&wat_opacity=0.7\&wat_gravity=northwest\&wat_url=https://colony-recorder.s3.us-west-1.amazonaws.com/images/watermarks/FB923C_standard.png\&wat_pad=595,176)

3\. Click "Override Schedule"

![](https://ajeuwbhvhr.cloudimg.io/https://colony-recorder.s3.amazonaws.com/files/2025-06-03/9aa07016-835d-4bce-99b1-d7ec5963b5ed/ascreenshot.jpeg?tl_px=1411,0\&br_px=2940,854\&force_format=jpeg\&q=100\&width=1120.0\&wat=1\&wat_opacity=0.7\&wat_gravity=northwest\&wat_url=https://colony-recorder.s3.us-west-1.amazonaws.com/images/watermarks/FB923C_standard.png\&wat_pad=974,153)

4\. Select the user whose rotation you want to override.

![](https://ajeuwbhvhr.cloudimg.io/https://colony-recorder.s3.amazonaws.com/files/2025-06-03/3d9738a4-d163-4e48-994e-27d05dc360fe/ascreenshot.jpeg?tl_px=427,328\&br_px=2393,1426\&force_format=jpeg\&q=100\&width=1120.0\&wat=1\&wat_opacity=0.7\&wat_gravity=northwest\&wat_url=https://colony-recorder.s3.us-west-1.amazonaws.com/images/watermarks/FB923C_standard.png\&wat_pad=476,338)

5\. Set date and time range.

![](https://ajeuwbhvhr.cloudimg.io/https://colony-recorder.s3.amazonaws.com/files/2025-06-03/7b72517a-794c-417f-bb5b-9acc40380a70/ascreenshot.jpeg?tl_px=0,55\&br_px=2752,1594\&force_format=jpeg\&q=100\&width=1120.0\&wat=1\&wat_opacity=0.7\&wat_gravity=northwest\&wat_url=https://colony-recorder.s3.us-west-1.amazonaws.com/images/watermarks/FB923C_standard.png\&wat_pad=520,369)

6\. Click "Update Rotation"

![](https://ajeuwbhvhr.cloudimg.io/https://colony-recorder.s3.amazonaws.com/files/2025-06-03/5d8c4900-526d-4f2c-a12e-b015d956eaf7/ascreenshot.jpeg?tl_px=537,233\&br_px=2502,1331\&force_format=jpeg\&q=100\&width=1120.0\&wat=1\&wat_opacity=0.7\&wat_gravity=northwest\&wat_url=https://colony-recorder.s3.us-west-1.amazonaws.com/images/watermarks/FB923C_standard.png\&wat_pad=524,455)

7\. Team rotation updated successfully!

![](https://ajeuwbhvhr.cloudimg.io/https://colony-recorder.s3.amazonaws.com/files/2025-06-03/a024f74f-cbc6-4843-9b99-248c109bca4e/ascreenshot.jpeg?tl_px=1881,1002\&br_px=2940,1594\&force_format=jpeg\&q=100\&width=1058\&wat_scale=94\&wat=1\&wat_opacity=0.7\&wat_gravity=northwest\&wat_url=https://colony-recorder.s3.us-west-1.amazonaws.com/images/watermarks/FB923C_standard.png\&wat_pad=712,403)

8\. Click the 'x' icon to delete the override.

![](https://ajeuwbhvhr.cloudimg.io/https://colony-recorder.s3.amazonaws.com/files/2025-06-03/c7ef8dc5-e76e-4a95-b29e-73c518c48ff8/ascreenshot.jpeg?tl_px=1614,894\&br_px=2865,1594\&force_format=jpeg\&q=100\&width=1120.0\&wat=1\&wat_opacity=0.7\&wat_gravity=northwest\&wat_url=https://colony-recorder.s3.us-west-1.amazonaws.com/images/watermarks/FB923C_standard.png\&wat_pad=878,369)

9\. Click "Delete".

![](https://ajeuwbhvhr.cloudimg.io/https://colony-recorder.s3.amazonaws.com/files/2025-06-03/1be800ec-dc55-4074-a0eb-1bd680e442d3/ascreenshot.jpeg?tl_px=756,326\&br_px=2284,1180\&force_format=jpeg\&q=100\&width=1120.0\&wat=1\&wat_opacity=0.7\&wat_gravity=northwest\&wat_url=https://colony-recorder.s3.us-west-1.amazonaws.com/images/watermarks/FB923C_standard.png\&wat_pad=667,382)

10\. Override removed successfully!

![](https://ajeuwbhvhr.cloudimg.io/https://colony-recorder.s3.amazonaws.com/files/2025-06-03/fa45a971-a70a-4a07-95f7-0b17114c5797/ascreenshot.jpeg?tl_px=1689,894\&br_px=2940,1594\&force_format=jpeg\&q=100\&width=1120.0\&wat=1\&wat_opacity=0.7\&wat_gravity=northwest\&wat_url=https://colony-recorder.s3.us-west-1.amazonaws.com/images/watermarks/FB923C_standard.png\&wat_pad=324,450)


# Swap Rotation between users

1\. Navigate to <https://workspace.pagerly.io/calendar>

![](https://ajeuwbhvhr.cloudimg.io/https://colony-recorder.s3.amazonaws.com/files/2025-11-12/d8f6d9cc-b775-4536-87e6-d7f366eb2f00/ascreenshot.jpeg?tl_px=0,0\&br_px=1528,854\&force_format=jpeg\&q=100\&width=1120.0\&wat=1\&wat_opacity=0.7\&wat_gravity=northwest\&wat_url=https://colony-recorder.s3.us-west-1.amazonaws.com/images/watermarks/FB923C_standard.png\&wat_pad=158,435)

2\. Click "Swap Rotation"

![](https://ajeuwbhvhr.cloudimg.io/https://colony-recorder.s3.amazonaws.com/files/2025-11-12/ca1c0e05-57a4-4ed0-9881-225c3eb5dd49/ascreenshot.jpeg?tl_px=1689,0\&br_px=2940,699\&force_format=jpeg\&q=100\&width=1120.0\&wat=1\&wat_opacity=0.7\&wat_gravity=northwest\&wat_url=https://colony-recorder.s3.us-west-1.amazonaws.com/images/watermarks/FB923C_standard.png\&wat_pad=974,184)

3\. 1. Select the user whose rotation you want to swap. 2. Select that user's rotation that you want to swap ( Target Rotation ). 3. Select a rotation from another user's schedule that you want to swap the target rotation with (Destination Rotation). 4. Click "Swap Schedule".

![](https://ajeuwbhvhr.cloudimg.io/https://colony-recorder.s3.amazonaws.com/files/2025-11-12/574dde61-b9b3-4709-8a6c-b78709b88ad1/ascreenshot.jpeg?tl_px=749,404\&br_px=2278,1258\&force_format=jpeg\&q=100\&width=1120.0\&wat=1\&wat_opacity=0.7\&wat_gravity=northwest\&wat_url=https://colony-recorder.s3.us-west-1.amazonaws.com/images/watermarks/FB923C_standard.png\&wat_pad=595,470)


# Create Swap on Oncall / Rotations

With Pagerly you can directly swap 2 rotations wihout clicking and creating multiple overrides.

<details>

<summary>Step 1:<br>Enter the command <code>/schedule &#x3C;teamname> swap</code> in the command line, replacing <code>&#x3C;teamname></code> with the appropriate team name you wish to manage.</summary>

</details>

<details>

<summary>Step 2 :<br>A list of team members will appear. Select the users you want to include in the swap by clicking on their names.</summary>

</details>

<figure><img src="/files/bAeAIiROAEwomdOqAF1T" alt=""><figcaption></figcaption></figure>

<details>

<summary>Step 3 :<br>After selecting the users, proceed to choose the specific time period for the swap. This could include specific dates and times according to your needs.</summary>

Choose the time period for User 1 and Time period for User 2

</details>

<figure><img src="/files/F4UaSI4JJG740tX31YPN" alt=""><figcaption></figcaption></figure>

<details>

<summary>Step 4 :<br>Confirm the swap details to finalize the rotation change. Verify using <code>/schedule &#x3C;teamname></code> command</summary>

</details>


# Raise oncall cover request

This section covers how to raise an on-call cover request in Pagerly.

1\. Navigate to [https://workspace.pagerly.io/calendar](https://workspace.pagerly.io/calendar/)

![](/files/OoTs9HFG1GVrDunR98CP)

2\. Click on any rotation.

![](/files/diVleQQ80VwEc6uIfyd3)

3\. Select "Request Cover" option.

![](/files/pq9dtkvlZCbQcjlbJ80V)

4\. Select the schedule for which you want to raise the cover request.

![](/files/P0pgyj7obzlEpaPN89DI)

5\. By default, the cover request applies to the entire shift. To request partial cover, uncheck the box and manually set the duration.

{% hint style="info" %}
When manually setting the duration, please note that the cover request must fall within the scheduled shift times.
{% endhint %}

![](/files/eylplRDex0T2aPaxH0bu)

6\. Add reason for absence.

![](/files/1VmRfRlEfyY8IPGxcKJ3)

7\. By default, the cover request is sent to the entire team. To request a specific person, uncheck the box and select the individual users.

{% hint style="info" %}
If the cover request is targeted to some specific users then only those users can accept that request.
{% endhint %}

![](/files/KSXyjcdJO1izCfh3oGod)

8\. Click "Creating Request".

![](/files/Lw8ouISk1Law0XRIkWFW)

9\. Cover request created successfully!

![](/files/3e9tMjPHO1UZbbhSSK6J)

10\. To view the cover request, navigate to <https://workspace.pagerly.io/cover-requests>

![](/files/c3ytHc72y0vGlXOxlgk8)

11\. Actions that can be performed on the generated cover request.

* **Accept Request:** Enabled for all users except the requester.
* **Reject Request:** Enabled for all users except the requester.
* **Cancel Request:** Enabled only for the requester.

![](/files/VOBGrdrpYhRl4S1oiKX4)


# Escalations

This section covers  what escalations are and how to create escalations in Pagerly

Escalation refers to a process where you can alert more users in your company in case the on-call / rotated user is not able to acknowledge the current issue.

Pagerly provides the entire experience within Slack, Teams and Discord.

### Setup and Define Escalations

This section considers [you have already setup teams in Pagerly](/oncall-and-rotations/sync-team-schedule-from-tools-pagerduty-opsgenie-etc)

<details>

<summary>Step 1: Go to the Pagerly App and navigate to Escalations</summary>

Navigate to **Incidents & Paging → Escalations** in the left sidebar. You'll see the Escalations list page with a table showing your existing escalation teams. Click **+ Add Escalation** to create a new one.

![](/files/akrYeKuYzjcO11JzkKkB)

</details>

<details>

<summary>Step 2: Define Escalation Config</summary>

A side panel will open with the **Create Escalation Team** form. Fill in the following details:

**Escalation Team Name** — Give your escalation a descriptive name (e.g., `payments-escalation`).

**Layer 1** (Required):

* **Select Team** — Choose the Pagerly team whose on-call will be notified first.
* **Time** — Set how long to wait before escalating (e.g., `30`).
* **Time Unit** — Choose `Minutes` or `Hours`.

**Layer 2** (Optional):

* **Select Team** — Choose the next team to notify if Layer 1 doesn't acknowledge.
* **Fixed Users** — Optionally add specific users who should always be notified at this layer.
* **Time** and **Time Unit** — Set the wait time before escalating to Layer 3.

**Layer 3** (Optional):

* **Select Team** — Choose the final escalation team.
* **Fixed Users** — Optionally add specific users who should always be notified at this layer.

![](/files/goUH8Qh1LR1nAaVkoEuN)

![](/files/VNNPTHhNwhKOYjLMPn4g)

</details>

<details>

<summary>Step 3: Save Escalation</summary>

Once you've configured all the layers, click the **Save Escalation** button at the bottom of the form. Your new escalation team will appear in the escalation teams table.

You can edit or delete any existing escalation using the actions menu in the table.

</details>

### Test & Play

Use `@Pagerly <team>` in any channel where the `<team>` is the name of the team mentioned in Layer 1 of the escalation.

### Acknowledge or Escalate

* **Acknowledge** to take ownership and transition the issue / ticket / incident
* If the on-call doesn't acknowledge within the escalation time, the next layer team's on-call is automatically notified and assigned

<figure><img src="/files/a67FGSIsivP8APdtMkHV" alt=""><figcaption><p>Slack thread showing escalation from Layer 1 (devops) to Layer 2 (management)</p></figcaption></figure>


# Import Holidays Calendar

1\. Navigate to <https://workspace.pagerly.io/calendar>

![](https://ajeuwbhvhr.cloudimg.io/https://colony-recorder.s3.amazonaws.com/files/2025-11-12/9aa0db4a-177b-44a8-91ef-64c3f4527e3b/ascreenshot.jpeg?tl_px=0,9\&br_px=1528,864\&force_format=jpeg\&q=100\&width=1120.0\&wat=1\&wat_opacity=0.7\&wat_gravity=northwest\&wat_url=https://colony-recorder.s3.us-west-1.amazonaws.com/images/watermarks/FB923C_standard.png\&wat_pad=116,431)

2\. Click "Import Holidays Calendar"

![](https://ajeuwbhvhr.cloudimg.io/https://colony-recorder.s3.amazonaws.com/files/2025-11-12/04eb91a7-8754-479c-8edb-dce8babdde07/ascreenshot.jpeg?tl_px=1080,0\&br_px=2608,854\&force_format=jpeg\&q=100\&width=1120.0\&wat=1\&wat_opacity=0.7\&wat_gravity=northwest\&wat_url=https://colony-recorder.s3.us-west-1.amazonaws.com/images/watermarks/FB923C_standard.png\&wat_pad=520,139)

3\. 1. Add the calendar ID of the schedule that you want to import. 2. Select the user who will be on holiday:\
2.1 - **Assignee**: Select the user who was assigned that rotation.\
2.2 - **Creator:** Select the user who has created the rotation. 3. Action to perform for that user. 4. Click "Save Config".

![](https://ajeuwbhvhr.cloudimg.io/https://colony-recorder.s3.amazonaws.com/files/2025-11-12/3f3a2dba-02a4-4bb3-88b6-53c26d539879/ascreenshot.jpeg?tl_px=587,224\&br_px=2553,1323\&force_format=jpeg\&q=100\&width=1120.0\&wat=1\&wat_opacity=0.7\&wat_gravity=northwest\&wat_url=https://colony-recorder.s3.us-west-1.amazonaws.com/images/watermarks/FB923C_standard.png\&wat_pad=545,507)

4\. Holiday calendar has been imported successfully!

![](https://ajeuwbhvhr.cloudimg.io/https://colony-recorder.s3.amazonaws.com/files/2025-11-12/9384afc4-2858-434e-a15b-8c22aa7f6166/ascreenshot.jpeg?tl_px=1689,894\&br_px=2940,1594\&force_format=jpeg\&q=100\&width=1120.0\&wat=1\&wat_opacity=0.7\&wat_gravity=northwest\&wat_url=https://colony-recorder.s3.us-west-1.amazonaws.com/images/watermarks/FB923C_standard.png\&wat_pad=887,367)


# Reminders for Upcoming Rotation

In case you want to receive reminders for upcoming rotation change / oncall handover, with Pagerly, you can set reminders.\
\
Pagerly would automatically detect the upcoming change in schedule, and would throw the notification of upcoming schedule on the Team's Channel configured in Pagerly\
\
You can set Reminders

* **6 Hours Before**
* **12 Hours Before**
* **1 Day Before**
* **Custom** - Use this if you want to setup reminders at a **fixed Time and Day of the Week**

### Setup Reminders in the following Steps

1\. Click "3 dots" to open the actions dropdown and select "Reminder".

![](https://ajeuwbhvhr.cloudimg.io/https://colony-recorder.s3.amazonaws.com/files/2025-06-03/60006a3c-97b3-44f1-b5b4-626c3db1bea8/ascreenshot.jpeg?tl_px=188,55\&br_px=2940,1594\&force_format=jpeg\&q=100\&width=1120.0\&wat=1\&wat_opacity=0.7\&wat_gravity=northwest\&wat_url=https://colony-recorder.s3.us-west-1.amazonaws.com/images/watermarks/FB923C_standard.png\&wat_pad=978,312)

2\. For setting up a custom reminder:

1. Set rotation frequency to "Custom".
2. Select the day of the week.
3. Select time of day.
4. Select timezone.
5. Set custom message (optional): 5.1 - Set message type 5.2 - Send message to ( channel, dm or both ) 5.3 - Add new channel ID to receive updates on ( leave blank to use the same team channel ) 5.4 - Set custom message using template.
6. Click "Save Reminder".

![](/files/Ic8CEfjoL6cAX4Odrt3C)

3\. Rotation reminder added successfully!

![](https://ajeuwbhvhr.cloudimg.io/https://colony-recorder.s3.amazonaws.com/files/2025-06-03/c99e99ac-0efa-42e7-a054-389084be63a0/ascreenshot.jpeg?tl_px=1414,362\&br_px=2665,1061\&force_format=jpeg\&q=100\&width=1120.0\&wat=1\&wat_opacity=0.7\&wat_gravity=northwest\&wat_url=https://colony-recorder.s3.us-west-1.amazonaws.com/images/watermarks/FB923C_standard.png\&wat_pad=524,276)


# Set Reminders

In case you want to receive reminders for upcoming rotation change / oncall handover, with Pagerly, you can set reminders. Pagerly would automatically detect the upcoming change in schedule, and would throw the notification of upcoming schedule on the Team's Channel configured in Pagerly You can set Reminders

* **6 Hours Before**
* **12 Hours Before**
* **1 Day Before**
* **Custom** - Use this if you want to setup reminders at a **fixed Time and Day of the Week**

​

#### Setup Reminders in the following Steps <a href="#setup-reminders-in-the-following-steps" id="setup-reminders-in-the-following-steps"></a>

1\. Click "3 dots" to open the actions dropdown and select "Reminder".2. For setting up a custom reminder:

<figure><img src="https://images.gitbook.com/__img/dpr=2,width=760,onerror=redirect,format=auto,signature=1873551553/https%3A%2F%2Fajeuwbhvhr.cloudimg.io%2Fhttps%3A%2F%2Fcolony-recorder.s3.amazonaws.com%2Ffiles%2F2025-06-03%2F60006a3c-97b3-44f1-b5b4-626c3db1bea8%2Fascreenshot.jpeg%3Ftl_px%3D188%2C55%26br_px%3D2940%2C1594%26force_format%3Djpeg%26q%3D100%26width%3D1120.0%26wat%3D1%26wat_opacity%3D0.7%26wat_gravity%3Dnorthwest%26wat_url%3Dhttps%3A%2F%2Fcolony-recorder.s3.us-west-1.amazonaws.com%2Fimages%2Fwatermarks%2FFB923C_standard.png%26wat_pad%3D978%2C312" alt=""><figcaption></figcaption></figure>

1. Set rotation frequency to "Custom".
2. Select the day of the week.
3. Select time of day.
4. Select timezone.
5. Click "Save Reminder".

<figure><img src="https://images.gitbook.com/__img/dpr=2,width=760,onerror=redirect,format=auto,signature=-1646278314/https%3A%2F%2Fajeuwbhvhr.cloudimg.io%2Fhttps%3A%2F%2Fcolony-recorder.s3.amazonaws.com%2Ffiles%2F2025-06-03%2F3dc5aa11-f9a3-4b46-9cb8-429422eeeb89%2Fascreenshot.jpeg%3Ftl_px%3D561%2C458%26br_px%3D2526%2C1557%26force_format%3Djpeg%26q%3D100%26width%3D1120.0%26wat%3D1%26wat_opacity%3D0.7%26wat_gravity%3Dnorthwest%26wat_url%3Dhttps%3A%2F%2Fcolony-recorder.s3.us-west-1.amazonaws.com%2Fimages%2Fwatermarks%2FFB923C_standard.png%26wat_pad%3D524%2C276" alt=""><figcaption></figcaption></figure>


# Sync Schedules to Google Calendar, Linear & Jira

Keep your on-call and shift schedules always visible and directly tied into your team’s workflow tools. Pagerly automatically syncs rotations and shifts with **Google Calendar**, **Linear**, **Jira**, and **PagerDuty** — so ownership and triage responsibilities are always clear.

***

### 🗓 Sync to Google Calendar

* Export shifts and rotations as calendar events.
* Always know who’s on-call directly from your calendar.
* Works with both personal and shared team calendars.
* Perfect for distributed teams across time zones.

[For Syncing schedule to Google Calendar , check this page](/integrations/sync-schedule-with-google-calendar)

***

### 📌 Sync to Linear (Triage Responsibility)

* Automatically set the **on-call engineer as the Linear triage owner**.
* Ensure every new issue is routed to the right person instantly.
* Handoffs happen seamlessly when shifts change — no manual reassignments.
* Keep your Linear workflow fully aligned with Pagerly’s on-call rotations.

[For Syncing schedule to Linear, check this page](/integrations/sync-schedule-with-google-calendar)

***

### 📝 Sync to Jira

* Map on-call schedules to **Jira assignees** or custom fields.
* Automatically update Jira tickets with the current on-call engineer.
* Ensure incidents and bugs are triaged by the right person at the right time.
* Works across multiple projects and Jira instances.

[For Syncing schedule to Jira , check this page](/integrations/integration-with-jira/round-robin-assignment-of-jira-issues-tickets)\ <br>

***

### 📟 Sync to PagerDuty

* Push your Pagerly rotation into a **PagerDuty schedule** as overrides.
* PagerDuty alerting always pages the person who is on-call in Pagerly.
* Shift swaps, overrides, and holiday skips flow through automatically.
* Existing PagerDuty layers stay untouched — the base layer remains as fallback.

[For Syncing schedule to PagerDuty, check this page](/oncall-and-rotations/sync-schedule-to-pagerduty)

***

### ✅ Benefits of Sync

* No more manual handoffs or schedule updates.
* Crystal-clear triage responsibility in **Linear** and **Jira**.
* Transparency for engineering and support teams.
* Works with **Round Robin** and **Shift Schedules** created in Pagerly.

***

👉 With Pagerly, your **Google Calendar, Linear, Jira, and PagerDuty** are always in sync with your on-call schedules — ensuring accountability, faster response times, and less coordination overhead.


# Sync Schedule to PagerDuty

For Teams created with Pagerly's Round Robin / Shift Schedule, you can sync the same schedule to a PagerDuty schedule.

Pagerly can push your Pagerly-managed rotation into a **PagerDuty schedule** automatically. Each shift is written as an **override** on the PagerDuty schedule you choose, so PagerDuty always reflects who is on-call in Pagerly — including shift swaps, overrides, and holiday skips.

{% hint style="info" %}
This sync is for teams whose rotation is **created in Pagerly** (Round Robin or Shift Schedules). Teams that import their schedule *from* PagerDuty don't need this — their source of truth is already PagerDuty.
{% endhint %}

## Prerequisites

1. **PagerDuty connected to Pagerly** with an account-level API key that has **write access**. A read-only key can list schedules but cannot create overrides.
2. **A PagerDuty schedule to sync into.** We recommend creating a dedicated schedule in PagerDuty for this. Any placeholder user on its base layer is fine — Pagerly's overrides sit on top of the base layer.
3. **Team members exist in PagerDuty** with the **same email address** as their Slack account. Members whose email doesn't match any PagerDuty user are skipped.

## Sync schedule to PagerDuty

1\. Navigate to <https://workspace.pagerly.io/calendar>

2\. Select the team whose schedule you want to sync to PagerDuty.

3\. Click "Sync to Third-Party Apps".

4\. Click the "Sync" button for PagerDuty.

5\. Select the target PagerDuty schedule from the dropdown and click "Save".

6\. Done! Pagerly pushes the upcoming shifts right away and keeps the PagerDuty schedule updated automatically whenever the rotation changes — edits, shift swaps, and overrides included.

## Good to know

* **Only future shifts are synced.** Past shifts are never written to PagerDuty.
* **Existing PagerDuty layers are untouched.** Pagerly only adds/removes its own overrides; whatever is on the schedule's base layer stays as a fallback.
* **Changes flow one way** — from Pagerly to PagerDuty. Edit the rotation in Pagerly (or via Slack). Changes made directly in PagerDuty are not pulled back into Pagerly.
* If a shift's member can't be matched to a PagerDuty user by email, that shift is skipped — the rest of the rotation still syncs.

## Disconnect

Click **Disconnect Sync** on the PagerDuty tile. You'll be asked whether to also **remove the entries Pagerly created** in PagerDuty — choose *Yes* to clean up the schedule, or *No* to leave the already-created overrides in place.


# Post Rotation Updates to Slack Channels & Channel Topic

Pagerly keeps your entire team informed by automatically posting rotation changes to Slack channels and updating the channel topic with the latest on-call information. No more guessing who’s on-call or digging into schedules — the answer is always visible where your team works.

#### What Pagerly Can Do with Slack Channels

📢 **Automatically Post Rotation Change Notifications**

* Post updates to any Slack channel(s) whenever On-call rotation changes.\
  Messages clearly show:
* Who is currently on-call
* Shift duration and timing
* Team or rotation name
* Keeps everyone aligned without manual announcements.
* Add Custom Context Messages like runbook or any doc or anything

📝 **Auto-Update Slack Channel Topic**

* Pagerly can automatically update the Slack channel topic to reflect:
  * Current on-call user(s)
  * Rotation name
  * Escalation or backup info (optional)<br>

### Team Settings

#### T**eam Channel(s)**

The slack channel which would subscribe for any oncall handover / oncall rotation change. On any change in oncall rotation, you would receive 2 notifications on this slack channel

* **Channel Topic Update** : Your slack channel topic would be automatically updated with the current oncall.\
  It would look something like this 👇🏻
* **Channel Message** : Your channel would receive a notification on the oncall change

([Customize Notification Here](https://docs.pagerly.io/how-to-work-with-pagerly/custom-change-notification-on-slack))👇🏻

<figure><img src="/files/OaeuPo0PPARSDb43SivH" alt=""><figcaption></figcaption></figure>

<figure><img src="/files/5j9JuECHv0kt4PYBf1Iy" alt=""><figcaption></figcaption></figure>

#### **Notification && Topic Setting**s

You can choose to receive if you want to receive notifications on oncall/rotation change as well topic updates.

* Update Channel with Topic Name -> If you want your channel topic to be updated with latest oncall
* Show Change Notification on Channel -> If you want to receive the Notification whenever there is a change in oncall / rotation ([Customize Notification Here](https://docs.pagerly.io/how-to-work-with-pagerly/custom-change-notification-on-slack))

<figure><img src="/files/ISVcTfzEiG124RdHV6YZ" alt=""><figcaption></figcaption></figure>


# Set Slack Status Automatically

<figure><img src="/files/3NTdeiW7IK4Lw617kbzd" alt=""><figcaption><p>Slack Status during Oncall / Rotation</p></figcaption></figure>

With Pagerly, you can now update and maintain your Slack Status .\
Whenever you are on rotation, Pagerly can automatically set your Slack Status .

You can:

* Choose your custom message 😎
* Enable / Disable Do Not Disturb / Pause-Notification 😴
* Opt-in/out of the automatic update.

{% hint style="warning" %}
Hi, For Slack Status , for now ,you need to install an additional App : [Pagerly Status](https://slack.com/oauth/v2/authorize?client_id=2800907882597.6641886163877\&scope=app_mentions:read,channels:join,channels:read,channels:write.topic,chat:write,team:read,users:read,users:read.email,commands\&user_scope=users.profile:read,users.profile:write,dnd:write) .\
This is needed untill Pagerly App is updated with User Status permssions.
{% endhint %}

### Setup Automatic Status Update in the following Steps

<details>

<summary>Step 1 : Install the Pagerly Status App</summary>

</details>

<details>

<summary>Step 2 : Use /set-status command.</summary>

</details>

<details>

<summary>Step 3 : Fill the Update Status form</summary>

</details>

<figure><img src="/files/m7XNVK6xcmZBV77egvfu" alt=""><figcaption><p>Set Slack Status Automatically</p></figcaption></figure>

* **Enable Automatic Update :** Main setting flag through which you can enable / disable automatic status updates whenever you are oncall.
* **Slack Status Message :** The text/message one can see in your Slack Status
* **Emoji :** Choose your Slack Emoji ( input the emoji as text e.g. :eyes: )
* **Pause Notifications :** Main setting flag through which you can enable / disable automatic pause / do not disturb during your oncall / rotation period.


# Daily Oncall Standup

## How to Add / Edit Daily Standup Questions

<details>

<summary>Step 1 :Go To Pagerly Slack App and go to Edit Team and to Manage Daily Report</summary>

<img src="/files/xyYPZhLy2TMjSoY5uuiO" alt="" data-size="original">

</details>

<details>

<summary>Step 2: Enable Daily Report to Yes.<br>Add/Edit all Questions in separate lines ( Use Shift+Enter to add questions in new line)</summary>

<img src="/files/QP8ptS9Vv6TmM2Mq2ySr" alt="" data-size="original">

</details>

##

## Respond to Questions

<details>

<summary>Step 1 :Pagerly would automatically prompt the current oncall to submit report</summary>

<img src="/files/Aog7t9JKvV8uf8ZsBfZb" alt="" data-size="original">

</details>

<details>

<summary>Step 2: Fill up the form with questions</summary>

<img src="/files/lbTSUpm6LXg3VNwcfUcj" alt="" data-size="original">

</details>

<details>

<summary>Step 3: Pagerly would automatically send the answers to the team's slack channel</summary>

<img src="/files/VijrwcBnCnMQKWdDjyiu" alt="" data-size="original">

</details>


# Custom Change Notification on Slack

## Custom Change Notification on Slack

1\. Click "3 dots" to open the actions dropdown and select "Set Notification".

![](https://ajeuwbhvhr.cloudimg.io/https://colony-recorder.s3.amazonaws.com/files/2025-06-03/2a285564-39e7-401f-9371-d8102ea0eca3/ascreenshot.jpeg?tl_px=1408,345\&br_px=2937,1200\&force_format=jpeg\&q=100\&width=1120.0\&wat=1\&wat_opacity=0.7\&wat_gravity=northwest\&wat_url=https://colony-recorder.s3.us-west-1.amazonaws.com/images/watermarks/FB923C_standard.png\&wat_pad=896,356)

2\. Click "Send"

![](https://ajeuwbhvhr.cloudimg.io/https://colony-recorder.s3.amazonaws.com/files/2025-06-03/69deae15-d0cd-4cf5-9a37-82fd221895ea/ascreenshot.jpeg?tl_px=730,409\&br_px=2259,1263\&force_format=jpeg\&q=100\&width=1120.0\&wat=1\&wat_opacity=0.7\&wat_gravity=northwest\&wat_url=https://colony-recorder.s3.us-west-1.amazonaws.com/images/watermarks/FB923C_standard.png\&wat_pad=706,332)

3\. Check slack message by Pagerly for editing custom notification

![](https://ajeuwbhvhr.cloudimg.io/https://colony-recorder.s3.amazonaws.com/files/2025-06-03/abaa3e38-e591-4aa9-8c69-c4c2fdf8c72d/ascreenshot.jpeg?tl_px=1689,894\&br_px=2940,1594\&force_format=jpeg\&q=100\&width=1120.0\&wat=1\&wat_opacity=0.7\&wat_gravity=northwest\&wat_url=https://colony-recorder.s3.us-west-1.amazonaws.com/images/watermarks/FB923C_standard.png\&wat_pad=720,511)

<figure><img src="/files/7M1MuKqEnoKULDlHjqXN" alt=""><figcaption></figcaption></figure>

4. View / Edit custom message

Use ${team} to mention Team Name\
Use ${current} to mention current user\
Use ${previous} to mention previous user\
Use ${next} to mention next user

<figure><img src="/files/J4YWgBvWHeBwBLqzXFiB" alt=""><figcaption></figcaption></figure>


# Mention/Group Multiple Oncalls

With Pagerly, you can configure **MultiMention Teams,** with which you can mention multiple oncalls together

In today's complex and interconnected systems, incidents can arise from various parts of your organization. Pagerly's "Mention Multiple On-Calls" feature equips you with the ability to notify all relevant on-call teams simultaneously, ensuring that the right experts are informed promptly,

**Here are some of the use cases of Multi Mention Team**

* **Cross-Functional**

Some incidents require the expertise of multiple teams to be resolved effectively. With this feature, you can bring together developers, operations, and support teams in one go, enabling faster and more coordinated incident resolution.

**Ex : Use @frontend-oncall mentions @andriod-oncall, @ios-oncall, @web-oncall**

<figure><img src="/files/2sMpE2dfHZW4Es0MGd9a" alt=""><figcaption></figcaption></figure>

<br>

* **Scheduled Maintenance or Upgrades**

Scheduled Maintenance or Upgrades: Even planned activities can encounter unexpected challenges. By mentioning all relevant on-call teams, you can ensure a rapid response in case any issues arise during maintenance or upgrades.

<figure><img src="/files/4tyJkDugMCm14KtTkDfy" alt=""><figcaption></figcaption></figure>

* **Geographically Distributed Teams**

If your organization has teams spread across different time zones, mentioning multiple on-calls ensures that incidents get immediate attention, regardless of the hour.

<figure><img src="/files/dBtDcWCC8bNo9wy8QEsA" alt=""><figcaption></figcaption></figure>

* **Escalation Pathways**

For critical incidents that need immediate attention, you can set up escalation pathways. If the initial on-call team doesn't respond within a specified time, the system can automatically notify additional teams, ensuring that incidents are addressed promptly.

<figure><img src="/files/5lhrLp4XLnd2aunM2ESd" alt=""><figcaption></figcaption></figure>

* **Product Launches**

Product Launches or Updates: During product launches or updates, multiple teams are involved in ensuring a smooth release. Coordinating these efforts is vital, and this feature enables you to keep everyone on the same page.

<figure><img src="/files/c8c4QChvIS6rEaFbbpKX" alt=""><figcaption></figcaption></figure>


# Configure MultiMention Team

## Grouping multiple on-call teams

1\. Navigate to <https://workspace.pagerly.io/group-oncalls>

![](https://ajeuwbhvhr.cloudimg.io/https://colony-recorder.s3.amazonaws.com/files/2025-05-30/1e206f98-5379-4242-b12c-a45ed6def84b/ascreenshot.jpeg?tl_px=2,0\&br_px=1531,854\&force_format=jpeg\&q=100\&width=1120.0\&wat=1\&wat_opacity=0.7\&wat_gravity=northwest\&wat_url=https://colony-recorder.s3.us-west-1.amazonaws.com/images/watermarks/FB923C_standard.png\&wat_pad=164,344)

2\. Click "Add Team"

![](https://ajeuwbhvhr.cloudimg.io/https://colony-recorder.s3.amazonaws.com/files/2025-05-30/9e8030ac-b340-452f-a0e0-8c85eef055e0/ascreenshot.jpeg?tl_px=1689,0\&br_px=2940,699\&force_format=jpeg\&q=100\&width=1120.0\&wat=1\&wat_opacity=0.7\&wat_gravity=northwest\&wat_url=https://colony-recorder.s3.us-west-1.amazonaws.com/images/watermarks/FB923C_standard.png\&wat_pad=912,193)

3\. Set up a new multi-mention on-call team:

1. Set team name.
2. Add usergroup to mention multiple on-calls together (optional).
3. Add permanent users to the group (optional).
4. Select the teams you want to mention together.
5. Click the "Add Multi-Mention Team" button.

![](https://ajeuwbhvhr.cloudimg.io/https://colony-recorder.s3.amazonaws.com/files/2025-05-30/287697b7-3db9-47a4-93c3-95e6052ed48c/ascreenshot.jpeg?tl_px=188,55\&br_px=2940,1594\&force_format=jpeg\&q=100\&width=1120.0\&wat=1\&wat_opacity=0.7\&wat_gravity=northwest\&wat_url=https://colony-recorder.s3.us-west-1.amazonaws.com/images/watermarks/FB923C_standard.png\&wat_pad=852,342)

4\. Multi-Mention team created successfully!

![](https://ajeuwbhvhr.cloudimg.io/https://colony-recorder.s3.amazonaws.com/files/2025-05-30/d0ac760d-19ce-4447-ab90-af4579de2fb6/ascreenshot.jpeg?tl_px=303,161\&br_px=2268,1260\&force_format=jpeg\&q=100\&width=1120.0\&wat=1\&wat_opacity=0.7\&wat_gravity=northwest\&wat_url=https://colony-recorder.s3.us-west-1.amazonaws.com/images/watermarks/FB923C_standard.png\&wat_pad=524,426)

5\. Click the "3 dots" to open the actions dropdown and select "Edit".

![](https://ajeuwbhvhr.cloudimg.io/https://colony-recorder.s3.amazonaws.com/files/2025-05-30/2adabf24-9f5b-447a-a66c-3084263c8ffe/ascreenshot.jpeg?tl_px=1411,660\&br_px=2940,1515\&force_format=jpeg\&q=100\&width=1120.0\&wat=1\&wat_opacity=0.7\&wat_gravity=northwest\&wat_url=https://colony-recorder.s3.us-west-1.amazonaws.com/images/watermarks/FB923C_standard.png\&wat_pad=810,276)

6\. Update the multi-mention team settings and click the "Update Multi-Mention Team" button.

![](https://ajeuwbhvhr.cloudimg.io/https://colony-recorder.s3.amazonaws.com/files/2025-05-30/882d8202-168f-46ad-9618-e3252fcacc1f/ascreenshot.jpeg?tl_px=188,0\&br_px=2940,1538\&force_format=jpeg\&q=100\&width=1120.0\&wat=1\&wat_opacity=0.7\&wat_gravity=northwest\&wat_url=https://colony-recorder.s3.us-west-1.amazonaws.com/images/watermarks/FB923C_standard.png\&wat_pad=849,162)

7\. To delete a multi-mention team, permanently select "Delete" from the actions dropdown.

![](https://ajeuwbhvhr.cloudimg.io/https://colony-recorder.s3.amazonaws.com/files/2025-05-30/09d014e7-518e-404e-aa12-075a3736e5ec/ascreenshot.jpeg?tl_px=1411,732\&br_px=2940,1587\&force_format=jpeg\&q=100\&width=1120.0\&wat=1\&wat_opacity=0.7\&wat_gravity=northwest\&wat_url=https://colony-recorder.s3.us-west-1.amazonaws.com/images/watermarks/FB923C_standard.png\&wat_pad=793,277)

8\. Click "Delete"

![](https://ajeuwbhvhr.cloudimg.io/https://colony-recorder.s3.amazonaws.com/files/2025-05-30/47de0406-6a4c-4f6f-bc91-a40c80f5efcd/ascreenshot.jpeg?tl_px=772,419\&br_px=2301,1273\&force_format=jpeg\&q=100\&width=1120.0\&wat=1\&wat_opacity=0.7\&wat_gravity=northwest\&wat_url=https://colony-recorder.s3.us-west-1.amazonaws.com/images/watermarks/FB923C_standard.png\&wat_pad=647,316)

9\. Multi-Mention team deleted successfully!

![](https://ajeuwbhvhr.cloudimg.io/https://colony-recorder.s3.amazonaws.com/files/2025-05-30/0ff3f943-5fdf-4f64-a47b-696a02fdb6bd/ascreenshot.jpeg?tl_px=1411,739\&br_px=2940,1593\&force_format=jpeg\&q=100\&width=1120.0\&wat=1\&wat_opacity=0.7\&wat_gravity=northwest\&wat_url=https://colony-recorder.s3.us-west-1.amazonaws.com/images/watermarks/FB923C_standard.png\&wat_pad=827,507)


# Unified Messages

Aggregate, filter, and respond to Slack messages across multiple channels in a single central Hub Channel with 2-way sync.

Unified Messages in Pagerly allows engineering and operations teams to aggregate messages from multiple Slack source channels into a central **Hub Channel**, apply custom routing filters, and reply directly from the Hub with full 2-way thread sync.

### Key Capabilities

* 🎯 **Centralized Hub Channel**: Combine chatter and alerts from dozens of channels into a single triage channel.
* 🔍 **Smart Multi-Filtering**: Filter messages by keyword text, `@user` mentions, `@usergroup` tags, or custom tags.
* 🔄 **2-Way Reply Sync**: Replies posted in the Hub Channel automatically mirror back to the original message's thread in the source channel.
* ⚡ **Team Scoping**: Configure separate Hubs and Source Channels for different teams (e.g. Platform, Infrastructure, Backend).

***

### Navigation in Documentation

* [⚙️ **Configure Hub & Source Channels**](/slack-features/unified-messages/configure-hub-and-source-channels) — Connect teams, hub channels, and source channels.
* [🎯 **Message Filters & Routing**](/slack-features/unified-messages/message-filters-and-routing) — Set up keywords, user mentions, and usergroup filters.
* [🔄 **2-Way Reply Thread Sync**](/slack-features/unified-messages/2-way-reply-sync) — Enable user OAuth for seamless cross-channel conversation sync.


# Configure Hub & Source Channels

Step-by-step guide to configure Hub Channels and Source Channels for Unified Messages in Pagerly.

Set up a Hub Channel where aggregated conversations land, and define the list of monitored Source Channels.

### ⚙️ Step-by-Step Configuration

1. In Pagerly Dashboard, navigate to **Unified Messages** (`/unified-messages`).
2. Select your **Team** from the team dropdown selector.
3. Enter the **Hub Channel Name** (e.g. `#hub-platform-alerts` or `#oncall-triage`).
4. Enter the **Source Channel Names** separated by commas (e.g. `#prod-incidents, #api-alerts, #help-backend`).
5. Toggle the **Enable Unified Messages** switch to **ON**.
6. Click **Save Configuration**.

***

### 💡 Best Practices

* **Dedicated Hub Channel**: Use a dedicated, public or private channel as your Hub to keep triage organized.
* **Pagerly Bot Permissions**: Ensure the Pagerly Slack Bot is added to both the Hub Channel and all specified Source Channels.


# Message Filters & Routing

How to configure text, user mention, usergroup, and tag filters for Unified Messages.

Filters determine which Slack messages across your Source Channels get routed into your Hub Channel.

### 🎯 Filter Types Supported

1. **Text Match** (`type: "text"`): Matches specific keywords in message body (e.g. `FATAL`, `Outage`, `DB Connection Error`).
2. **User Mention** (`type: "user"`): Routes any message mentioning a specific user (e.g. `@john.doe`).
3. **Usergroup Mention** (`type: "usergroup"`): Routes messages mentioning a Slack usergroup (e.g. `@oncall-backend`).
4. **Tag Match** (`type: "tag"`): Routes messages with matching tags or hashtags (e.g. `#sev1`, `[URGENT]`).

***

### ⚙️ Adding & Managing Filters

1. Open **Unified Messages** (`/unified-messages`) in the Pagerly Dashboard.
2. Under **Message Filters**, select the **Filter Type** (Text, User, Usergroup, or Tag).
3. Search or type the filter value.
4. Click **Add Filter** (`+`).
5. Click **Save Configuration**.


# 2-Way Reply Thread Sync

How 2-way thread reply synchronization works in Unified Messages.

With 2-Way Reply Sync, team members can reply directly in the Hub Channel, and Pagerly automatically mirrors their reply back to the original message's thread in the source channel under their user profile.

### 🔄 How It Works

1. A message in `#prod-alerts` matches a filter and appears in `#hub-triage`.
2. An engineer replies in `#hub-triage` to assist.
3. Pagerly's OAuth integration syncs the reply back to the original thread in `#prod-alerts`.
4. Other responders in `#prod-alerts` see the reply seamlessly in real-time.

***

### 🔑 Connecting User OAuth for Reply Sync

For replies to be posted under your own Slack profile:

1. In Pagerly Dashboard, open **Unified Messages** (`/unified-messages`).
2. Click **Connect Slack User OAuth**.
3. Authorize Pagerly to post replies on your behalf in Slack.
4. Your Slack account will show as **Connected** with a green checkmark (`User OAuth Active`).


# Manage Oncall Users Phone Numbers

## Add and manage users

1\. Navigate to [https://workspace.pagerly.io/users](https://pagerly-git-feat-escalation-kritik-kapoors-projects.vercel.app/users)

![](https://ajeuwbhvhr.cloudimg.io/https://colony-recorder.s3.amazonaws.com/files/2025-07-31/094dd444-7364-4d99-bbc1-a3ee317c7ca4/ascreenshot.jpeg?tl_px=0,583\&br_px=1528,1438\&force_format=jpeg\&q=100\&width=1120.0\&wat=1\&wat_opacity=0.7\&wat_gravity=northwest\&wat_url=https://colony-recorder.s3.us-west-1.amazonaws.com/images/watermarks/FB923C_standard.png\&wat_pad=173,335)

2\. Click "Add User"

![](https://ajeuwbhvhr.cloudimg.io/https://colony-recorder.s3.amazonaws.com/files/2025-07-31/2faa8b70-8922-4b5b-a6b6-59f81556a18d/ascreenshot.jpeg?tl_px=1689,0\&br_px=2940,699\&force_format=jpeg\&q=100\&width=1120.0\&wat=1\&wat_opacity=0.7\&wat_gravity=northwest\&wat_url=https://colony-recorder.s3.us-west-1.amazonaws.com/images/watermarks/FB923C_standard.png\&wat_pad=917,195)

3\. Add the user details and click the "Add User" button.

![](https://ajeuwbhvhr.cloudimg.io/https://colony-recorder.s3.amazonaws.com/files/2025-07-31/d1cb864c-eb62-41ef-8fa4-b5955f10fdb2/ascreenshot.jpeg?tl_px=558,250\&br_px=2524,1349\&force_format=jpeg\&q=100\&width=1120.0\&wat=1\&wat_opacity=0.7\&wat_gravity=northwest\&wat_url=https://colony-recorder.s3.us-west-1.amazonaws.com/images/watermarks/FB923C_standard.png\&wat_pad=724,540)

4\. User added successfully!

![](https://ajeuwbhvhr.cloudimg.io/https://colony-recorder.s3.amazonaws.com/files/2025-07-31/adf52d55-98c2-4bb0-887d-1c739f933213/ascreenshot.jpeg?tl_px=522,163\&br_px=2488,1262\&force_format=jpeg\&q=100\&width=1120.0\&wat=1\&wat_opacity=0.7\&wat_gravity=northwest\&wat_url=https://colony-recorder.s3.us-west-1.amazonaws.com/images/watermarks/FB923C_standard.png\&wat_pad=281,447)

5\. To update user details, select "Edit" from the dropdown.

![](https://ajeuwbhvhr.cloudimg.io/https://colony-recorder.s3.amazonaws.com/files/2025-07-31/ac64537f-627c-4fd3-a0e8-9e6f6e0db15b/ascreenshot.jpeg?tl_px=1411,622\&br_px=2940,1477\&force_format=jpeg\&q=100\&width=1120.0\&wat=1\&wat_opacity=0.7\&wat_gravity=northwest\&wat_url=https://colony-recorder.s3.us-west-1.amazonaws.com/images/watermarks/FB923C_standard.png\&wat_pad=914,277)


# Oncall Paging and Phone Numbers

This section describes how you can add users for paging and their respective phone numbers.

For any incident , the oncall who has valid contact here would receive call , sms and email

{% hint style="warning" %}
To receive calls while your phone is in Do Not Disturb (DND) mode, [follow this guide](/incidents-and-alerting/receive-calls-in-do-not-distrubs)
{% endhint %}

1\. Navigate to [https://workspace.pagerly.io/users](https://pagerly-git-feat-escalation-kritik-kapoors-projects.vercel.app/users)

![](https://ajeuwbhvhr.cloudimg.io/https://colony-recorder.s3.amazonaws.com/files/2025-07-31/094dd444-7364-4d99-bbc1-a3ee317c7ca4/ascreenshot.jpeg?tl_px=0,583\&br_px=1528,1438\&force_format=jpeg\&q=100\&width=1120.0\&wat=1\&wat_opacity=0.7\&wat_gravity=northwest\&wat_url=https://colony-recorder.s3.us-west-1.amazonaws.com/images/watermarks/FB923C_standard.png\&wat_pad=173,335)

2\. Click "Add User"

![](https://ajeuwbhvhr.cloudimg.io/https://colony-recorder.s3.amazonaws.com/files/2025-07-31/2faa8b70-8922-4b5b-a6b6-59f81556a18d/ascreenshot.jpeg?tl_px=1689,0\&br_px=2940,699\&force_format=jpeg\&q=100\&width=1120.0\&wat=1\&wat_opacity=0.7\&wat_gravity=northwest\&wat_url=https://colony-recorder.s3.us-west-1.amazonaws.com/images/watermarks/FB923C_standard.png\&wat_pad=917,195)

3\. Add the user details and click the "Add User" button.

![](https://ajeuwbhvhr.cloudimg.io/https://colony-recorder.s3.amazonaws.com/files/2025-07-31/d1cb864c-eb62-41ef-8fa4-b5955f10fdb2/ascreenshot.jpeg?tl_px=558,250\&br_px=2524,1349\&force_format=jpeg\&q=100\&width=1120.0\&wat=1\&wat_opacity=0.7\&wat_gravity=northwest\&wat_url=https://colony-recorder.s3.us-west-1.amazonaws.com/images/watermarks/FB923C_standard.png\&wat_pad=724,540)

4\. User added successfully!

![](https://ajeuwbhvhr.cloudimg.io/https://colony-recorder.s3.amazonaws.com/files/2025-07-31/adf52d55-98c2-4bb0-887d-1c739f933213/ascreenshot.jpeg?tl_px=522,163\&br_px=2488,1262\&force_format=jpeg\&q=100\&width=1120.0\&wat=1\&wat_opacity=0.7\&wat_gravity=northwest\&wat_url=https://colony-recorder.s3.us-west-1.amazonaws.com/images/watermarks/FB923C_standard.png\&wat_pad=281,447)

5\. To update user details, select "Edit" from the dropdown.

![](https://ajeuwbhvhr.cloudimg.io/https://colony-recorder.s3.amazonaws.com/files/2025-07-31/ac64537f-627c-4fd3-a0e8-9e6f6e0db15b/ascreenshot.jpeg?tl_px=1411,622\&br_px=2940,1477\&force_format=jpeg\&q=100\&width=1120.0\&wat=1\&wat_opacity=0.7\&wat_gravity=northwest\&wat_url=https://colony-recorder.s3.us-west-1.amazonaws.com/images/watermarks/FB923C_standard.png\&wat_pad=914,277)


# Create Incident Manually

## Create an Incident

Pagerly provides

1\. Navigate to [https://workspace.pagerly.io/incidents](https://pagerly-git-feat-escalation-kritik-kapoors-projects.vercel.app/incidents)

![](https://ajeuwbhvhr.cloudimg.io/https://colony-recorder.s3.amazonaws.com/files/2025-07-31/876c35a6-aae4-4103-b17f-76b0b2486aab/ascreenshot.jpeg?tl_px=0,572\&br_px=1250,1271\&force_format=jpeg\&q=100\&width=1120.0\&wat=1\&wat_opacity=0.7\&wat_gravity=northwest\&wat_url=https://colony-recorder.s3.us-west-1.amazonaws.com/images/watermarks/FB923C_standard.png\&wat_pad=293,277)

2\. Click "Add Incident"

![](https://ajeuwbhvhr.cloudimg.io/https://colony-recorder.s3.amazonaws.com/files/2025-07-31/d6d10466-9acf-4a4a-a644-6395fc9c3c70/ascreenshot.jpeg?tl_px=1411,0\&br_px=2940,854\&force_format=jpeg\&q=100\&width=1120.0\&wat=1\&wat_opacity=0.7\&wat_gravity=northwest\&wat_url=https://colony-recorder.s3.us-west-1.amazonaws.com/images/watermarks/FB923C_standard.png\&wat_pad=897,147)

3\. 1. Add incident title. 2. Add incident description. 3. Select the team responsible for handling the incident. 4. Set incident severity (SEV 1 -> Least, SEV 2 -> Medium and SEV 3 -> Highest). 5. Select the checkbox to automatically assign the incident to the current oncall user, or else assign it to a specific user. 6. Click "Create Incident"

![](https://ajeuwbhvhr.cloudimg.io/https://colony-recorder.s3.amazonaws.com/files/2025-07-31/14f63dfd-71f5-4373-bc33-c6299919cef4/ascreenshot.jpeg?tl_px=962,38\&br_px=2928,1137\&force_format=jpeg\&q=100\&width=1120.0\&wat=1\&wat_opacity=0.7\&wat_gravity=northwest\&wat_url=https://colony-recorder.s3.us-west-1.amazonaws.com/images/watermarks/FB923C_standard.png\&wat_pad=778,570)

4\. Incident added successfully!

![](https://ajeuwbhvhr.cloudimg.io/https://colony-recorder.s3.amazonaws.com/files/2025-07-31/ca6402aa-0431-4d19-9ec4-190b64d99e6b/ascreenshot.jpeg?tl_px=504,0\&br_px=2470,1098\&force_format=jpeg\&q=100\&width=1120.0\&wat=1\&wat_opacity=0.7\&wat_gravity=northwest\&wat_url=https://colony-recorder.s3.us-west-1.amazonaws.com/images/watermarks/FB923C_standard.png\&wat_pad=279,269)


# Update Incident

This section how one can update incident manually in pagerly

##

1\. Navigate to [https://workspace.pagerly.io/incidents](https://pagerly-git-feat-escalation-kritik-kapoors-projects.vercel.app/incidents)

![](https://ajeuwbhvhr.cloudimg.io/https://colony-recorder.s3.amazonaws.com/files/2025-07-31/7eb7ca1a-4d3c-45c7-8992-006cfda5fc42/ascreenshot.jpeg?tl_px=0,584\&br_px=1250,1283\&force_format=jpeg\&q=100\&width=1120.0\&wat=1\&wat_opacity=0.7\&wat_gravity=northwest\&wat_url=https://colony-recorder.s3.us-west-1.amazonaws.com/images/watermarks/FB923C_standard.png\&wat_pad=257,277)

2\. Select the incident you want to add an update to.

![](https://ajeuwbhvhr.cloudimg.io/https://colony-recorder.s3.amazonaws.com/files/2025-07-31/9c7a11b6-c789-4d40-af48-078618246f69/ascreenshot.jpeg?tl_px=416,159\&br_px=1945,1014\&force_format=jpeg\&q=100\&width=1120.0\&wat=1\&wat_opacity=0.7\&wat_gravity=northwest\&wat_url=https://colony-recorder.s3.us-west-1.amazonaws.com/images/watermarks/FB923C_standard.png\&wat_pad=470,298)

3\. To update the incident title, click the "Update icon".

![](https://ajeuwbhvhr.cloudimg.io/https://colony-recorder.s3.amazonaws.com/files/2025-07-31/4f8712fc-a6f2-4896-811f-1b0cb9c16bdc/ascreenshot.jpeg?tl_px=292,72\&br_px=1821,927\&force_format=jpeg\&q=100\&width=1120.0\&wat=1\&wat_opacity=0.7\&wat_gravity=northwest\&wat_url=https://colony-recorder.s3.us-west-1.amazonaws.com/images/watermarks/FB923C_standard.png\&wat_pad=375,208)

4\. 1. To update a field, click the "Update" icon.

2. Update the value.
3. Click the "Tick" icon to successfully update the field or click "Cancel" to stop updating and revert to the original value.\
   \
   **Example:**\
   Update the title and click the "Tick" icon. Click "Cancel" if you want to cancel the update.

![](https://ajeuwbhvhr.cloudimg.io/https://colony-recorder.s3.amazonaws.com/files/2025-07-31/2ff61543-b651-48c4-8c40-610c10bf02bd/ascreenshot.jpeg?tl_px=292,183\&br_px=1820,1038\&force_format=jpeg\&q=100\&width=1120.0\&wat=1\&wat_opacity=0.7\&wat_gravity=northwest\&wat_url=https://colony-recorder.s3.us-west-1.amazonaws.com/images/watermarks/FB923C_standard.png\&wat_pad=315,100)

5\. Title updated successfully!

![](https://ajeuwbhvhr.cloudimg.io/https://colony-recorder.s3.amazonaws.com/files/2025-07-31/857c0a9c-4521-49d2-8d25-3c9ca72a9971/ascreenshot.jpeg?tl_px=432,28\&br_px=1961,883\&force_format=jpeg\&q=100\&width=1120.0\&wat=1\&wat_opacity=0.7\&wat_gravity=northwest\&wat_url=https://colony-recorder.s3.us-west-1.amazonaws.com/images/watermarks/FB923C_standard.png\&wat_pad=232,283)

6\. Update incident status.

![](https://ajeuwbhvhr.cloudimg.io/https://colony-recorder.s3.amazonaws.com/files/2025-07-31/d30a4439-24f8-451b-b940-196ea58b2e5a/ascreenshot.jpeg?tl_px=1406,171\&br_px=2935,1026\&force_format=jpeg\&q=100\&width=1120.0\&wat=1\&wat_opacity=0.7\&wat_gravity=northwest\&wat_url=https://colony-recorder.s3.us-west-1.amazonaws.com/images/watermarks/FB923C_standard.png\&wat_pad=523,277)

7\. Update team.

![](https://ajeuwbhvhr.cloudimg.io/https://colony-recorder.s3.amazonaws.com/files/2025-07-31/4ba0a919-139d-4580-8a55-9746e126fcaf/ascreenshot.jpeg?tl_px=386,198\&br_px=1915,1053\&force_format=jpeg\&q=100\&width=1120.0\&wat=1\&wat_opacity=0.7\&wat_gravity=northwest\&wat_url=https://colony-recorder.s3.us-west-1.amazonaws.com/images/watermarks/FB923C_standard.png\&wat_pad=189,314)

8\. Update severity.

![](https://ajeuwbhvhr.cloudimg.io/https://colony-recorder.s3.amazonaws.com/files/2025-07-31/abf3c472-18be-4ae5-bb48-c01731f7f31e/ascreenshot.jpeg?tl_px=481,277\&br_px=2447,1376\&force_format=jpeg\&q=100\&width=1120.0\&wat=1\&wat_opacity=0.7\&wat_gravity=northwest\&wat_url=https://colony-recorder.s3.us-west-1.amazonaws.com/images/watermarks/FB923C_standard.png\&wat_pad=665,307)

9\. Update the incident description.

![](https://ajeuwbhvhr.cloudimg.io/https://colony-recorder.s3.amazonaws.com/files/2025-07-31/40b030fb-f1bb-455d-8a98-b9d0004dc26f/ascreenshot.jpeg?tl_px=308,250\&br_px=2274,1349\&force_format=jpeg\&q=100\&width=1120.0\&wat=1\&wat_opacity=0.7\&wat_gravity=northwest\&wat_url=https://colony-recorder.s3.us-west-1.amazonaws.com/images/watermarks/FB923C_standard.png\&wat_pad=315,278)

10\. Page a user:

1. Search and select the user for paging.
2. Click the "Tick" icon.

![](https://ajeuwbhvhr.cloudimg.io/https://colony-recorder.s3.amazonaws.com/files/2025-07-31/7ba998dd-ef66-4745-ae36-0a3c9c12d829/ascreenshot.jpeg?tl_px=354,309\&br_px=2320,1408\&force_format=jpeg\&q=100\&width=1120.0\&wat=1\&wat_opacity=0.7\&wat_gravity=northwest\&wat_url=https://colony-recorder.s3.us-west-1.amazonaws.com/images/watermarks/FB923C_standard.png\&wat_pad=270,296)

11\. Click the "Page now" button to page the user immediately.\
Note: The User will receive a phone call.

![](https://ajeuwbhvhr.cloudimg.io/https://colony-recorder.s3.amazonaws.com/files/2025-07-31/e08ecb23-34be-4a50-9de2-db2cea4657c9/ascreenshot.jpeg?tl_px=359,336\&br_px=1888,1190\&force_format=jpeg\&q=100\&width=1120.0\&wat=1\&wat_opacity=0.7\&wat_gravity=northwest\&wat_url=https://colony-recorder.s3.us-west-1.amazonaws.com/images/watermarks/FB923C_standard.png\&wat_pad=346,399)

12\. User paged successfully!

![](https://ajeuwbhvhr.cloudimg.io/https://colony-recorder.s3.amazonaws.com/files/2025-07-31/e425cc4c-db94-4fec-ae40-4d52040163e6/ascreenshot.jpeg?tl_px=1411,739\&br_px=2940,1593\&force_format=jpeg\&q=100\&width=1120.0\&wat=1\&wat_opacity=0.7\&wat_gravity=northwest\&wat_url=https://colony-recorder.s3.us-west-1.amazonaws.com/images/watermarks/FB923C_standard.png\&wat_pad=725,425)

13\. Updating assigned user.

![](https://ajeuwbhvhr.cloudimg.io/https://colony-recorder.s3.amazonaws.com/files/2025-07-31/14494f91-c3a7-4408-92e0-28d06fc89463/ascreenshot.jpeg?tl_px=1411,288\&br_px=2940,1142\&force_format=jpeg\&q=100\&width=1120.0\&wat=1\&wat_opacity=0.7\&wat_gravity=northwest\&wat_url=https://colony-recorder.s3.us-west-1.amazonaws.com/images/watermarks/FB923C_standard.png\&wat_pad=838,296)

14\. Add a new comment and click "Save".

![](https://ajeuwbhvhr.cloudimg.io/https://colony-recorder.s3.amazonaws.com/files/2025-07-31/54281480-b2f0-4fe6-bcf9-2693b9d90dff/ascreenshot.jpeg?tl_px=437,333\&br_px=2402,1432\&force_format=jpeg\&q=100\&width=1120.0\&wat=1\&wat_opacity=0.7\&wat_gravity=northwest\&wat_url=https://colony-recorder.s3.us-west-1.amazonaws.com/images/watermarks/FB923C_standard.png\&wat_pad=939,220)

15\. Comment added successfully!

![](https://ajeuwbhvhr.cloudimg.io/https://colony-recorder.s3.amazonaws.com/files/2025-07-31/95378d5b-728e-4151-83bb-9c723b9fbc27/ascreenshot.jpeg?tl_px=0,55\&br_px=2752,1594\&force_format=jpeg\&q=100\&width=1120.0\&wat=1\&wat_opacity=0.7\&wat_gravity=northwest\&wat_url=https://colony-recorder.s3.us-west-1.amazonaws.com/images/watermarks/FB923C_standard.png\&wat_pad=486,532)


# Receive Calls in Do Not Disturb

## Always Receive Pagerly Calls (Even on Silent or Do Not Disturb)

This is the **Pagerly number for paging**:\
📞 **+1 (175) 546-9561**

We’re launching the **Pagerly app** soon 🎉.\
Until then, you can make sure you **never miss a Pagerly call** by setting this number to always ring.

***

### 📱 iPhone Setup

#### Step 0: Create a Contact for Pagerly

1. Open the **Phone app** → go to **Contacts**.
2. Tap **+** to add a new contact.
3. Enter the name **Pagerly** and the number **+1 (175) 546-9561**.
4. Save the contact.

***

#### Step 1: Add Pagerly to Favorites

1. Open **Phone → Contacts**.
2. Select the **Pagerly** contact you just created.
3. Tap **Add to Favorites**.

***

#### Step 2: Enable Emergency Bypass

1. In the **Pagerly** contact, tap **Edit** → **Ringtone**.
2. Toggle **Emergency Bypass ON**.
3. Tap **Done** to save.

> ✅ Pagerly calls will always ring — even if your iPhone is on Silent, Do Not Disturb, or in a Focus mode.

***

### 🤖 Android Setup

#### Step 0: Create a Contact for Pagerly

1. Open the **Phone app** → go to **Contacts**.
2. Tap **+** to add a new contact.
3. Enter the name **Pagerly** and the number **+1 (175) 546-9561**.
4. Save the contact.

***

#### Step 1: Mark Pagerly as a Starred Contact

1. Open **Contacts**.
2. Select **Pagerly**.
3. Tap the **star icon** ⭐ to add it to your **Favorites**.

***

#### Step 2: Allow Calls from Favorites in Do Not Disturb

1. Open **Settings → Notifications → Do Not Disturb** (path may vary by phone).
2. Under **Exceptions / Allowed Contacts**, choose **Favorites** (or **Starred contacts**).
3. Make sure calls from Favorites are set to **Allow**.

***

#### Step 3: (Optional) Set Custom Ringtone

1. In the **Pagerly** contact → tap **Edit**.
2. Set a **unique ringtone** so you instantly recognize Pagerly calls.

> ✅ Now Pagerly calls will bypass Do Not Disturb and ring every time.


# Integrations

Pagerly supports incoming integrations with popular observability and monitoring tools. These integrations allow you to automatically create incidents in Pagerly when alerts fire in your monitoring systems.

## Supported Integrations

| Integration                                                                         | Description                                                                  |
| ----------------------------------------------------------------------------------- | ---------------------------------------------------------------------------- |
| [AWS CloudWatch](/incidents-and-alerting/integrations/aws-cloudwatch)               | Receive alerts from AWS CloudWatch alarms and automatically create incidents |
| [Grafana](/incidents-and-alerting/integrations/grafana)                             | Integrate with Grafana alerting to create incidents from alert notifications |
| [Datadog](/incidents-and-alerting/integrations/datadog)                             | Connect Datadog monitors and receive webhook notifications as incidents      |
| [Sentry](/incidents-and-alerting/integrations/sentry)                               | Automatically create incidents from Sentry error and performance alerts      |
| [Prometheus](/incidents-and-alerting/integrations/prometheus)                       | Receive Prometheus Alertmanager alerts as incidents                          |
| [Elastic Observability](/incidents-and-alerting/integrations/elastic-observability) | Create incidents from Elastic alerting rules via webhook connectors          |
| [CubeAPM](/incidents-and-alerting/integrations/cubeapm)                             | Receive alerts from CubeAPM and automatically create incidents               |

## Getting Started

1. [Add an Incoming Integration](/incidents-and-alerting/integrations/add-incoming-integration) — Learn how to create an inbound integration in Pagerly
2. [Incoming Integration Payload](/incidents-and-alerting/integrations/incoming-integration-payload) — Configure payload mapping for your integrations
3. Choose your monitoring tool from the list above and follow the step-by-step setup guide

For more integrations or custom integration requests, reach out to us at <hello@pagerly.io>.


# Add Incoming Integration

## Add Incoming Integration to automatically create incident with your favourite observability tools

1\. Navigate to [https://workspace.pagerly.io/inbound](https://pagerly-git-feat-escalation-kritik-kapoors-projects.vercel.app/inbound)

![](https://ajeuwbhvhr.cloudimg.io/https://colony-recorder.s3.amazonaws.com/files/2025-07-31/ac8cb620-bcda-494b-9c42-e5cf63c91027/ascreenshot.jpeg?tl_px=0,0\&br_px=1528,854\&force_format=jpeg\&q=100\&width=1120.0\&wat=1\&wat_opacity=0.7\&wat_gravity=northwest\&wat_url=https://colony-recorder.s3.us-west-1.amazonaws.com/images/watermarks/FB923C_standard.png\&wat_pad=195,321)

2\. Click "Add Inbound Integration"

![](https://ajeuwbhvhr.cloudimg.io/https://colony-recorder.s3.amazonaws.com/files/2025-07-31/e60cdc6d-09e7-4594-8adf-681e1978e245/ascreenshot.jpeg?tl_px=1411,0\&br_px=2940,854\&force_format=jpeg\&q=100\&width=1120.0\&wat=1\&wat_opacity=0.7\&wat_gravity=northwest\&wat_url=https://colony-recorder.s3.us-west-1.amazonaws.com/images/watermarks/FB923C_standard.png\&wat_pad=807,155)

3\. 1. Integration display name. 2. Select the team for this integration. 3. Choose Integration. 4. Click the "Add Integration" button.

![](https://ajeuwbhvhr.cloudimg.io/https://colony-recorder.s3.amazonaws.com/files/2025-07-31/4ce4a199-2dce-4633-8a35-35547ef2185a/ascreenshot.jpeg?tl_px=94,55\&br_px=2847,1594\&force_format=jpeg\&q=100\&width=1120.0\&wat=1\&wat_opacity=0.7\&wat_gravity=northwest\&wat_url=https://colony-recorder.s3.us-west-1.amazonaws.com/images/watermarks/FB923C_standard.png\&wat_pad=524,443)

4\. Integration added successfully!

![](https://ajeuwbhvhr.cloudimg.io/https://colony-recorder.s3.amazonaws.com/files/2025-07-31/f5872e07-a1b6-4e33-a9cd-ccc1ee93fa6e/ascreenshot.jpeg?tl_px=404,164\&br_px=1933,1019\&force_format=jpeg\&q=100\&width=1120.0\&wat=1\&wat_opacity=0.7\&wat_gravity=northwest\&wat_url=https://colony-recorder.s3.us-west-1.amazonaws.com/images/watermarks/FB923C_standard.png\&wat_pad=174,519)


# Incoming Integration Payload

## Payload Mapping

1\. Navigate to [https://workspace.pagerly.io/inbound](https://pagerly-git-feat-escalation-kritik-kapoors-projects.vercel.app/inbound)

![](https://ajeuwbhvhr.cloudimg.io/https://colony-recorder.s3.amazonaws.com/files/2025-08-01/18580f83-0a41-4947-ae30-d8dcf779b0ff/ascreenshot.jpeg?tl_px=0,0\&br_px=1528,854\&force_format=jpeg\&q=100\&width=1120.0\&wat=1\&wat_opacity=0.7\&wat_gravity=northwest\&wat_url=https://colony-recorder.s3.us-west-1.amazonaws.com/images/watermarks/FB923C_standard.png\&wat_pad=219,333)

2\. Select the added integration you want to update.

![](https://ajeuwbhvhr.cloudimg.io/https://colony-recorder.s3.amazonaws.com/files/2025-08-01/e8dbbf52-a450-473a-8796-35c34f634310/ascreenshot.jpeg?tl_px=411,0\&br_px=1940,854\&force_format=jpeg\&q=100\&width=1120.0\&wat=1\&wat_opacity=0.7\&wat_gravity=northwest\&wat_url=https://colony-recorder.s3.us-west-1.amazonaws.com/images/watermarks/FB923C_standard.png\&wat_pad=318,372)

3\. Click "PAYLOAD MAPPING"

![](https://ajeuwbhvhr.cloudimg.io/https://colony-recorder.s3.amazonaws.com/files/2025-08-01/ae1835e0-62fa-42ea-b0f8-d445d88f2afd/ascreenshot.jpeg?tl_px=447,0\&br_px=1976,854\&force_format=jpeg\&q=100\&width=1120.0\&wat=1\&wat_opacity=0.7\&wat_gravity=northwest\&wat_url=https://colony-recorder.s3.us-west-1.amazonaws.com/images/watermarks/FB923C_standard.png\&wat_pad=366,331)

4\. You can review the payloads that Pagerly received from the integration to use them as a template or example for your attribute mapping.

![](https://ajeuwbhvhr.cloudimg.io/https://colony-recorder.s3.amazonaws.com/files/2025-08-01/250fae69-5e92-402d-9fcc-73866641cd0f/ascreenshot.jpeg?tl_px=187,0\&br_px=2940,1538\&force_format=jpeg\&q=100\&width=1120.0\&wat=1\&wat_opacity=0.7\&wat_gravity=northwest\&wat_url=https://colony-recorder.s3.us-west-1.amazonaws.com/images/watermarks/FB923C_standard.png\&wat_pad=532,199)

5\. Below you can find the mapping component that maps the payload to a Pagerly incident.

![](https://ajeuwbhvhr.cloudimg.io/https://colony-recorder.s3.amazonaws.com/files/2025-08-01/1fcec2b0-1e91-41fb-8db2-68d4003f5cb0/ascreenshot.jpeg?tl_px=409,495\&br_px=2375,1594\&force_format=jpeg\&q=100\&width=1120.0\&wat=1\&wat_opacity=0.7\&wat_gravity=northwest\&wat_url=https://colony-recorder.s3.us-west-1.amazonaws.com/images/watermarks/FB923C_standard.png\&wat_pad=724,376)

6\. Click "Edit"

![](https://ajeuwbhvhr.cloudimg.io/https://colony-recorder.s3.amazonaws.com/files/2025-08-01/81ab71d6-3364-49a1-aac8-530bd5264fc7/ascreenshot.jpeg?tl_px=188,55\&br_px=2940,1594\&force_format=jpeg\&q=100\&width=1120.0\&wat=1\&wat_opacity=0.7\&wat_gravity=northwest\&wat_url=https://colony-recorder.s3.us-west-1.amazonaws.com/images/watermarks/FB923C_standard.png\&wat_pad=973,428)

7\. Update the source field to which the attribute will point.\
**Note:** If you set the source field as "No Source", then the attribute will point to the mapping value by default.

![](https://ajeuwbhvhr.cloudimg.io/https://colony-recorder.s3.amazonaws.com/files/2025-08-01/5695b1a1-1e42-4554-ad8e-806b6e7f50cd/ascreenshot.jpeg?tl_px=974,0\&br_px=2940,1098\&force_format=jpeg\&q=100\&width=1120.0\&wat=1\&wat_opacity=0.7\&wat_gravity=northwest\&wat_url=https://colony-recorder.s3.us-west-1.amazonaws.com/images/watermarks/FB923C_standard.png\&wat_pad=634,325)

8\. Click "Add Mapping"

![](https://ajeuwbhvhr.cloudimg.io/https://colony-recorder.s3.amazonaws.com/files/2025-08-01/a348cdf7-ea31-4c65-84f0-b2c579d7cd78/ascreenshot.jpeg?tl_px=188,55\&br_px=2940,1594\&force_format=jpeg\&q=100\&width=1120.0\&wat=1\&wat_opacity=0.7\&wat_gravity=northwest\&wat_url=https://colony-recorder.s3.us-west-1.amazonaws.com/images/watermarks/FB923C_standard.png\&wat_pad=586,320)

9\. Click the "Add Mapping" button to add a new key-value pair.

![](https://ajeuwbhvhr.cloudimg.io/https://colony-recorder.s3.amazonaws.com/files/2025-08-01/eabce5b3-851a-45f6-be2f-48f9de7d0e28/ascreenshot.jpeg?tl_px=974,0\&br_px=2940,1098\&force_format=jpeg\&q=100\&width=1120.0\&wat=1\&wat_opacity=0.7\&wat_gravity=northwest\&wat_url=https://colony-recorder.s3.us-west-1.amazonaws.com/images/watermarks/FB923C_standard.png\&wat_pad=535,464)

10\. Example: Added key: P6 and value: SEV3

![](https://ajeuwbhvhr.cloudimg.io/https://colony-recorder.s3.amazonaws.com/files/2025-08-01/15e16678-4b08-46c3-a0e8-202af440ec3c/ascreenshot.jpeg?tl_px=974,287\&br_px=2940,1386\&force_format=jpeg\&q=100\&width=1120.0\&wat=1\&wat_opacity=0.7\&wat_gravity=northwest\&wat_url=https://colony-recorder.s3.us-west-1.amazonaws.com/images/watermarks/FB923C_standard.png\&wat_pad=568,421)

11\. You can also update the fallback value.

![](https://ajeuwbhvhr.cloudimg.io/https://colony-recorder.s3.amazonaws.com/files/2025-08-01/26009cae-9107-48ac-931a-96652c9f787b/ascreenshot.jpeg?tl_px=974,495\&br_px=2940,1594\&force_format=jpeg\&q=100\&width=1120.0\&wat=1\&wat_opacity=0.7\&wat_gravity=northwest\&wat_url=https://colony-recorder.s3.us-west-1.amazonaws.com/images/watermarks/FB923C_standard.png\&wat_pad=750,337)

12\. Mapping field updated successfully!

![](https://ajeuwbhvhr.cloudimg.io/https://colony-recorder.s3.amazonaws.com/files/2025-08-01/633fb747-c3de-4adb-8a07-81fd96703d36/ascreenshot.jpeg?tl_px=188,55\&br_px=2940,1594\&force_format=jpeg\&q=100\&width=1120.0\&wat=1\&wat_opacity=0.7\&wat_gravity=northwest\&wat_url=https://colony-recorder.s3.us-west-1.amazonaws.com/images/watermarks/FB923C_standard.png\&wat_pad=556,407)

13\. Some attribute fields, such as `link`, `description`, and `title`, are string-based values rather than key-value pairs.\
**Note:** When the New source field is set to 'No Source', then 'Fallback value' is required.

![](https://ajeuwbhvhr.cloudimg.io/https://colony-recorder.s3.amazonaws.com/files/2025-08-01/466687fb-1b8d-466f-9675-813bb8374d04/ascreenshot.jpeg?tl_px=543,288\&br_px=2509,1386\&force_format=jpeg\&q=100\&width=1120.0\&wat=1\&wat_opacity=0.7\&wat_gravity=northwest\&wat_url=https://colony-recorder.s3.us-west-1.amazonaws.com/images/watermarks/FB923C_standard.png\&wat_pad=641,363)

14\. Example: Source set to 'No Source' and fallback value is added.

![](https://ajeuwbhvhr.cloudimg.io/https://colony-recorder.s3.amazonaws.com/files/2025-08-01/6b6bc178-6d88-4de7-87f5-857c3d17700a/ascreenshot.jpeg?tl_px=448,418\&br_px=2414,1517\&force_format=jpeg\&q=100\&width=1120.0\&wat=1\&wat_opacity=0.7\&wat_gravity=northwest\&wat_url=https://colony-recorder.s3.us-west-1.amazonaws.com/images/watermarks/FB923C_standard.png\&wat_pad=869,406)

### Automatic Incident Creation with Observability Tools

Following Integrations are supported by Pagerly for automatically creating incidents

* [AWS Cloudwatch](/incidents-and-alerting/integrations/aws-cloudwatch)
* [Grafana](/incidents-and-alerting/integrations/grafana)
* [Datadog](/incidents-and-alerting/integrations/datadog)
* [Sentry](/incidents-and-alerting/integrations/sentry)
* [Prometheus](/incidents-and-alerting/integrations/prometheus)

For more , reach out to us <hello@pagerly.io>.


# AWS Cloudwatch

### Create an integration and generate the webhook

1\. Navigate to [https://workspace.pagerly.io/inbound](https://pagerly-git-feat-escalation-kritik-kapoors-projects.vercel.app/inbound)

![](https://ajeuwbhvhr.cloudimg.io/https://colony-recorder.s3.amazonaws.com/files/2025-07-31/322f403e-62b8-47fa-b0cf-82582c562597/ascreenshot.jpeg?tl_px=0,0\&br_px=1528,854\&force_format=jpeg\&q=100\&width=1120.0\&wat=1\&wat_opacity=0.7\&wat_gravity=northwest\&wat_url=https://colony-recorder.s3.us-west-1.amazonaws.com/images/watermarks/FB923C_standard.png\&wat_pad=219,328)

2\. Click "Add Inbound Integration"

![](https://ajeuwbhvhr.cloudimg.io/https://colony-recorder.s3.amazonaws.com/files/2025-07-31/da2c5501-86cf-4451-b8d6-150107513a60/ascreenshot.jpeg?tl_px=1411,0\&br_px=2940,854\&force_format=jpeg\&q=100\&width=1120.0\&wat=1\&wat_opacity=0.7\&wat_gravity=northwest\&wat_url=https://colony-recorder.s3.us-west-1.amazonaws.com/images/watermarks/FB923C_standard.png\&wat_pad=881,128)

3\. 1. Set the display name for integration. 2. Select the team for this integration. 3. Select **"AWS Cloud Watch"** as Integration. 4. Click the "Add Integration" button.

![](https://ajeuwbhvhr.cloudimg.io/https://colony-recorder.s3.amazonaws.com/files/2025-07-31/577940d4-ebe6-4769-b6f0-6ec3dee050a2/ascreenshot.jpeg?tl_px=600,301\&br_px=2566,1400\&force_format=jpeg\&q=100\&width=1120.0\&wat=1\&wat_opacity=0.7\&wat_gravity=northwest\&wat_url=https://colony-recorder.s3.us-west-1.amazonaws.com/images/watermarks/FB923C_standard.png\&wat_pad=559,407)

4\. Integration added successfully!

![](https://ajeuwbhvhr.cloudimg.io/https://colony-recorder.s3.amazonaws.com/files/2025-07-31/e47b6326-1b6e-47c9-bc52-b972c2ff3191/ascreenshot.jpeg?tl_px=355,587\&br_px=1884,1441\&force_format=jpeg\&q=100\&width=1120.0\&wat=1\&wat_opacity=0.7\&wat_gravity=northwest\&wat_url=https://colony-recorder.s3.us-west-1.amazonaws.com/images/watermarks/FB923C_standard.png\&wat_pad=346,141)

5\. To update the display name, click the edit (Pen) icon.

![](https://ajeuwbhvhr.cloudimg.io/https://colony-recorder.s3.amazonaws.com/files/2025-07-31/d52eb111-1e49-4cd1-aa01-6b48ac6c4f58/ascreenshot.jpeg?tl_px=371,144\&br_px=1900,998\&force_format=jpeg\&q=100\&width=1120.0\&wat=1\&wat_opacity=0.7\&wat_gravity=northwest\&wat_url=https://colony-recorder.s3.us-west-1.amazonaws.com/images/watermarks/FB923C_standard.png\&wat_pad=310,324)

6\. Edit the Display Name, then click the tick icon to save your changes.

![](https://ajeuwbhvhr.cloudimg.io/https://colony-recorder.s3.amazonaws.com/files/2025-07-31/1c25b9ca-9974-44ff-9462-c1baf8fd747f/ascreenshot.jpeg?tl_px=329,125\&br_px=1858,980\&force_format=jpeg\&q=100\&width=1120.0\&wat=1\&wat_opacity=0.7\&wat_gravity=northwest\&wat_url=https://colony-recorder.s3.us-west-1.amazonaws.com/images/watermarks/FB923C_standard.png\&wat_pad=432,333)

7\. Generated the **Pagerly** webhook for **"AWS Cloud Watch"** integration.

![](https://ajeuwbhvhr.cloudimg.io/https://colony-recorder.s3.amazonaws.com/files/2025-07-31/068b82d7-bbf7-4e08-924d-628c8eb149ff/ascreenshot.jpeg?tl_px=497,466\&br_px=2026,1320\&force_format=jpeg\&q=100\&width=1120.0\&wat=1\&wat_opacity=0.7\&wat_gravity=northwest\&wat_url=https://colony-recorder.s3.us-west-1.amazonaws.com/images/watermarks/FB923C_standard.png\&wat_pad=595,223)

### Configure AWS CloudWatch Alarm to create an incident

\
Integrate Pagerly with AWS CloudWatch Alarms

1\. In a new tab, navigate to <https://aws.amazon.com/>

2\. Click "Create topic"

![](https://ajeuwbhvhr.cloudimg.io/https://colony-recorder.s3.amazonaws.com/files/2025-08-02/90f47946-4f3c-4f01-a2b9-d5fe43260a8a/ascreenshot.jpeg?tl_px=0,0\&br_px=2266,1266\&force_format=jpeg\&q=100\&width=1120.0\&wat=1\&wat_opacity=0.7\&wat_gravity=northwest\&wat_url=https://colony-recorder.s3.us-west-1.amazonaws.com/images/watermarks/FB923C_standard.png\&wat_pad=984,177)

3\. Click "StandardBest-effort message orderingAt-least once message deliverySubscription protocols: SQS, Lambda, Data Firehose, HTTP, SMS, email, mobile a..."

![](https://ajeuwbhvhr.cloudimg.io/https://colony-recorder.s3.amazonaws.com/files/2025-08-02/344e0fc1-8aff-40df-b120-a47485ddb3a7/ascreenshot.jpeg?tl_px=0,119\&br_px=2266,1386\&force_format=jpeg\&q=100\&width=1120.0\&wat=1\&wat_opacity=0.7\&wat_gravity=northwest\&wat_url=https://colony-recorder.s3.us-west-1.amazonaws.com/images/watermarks/FB923C_standard.png\&wat_pad=550,277)

4\. Type "-cloudwatch"

5\. Click the "MyTopic" field.

![](https://ajeuwbhvhr.cloudimg.io/https://colony-recorder.s3.amazonaws.com/files/2025-08-02/e5102b61-5c99-48a4-96ed-7577f9aabf05/ascreenshot.jpeg?tl_px=0,379\&br_px=2266,1646\&force_format=jpeg\&q=100\&width=1120.0\&wat=1\&wat_opacity=0.7\&wat_gravity=northwest\&wat_url=https://colony-recorder.s3.us-west-1.amazonaws.com/images/watermarks/FB923C_standard.png\&wat_pad=196,331)

6\. Click "Create topic"

![](https://ajeuwbhvhr.cloudimg.io/https://colony-recorder.s3.amazonaws.com/files/2025-08-02/589b5d53-4eea-4bcd-bb7d-57802f95866a/ascreenshot.jpeg?tl_px=0,379\&br_px=2266,1646\&force_format=jpeg\&q=100\&width=1120.0\&wat=1\&wat_opacity=0.7\&wat_gravity=northwest\&wat_url=https://colony-recorder.s3.us-west-1.amazonaws.com/images/watermarks/FB923C_standard.png\&wat_pad=982,505)

7\. Click "Create subscription"

![](https://ajeuwbhvhr.cloudimg.io/https://colony-recorder.s3.amazonaws.com/files/2025-08-02/f22c288f-b3a2-4c44-bd37-88cec1481cf6/ascreenshot.jpeg?tl_px=0,379\&br_px=2266,1646\&force_format=jpeg\&q=100\&width=1120.0\&wat=1\&wat_opacity=0.7\&wat_gravity=northwest\&wat_url=https://colony-recorder.s3.us-west-1.amazonaws.com/images/watermarks/FB923C_standard.png\&wat_pad=938,279)

8\. select HTTPS Protocol

![](https://ajeuwbhvhr.cloudimg.io/https://colony-recorder.s3.amazonaws.com/files/2025-08-02/7b265d8d-52b0-4267-906b-efa5e5a9b1ea/ascreenshot.jpeg?tl_px=0,379\&br_px=2266,1646\&force_format=jpeg\&q=100\&width=1120.0\&wat=1\&wat_opacity=0.7\&wat_gravity=northwest\&wat_url=https://colony-recorder.s3.us-west-1.amazonaws.com/images/watermarks/FB923C_standard.png\&wat_pad=278,368)

9\. Double-click "<https://api.pagerly.io/webhook/pagerly/integ/eebaadef-8ee3-4a2a-a382-263ebfa47513>"

![](https://ajeuwbhvhr.cloudimg.io/https://colony-recorder.s3.amazonaws.com/files/2025-08-02/b0d2565f-cd99-48f3-a5b5-e58265d61e21/ascreenshot.jpeg?tl_px=0,366\&br_px=2266,1633\&force_format=jpeg\&q=100\&width=1120.0\&wat=1\&wat_opacity=0.7\&wat_gravity=northwest\&wat_url=https://colony-recorder.s3.us-west-1.amazonaws.com/images/watermarks/FB923C_standard.png\&wat_pad=421,277)

10\. Click "A web server that can receive notifications from Amazon SNS."

![](https://ajeuwbhvhr.cloudimg.io/https://colony-recorder.s3.amazonaws.com/files/2025-08-02/6b622438-1103-483e-aaaf-cf5baf4ab6aa/ascreenshot.jpeg?tl_px=0,289\&br_px=2266,1556\&force_format=jpeg\&q=100\&width=1120.0\&wat=1\&wat_opacity=0.7\&wat_gravity=northwest\&wat_url=https://colony-recorder.s3.us-west-1.amazonaws.com/images/watermarks/FB923C_standard.png\&wat_pad=822,277)

11\. Click "Create subscription"

![](https://ajeuwbhvhr.cloudimg.io/https://colony-recorder.s3.amazonaws.com/files/2025-08-02/8cdcf89a-8be6-4b72-ab2f-a1710dc197a1/ascreenshot.jpeg?tl_px=0,379\&br_px=2266,1646\&force_format=jpeg\&q=100\&width=1120.0\&wat=1\&wat_opacity=0.7\&wat_gravity=northwest\&wat_url=https://colony-recorder.s3.us-west-1.amazonaws.com/images/watermarks/FB923C_standard.png\&wat_pad=958,505)

12\. Click "CloudWatch"

![](https://ajeuwbhvhr.cloudimg.io/https://colony-recorder.s3.amazonaws.com/files/2025-08-02/6143fda9-4fb8-4153-8715-e7a0d9715901/ascreenshot.jpeg?tl_px=0,0\&br_px=2266,1266\&force_format=jpeg\&q=100\&width=1120.0\&wat=1\&wat_opacity=0.7\&wat_gravity=northwest\&wat_url=https://colony-recorder.s3.us-west-1.amazonaws.com/images/watermarks/FB923C_standard.png\&wat_pad=427,85)

13\. Click "All alarms"

![](https://ajeuwbhvhr.cloudimg.io/https://colony-recorder.s3.amazonaws.com/files/2025-08-02/7ad0d678-f8fc-4b85-9758-d33c4d46fdd0/ascreenshot.jpeg?tl_px=0,94\&br_px=2266,1361\&force_format=jpeg\&q=100\&width=1120.0\&wat=1\&wat_opacity=0.7\&wat_gravity=northwest\&wat_url=https://colony-recorder.s3.us-west-1.amazonaws.com/images/watermarks/FB923C_standard.png\&wat_pad=36,277)

14\. Click "test alarm"

![](https://ajeuwbhvhr.cloudimg.io/https://colony-recorder.s3.amazonaws.com/files/2025-08-02/e5097e84-966b-4166-b749-024ed0bdfb56/ascreenshot.jpeg?tl_px=0,250\&br_px=1754,1231\&force_format=jpeg\&q=100\&width=1120.0\&wat=1\&wat_opacity=0.7\&wat_gravity=northwest\&wat_url=https://colony-recorder.s3.us-west-1.amazonaws.com/images/watermarks/FB923C_standard.png\&wat_pad=409,277)

15\. Click "Actions"

![](https://ajeuwbhvhr.cloudimg.io/https://colony-recorder.s3.amazonaws.com/files/2025-08-02/d553956e-6e17-45c3-93c5-0aa31c937599/ascreenshot.jpeg?tl_px=511,0\&br_px=2265,980\&force_format=jpeg\&q=100\&width=1120.0\&wat=1\&wat_opacity=0.7\&wat_gravity=northwest\&wat_url=https://colony-recorder.s3.us-west-1.amazonaws.com/images/watermarks/FB923C_standard.png\&wat_pad=726,169)

16\. Click "Edit"

![](https://ajeuwbhvhr.cloudimg.io/https://colony-recorder.s3.amazonaws.com/files/2025-08-02/48f4adf3-95f0-41e7-b40d-75c1b1421bcf/ascreenshot.jpeg?tl_px=511,0\&br_px=2265,980\&force_format=jpeg\&q=100\&width=1120.0\&wat=1\&wat_opacity=0.7\&wat_gravity=northwest\&wat_url=https://colony-recorder.s3.us-west-1.amazonaws.com/images/watermarks/FB923C_standard.png\&wat_pad=743,200)

17\. Click the "Send a notification to…" field.

![](https://ajeuwbhvhr.cloudimg.io/https://colony-recorder.s3.amazonaws.com/files/2025-08-02/0560847c-4a74-4ea3-b26e-b7e0e5e34191/ascreenshot.jpeg?tl_px=0,379\&br_px=2266,1646\&force_format=jpeg\&q=100\&width=1120.0\&wat=1\&wat_opacity=0.7\&wat_gravity=northwest\&wat_url=https://colony-recorder.s3.us-west-1.amazonaws.com/images/watermarks/FB923C_standard.png\&wat_pad=437,313)

18\. Click "OK"

![](https://ajeuwbhvhr.cloudimg.io/https://colony-recorder.s3.amazonaws.com/files/2025-08-02/147de0b3-ecaf-4772-86c3-4cbce35adf77/ascreenshot.jpeg?tl_px=0,0\&br_px=2266,1267\&force_format=jpeg\&q=100\&width=1120.0\&wat=1\&wat_opacity=0.7\&wat_gravity=northwest\&wat_url=https://colony-recorder.s3.us-west-1.amazonaws.com/images/watermarks/FB923C_standard.png\&wat_pad=652,276)

19\. Click "Update alarm"

![](https://ajeuwbhvhr.cloudimg.io/https://colony-recorder.s3.amazonaws.com/files/2025-08-02/09ce67f9-872c-49de-be12-994b5a1e0307/ascreenshot.jpeg?tl_px=0,379\&br_px=2266,1646\&force_format=jpeg\&q=100\&width=1120.0\&wat=1\&wat_opacity=0.7\&wat_gravity=northwest\&wat_url=https://colony-recorder.s3.us-west-1.amazonaws.com/images/watermarks/FB923C_standard.png\&wat_pad=1012,494)


# Grafana

### Create an integration and generate the webhook

1\. Navigate to [https://workspace.pagerly.io/inbound](https://pagerly-git-feat-escalation-kritik-kapoors-projects.vercel.app/inbound)

![](https://ajeuwbhvhr.cloudimg.io/https://colony-recorder.s3.amazonaws.com/files/2025-07-31/ffa4ca42-795b-4a60-9240-9a61c4715d59/ascreenshot.jpeg?tl_px=0,60\&br_px=1528,915\&force_format=jpeg\&q=100\&width=1120.0\&wat=1\&wat_opacity=0.7\&wat_gravity=northwest\&wat_url=https://colony-recorder.s3.us-west-1.amazonaws.com/images/watermarks/FB923C_standard.png\&wat_pad=218,277)

2\. Click "Add Inbound Integration"

![](https://ajeuwbhvhr.cloudimg.io/https://colony-recorder.s3.amazonaws.com/files/2025-07-31/5400098b-106a-4c19-a6fd-684080da030e/ascreenshot.jpeg?tl_px=1411,0\&br_px=2940,854\&force_format=jpeg\&q=100\&width=1120.0\&wat=1\&wat_opacity=0.7\&wat_gravity=northwest\&wat_url=https://colony-recorder.s3.us-west-1.amazonaws.com/images/watermarks/FB923C_standard.png\&wat_pad=800,154)

3\. 1. Set the display name for integration. 2. Select the team for this integration. 3. Select **"Grafana"** as Integration. 4. Click the "Add Integration" button.

![](https://ajeuwbhvhr.cloudimg.io/https://colony-recorder.s3.amazonaws.com/files/2025-07-31/89b3175e-725f-43f7-bafa-e1831e91de7a/ascreenshot.jpeg?tl_px=624,284\&br_px=2589,1383\&force_format=jpeg\&q=100\&width=1120.0\&wat=1\&wat_opacity=0.7\&wat_gravity=northwest\&wat_url=https://colony-recorder.s3.us-west-1.amazonaws.com/images/watermarks/FB923C_standard.png\&wat_pad=545,441)

4\. Grafana integrated successfully!

![](https://ajeuwbhvhr.cloudimg.io/https://colony-recorder.s3.amazonaws.com/files/2025-07-31/3e8c4da4-030f-482b-a3b8-02d13a5b5e24/ascreenshot.jpeg?tl_px=441,0\&br_px=1970,854\&force_format=jpeg\&q=100\&width=1120.0\&wat=1\&wat_opacity=0.7\&wat_gravity=northwest\&wat_url=https://colony-recorder.s3.us-west-1.amazonaws.com/images/watermarks/FB923C_standard.png\&wat_pad=523,369)

5\. To update the display name, click the edit (Pen) icon.

![](https://ajeuwbhvhr.cloudimg.io/https://colony-recorder.s3.amazonaws.com/files/2025-07-31/954b393b-149a-4902-9450-83db865412ca/ascreenshot.jpeg?tl_px=468,163\&br_px=1997,1017\&force_format=jpeg\&q=100\&width=1120.0\&wat=1\&wat_opacity=0.7\&wat_gravity=northwest\&wat_url=https://colony-recorder.s3.us-west-1.amazonaws.com/images/watermarks/FB923C_standard.png\&wat_pad=240,309)

6\. Edit the Display Name, then click the tick icon to save your changes.

![](https://ajeuwbhvhr.cloudimg.io/https://colony-recorder.s3.amazonaws.com/files/2025-07-31/f5ce98d3-a2ca-4816-a73c-249a04c9eade/ascreenshot.jpeg?tl_px=386,130\&br_px=1915,985\&force_format=jpeg\&q=100\&width=1120.0\&wat=1\&wat_opacity=0.7\&wat_gravity=northwest\&wat_url=https://colony-recorder.s3.us-west-1.amazonaws.com/images/watermarks/FB923C_standard.png\&wat_pad=395,335)

7\. Generated the **Pagerly** webhook for **"Grafana"** integration.

![](https://ajeuwbhvhr.cloudimg.io/https://colony-recorder.s3.amazonaws.com/files/2025-07-31/932da2d7-7dd5-475e-a0d6-abae40f6316e/ascreenshot.jpeg?tl_px=494,443\&br_px=2023,1298\&force_format=jpeg\&q=100\&width=1120.0\&wat=1\&wat_opacity=0.7\&wat_gravity=northwest\&wat_url=https://colony-recorder.s3.us-west-1.amazonaws.com/images/watermarks/FB923C_standard.png\&wat_pad=774,299)

### Configure Grafana Alarm to create an incident

1\. Under **Alerting,** navigate to the **'Contact Points'** tab.

![](https://ajeuwbhvhr.cloudimg.io/https://colony-recorder.s3.amazonaws.com/files/2025-08-02/88e760c3-e571-4a6b-8013-394289ec783b/ascreenshot.jpeg?tl_px=0,660\&br_px=1528,1515\&force_format=jpeg\&q=100\&width=1120.0\&wat=1\&wat_opacity=0.7\&wat_gravity=northwest\&wat_url=https://colony-recorder.s3.us-west-1.amazonaws.com/images/watermarks/FB923C_standard.png\&wat_pad=193,276)

2\. Click "Create contact point"

![](https://ajeuwbhvhr.cloudimg.io/https://colony-recorder.s3.amazonaws.com/files/2025-08-02/348903f4-cb6f-4669-9115-6015f48f5541/ascreenshot.jpeg?tl_px=974,0\&br_px=2940,1098\&force_format=jpeg\&q=100\&width=1120.0\&wat=1\&wat_opacity=0.7\&wat_gravity=northwest\&wat_url=https://colony-recorder.s3.us-west-1.amazonaws.com/images/watermarks/FB923C_standard.png\&wat_pad=793,227)

3\. Copy the webhook URL for Grafana.

![](https://ajeuwbhvhr.cloudimg.io/https://colony-recorder.s3.amazonaws.com/files/2025-08-02/212c067e-67a6-4971-8778-a40ab79f36c6/ascreenshot.jpeg?tl_px=426,171\&br_px=2392,1270\&force_format=jpeg\&q=100\&width=1120.0\&wat=1\&wat_opacity=0.7\&wat_gravity=northwest\&wat_url=https://colony-recorder.s3.us-west-1.amazonaws.com/images/watermarks/FB923C_standard.png\&wat_pad=680,377)

4\. 1. Set a name for your contact point. 2. Set Integration as **webhook**. 3. Copy and paste the above webhook url in the URL field. 4. To save, click "Save contact point".

![](https://ajeuwbhvhr.cloudimg.io/https://colony-recorder.s3.amazonaws.com/files/2025-08-02/a45bd586-a7b1-43a9-95f4-4e87a8c0e7c5/ascreenshot.jpeg?tl_px=488,278\&br_px=2454,1377\&force_format=jpeg\&q=100\&width=1120.0\&wat=1\&wat_opacity=0.7\&wat_gravity=northwest\&wat_url=https://colony-recorder.s3.us-west-1.amazonaws.com/images/watermarks/FB923C_standard.png\&wat_pad=831,159)

5\. **Test contact point:**

1. Click "Test".
2. Click "Send test notification".

![](https://ajeuwbhvhr.cloudimg.io/https://colony-recorder.s3.amazonaws.com/files/2025-08-02/80f88d6f-4346-49b7-8616-a0eb17e5173d/ascreenshot.jpeg?tl_px=557,20\&br_px=2523,1119\&force_format=jpeg\&q=100\&width=1120.0\&wat=1\&wat_opacity=0.7\&wat_gravity=northwest\&wat_url=https://colony-recorder.s3.us-west-1.amazonaws.com/images/watermarks/FB923C_standard.png\&wat_pad=727,311)

6\. Under **Alerting,** navigate to the **"Notification policies"** tab.

![](https://ajeuwbhvhr.cloudimg.io/https://colony-recorder.s3.amazonaws.com/files/2025-08-02/d7757afa-153b-4130-bfc1-778c0e71048f/ascreenshot.jpeg?tl_px=0,495\&br_px=1965,1594\&force_format=jpeg\&q=100\&width=1120.0\&wat=1\&wat_opacity=0.7\&wat_gravity=northwest\&wat_url=https://colony-recorder.s3.us-west-1.amazonaws.com/images/watermarks/FB923C_standard.png\&wat_pad=141,334)

7\. **Updating Notifcation Policy:**

1. Select the newly created **'Pagerly webhook'** as the default contact point.
2. Click "Update default policy"

![](https://ajeuwbhvhr.cloudimg.io/https://colony-recorder.s3.amazonaws.com/files/2025-08-02/2013bc80-3ecc-4488-b657-783c642b5da4/ascreenshot.jpeg?tl_px=462,40\&br_px=2428,1139\&force_format=jpeg\&q=100\&width=1120.0\&wat=1\&wat_opacity=0.7\&wat_gravity=northwest\&wat_url=https://colony-recorder.s3.us-west-1.amazonaws.com/images/watermarks/FB923C_standard.png\&wat_pad=504,410)


# Datadog

### Create an integration and generate the webhook

1\. Navigate to [https://workspace.pagerly.io/inbound](https://pagerly-git-feat-escalation-kritik-kapoors-projects.vercel.app/inbound)

![](https://ajeuwbhvhr.cloudimg.io/https://colony-recorder.s3.amazonaws.com/files/2025-07-31/8882d51d-ef50-4577-9704-a8a796d90f5b/ascreenshot.jpeg?tl_px=0,5\&br_px=1528,860\&force_format=jpeg\&q=100\&width=1120.0\&wat=1\&wat_opacity=0.7\&wat_gravity=northwest\&wat_url=https://colony-recorder.s3.us-west-1.amazonaws.com/images/watermarks/FB923C_standard.png\&wat_pad=204,322)

2\. Click "Add Inbound Integration"

![](https://ajeuwbhvhr.cloudimg.io/https://colony-recorder.s3.amazonaws.com/files/2025-07-31/1579d1de-ba64-4e0f-b1e8-27edb9f5a3eb/ascreenshot.jpeg?tl_px=1689,0\&br_px=2940,699\&force_format=jpeg\&q=100\&width=1120.0\&wat=1\&wat_opacity=0.7\&wat_gravity=northwest\&wat_url=https://colony-recorder.s3.us-west-1.amazonaws.com/images/watermarks/FB923C_standard.png\&wat_pad=862,185)

3\. 1. Set the display name for integration. 2. Select the team for this integration. 3. Select **"Datadog"** as Integration. 4. Click the "Add Integration" button.

![](https://ajeuwbhvhr.cloudimg.io/https://colony-recorder.s3.amazonaws.com/files/2025-07-31/542deec5-16ed-4f62-a8a8-8d1976ce6078/ascreenshot.jpeg?tl_px=546,281\&br_px=2512,1380\&force_format=jpeg\&q=100\&width=1120.0\&wat=1\&wat_opacity=0.7\&wat_gravity=northwest\&wat_url=https://colony-recorder.s3.us-west-1.amazonaws.com/images/watermarks/FB923C_standard.png\&wat_pad=652,421)

4\. Datadog integrated successfully!

![](https://ajeuwbhvhr.cloudimg.io/https://colony-recorder.s3.amazonaws.com/files/2025-07-31/ac8b5407-faf8-455f-99e5-88fb52e39aa4/ascreenshot.jpeg?tl_px=0,0\&br_px=1965,1098\&force_format=jpeg\&q=100\&width=1120.0\&wat=1\&wat_opacity=0.7\&wat_gravity=northwest\&wat_url=https://colony-recorder.s3.us-west-1.amazonaws.com/images/watermarks/FB923C_standard.png\&wat_pad=450,434)

5\. To update the display name, click the edit (Pen) icon.

![](https://ajeuwbhvhr.cloudimg.io/https://colony-recorder.s3.amazonaws.com/files/2025-07-31/3ad8e95a-627b-4fb5-af0d-2e4ae6a01dad/ascreenshot.jpeg?tl_px=428,113\&br_px=1957,968\&force_format=jpeg\&q=100\&width=1120.0\&wat=1\&wat_opacity=0.7\&wat_gravity=northwest\&wat_url=https://colony-recorder.s3.us-west-1.amazonaws.com/images/watermarks/FB923C_standard.png\&wat_pad=258,358)

6\. Edit the Display Name, then click the tick icon to save your changes.

![](https://ajeuwbhvhr.cloudimg.io/https://colony-recorder.s3.amazonaws.com/files/2025-07-31/2ddd36cc-bae1-4d8f-b6e1-3f7951f7c7a4/ascreenshot.jpeg?tl_px=412,103\&br_px=1941,957\&force_format=jpeg\&q=100\&width=1120.0\&wat=1\&wat_opacity=0.7\&wat_gravity=northwest\&wat_url=https://colony-recorder.s3.us-west-1.amazonaws.com/images/watermarks/FB923C_standard.png\&wat_pad=380,360)

7\. Generated the **Pagerly** webhook for **"Datadog"** integration.

![](https://ajeuwbhvhr.cloudimg.io/https://colony-recorder.s3.amazonaws.com/files/2025-07-31/b282ab4a-3451-4501-9b76-02f9b70cb957/ascreenshot.jpeg?tl_px=524,475\&br_px=2053,1330\&force_format=jpeg\&q=100\&width=1120.0\&wat=1\&wat_opacity=0.7\&wat_gravity=northwest\&wat_url=https://colony-recorder.s3.us-west-1.amazonaws.com/images/watermarks/FB923C_standard.png\&wat_pad=864,268)

### Configure Datadog to create an incident

##

1\. Navigate to Integrations page -> <https://us5.datadoghq.com/integrations> 2. Install the **Webhooks** integration.

![](https://ajeuwbhvhr.cloudimg.io/https://colony-recorder.s3.amazonaws.com/files/2025-08-01/bc4568d5-0c8c-4c3c-af56-b3f867c61101/ascreenshot.jpeg?tl_px=0,187\&br_px=2182,1406\&force_format=jpeg\&q=100\&width=1120.0)

2\. Click "CONFIGURE"

![](https://ajeuwbhvhr.cloudimg.io/https://colony-recorder.s3.amazonaws.com/files/2025-08-01/0a13577c-af10-46a1-98c6-024aac2a954c/ascreenshot.jpeg?tl_px=0,374\&br_px=2182,1594\&force_format=jpeg\&q=100\&width=1120.0\&wat=1\&wat_opacity=0.7\&wat_gravity=northwest\&wat_url=https://colony-recorder.s3.us-west-1.amazonaws.com/images/watermarks/FB923C_standard.png\&wat_pad=275,286)

3\. Click the **"New Webhook"** button.

![](https://ajeuwbhvhr.cloudimg.io/https://colony-recorder.s3.amazonaws.com/files/2025-08-01/c02726be-2436-4fb3-84ae-7e62315aeb96/ascreenshot.jpeg?tl_px=0,374\&br_px=2182,1594\&force_format=jpeg\&q=100\&width=1120.0\&wat=1\&wat_opacity=0.7\&wat_gravity=northwest\&wat_url=https://colony-recorder.s3.us-west-1.amazonaws.com/images/watermarks/FB923C_standard.png\&wat_pad=874,386)

4\. Copy the webhook URL for Datadog.

![](https://ajeuwbhvhr.cloudimg.io/https://colony-recorder.s3.amazonaws.com/files/2025-08-01/a14aec8f-8d9c-4d85-9383-a75c4d3aa5be/ascreenshot.jpeg?tl_px=0,310\&br_px=2182,1529\&force_format=jpeg\&q=100\&width=1120.0\&wat=1\&wat_opacity=0.7\&wat_gravity=northwest\&wat_url=https://colony-recorder.s3.us-west-1.amazonaws.com/images/watermarks/FB923C_standard.png\&wat_pad=591,277)

5\. 1. Add webhook display name. 2. Paste the above copied webhook URL here. 3. Set Auth method (optional). 4. Configure the Datadog payload that Pagerly would receive. 5. Save the configuration.

![](https://ajeuwbhvhr.cloudimg.io/https://colony-recorder.s3.amazonaws.com/files/2025-08-01/16356d2b-862d-4f8a-ac2c-7479c4046c10/ascreenshot.jpeg?tl_px=0,269\&br_px=2182,1488\&force_format=jpeg\&q=100\&width=1120.0\&wat=1\&wat_opacity=0.7\&wat_gravity=northwest\&wat_url=https://colony-recorder.s3.us-west-1.amazonaws.com/images/watermarks/FB923C_standard.png\&wat_pad=752,277)

6\. You can use the below payload.

![](https://ajeuwbhvhr.cloudimg.io/https://colony-recorder.s3.amazonaws.com/files/2025-08-01/5514cf25-fc7f-480a-b503-310843222058/ascreenshot.jpeg?tl_px=946,383\&br_px=2532,1269\&force_format=jpeg\&q=100\&width=1120.0\&wat=1\&wat_opacity=0.7\&wat_gravity=northwest\&wat_url=https://colony-recorder.s3.us-west-1.amazonaws.com/images/watermarks/FB923C_standard.png\&wat_pad=951,714)

7\. Navigate to the **'Monitors'** tab.

![](https://ajeuwbhvhr.cloudimg.io/https://colony-recorder.s3.amazonaws.com/files/2025-08-01/daf7388d-aaee-4dfd-a3a7-70a463b49db4/ascreenshot.jpeg?tl_px=0,0\&br_px=2752,1538\&force_format=jpeg\&q=100\&width=1120.0\&wat=1\&wat_opacity=0.7\&wat_gravity=northwest\&wat_url=https://colony-recorder.s3.us-west-1.amazonaws.com/images/watermarks/FB923C_standard.png\&wat_pad=291,191)

8\. Select any template.

![](https://ajeuwbhvhr.cloudimg.io/https://colony-recorder.s3.amazonaws.com/files/2025-08-01/d9b71a82-3a5d-4bb0-a2b2-d4dfce8951b7/ascreenshot.jpeg?tl_px=0,34\&br_px=2752,1573\&force_format=jpeg\&q=100\&width=1120.0\&wat=1\&wat_opacity=0.7\&wat_gravity=northwest\&wat_url=https://colony-recorder.s3.us-west-1.amazonaws.com/images/watermarks/FB923C_standard.png\&wat_pad=322,277)

9\. Tag your newly created Pagerly webhook in the provided textarea.

![](https://ajeuwbhvhr.cloudimg.io/https://colony-recorder.s3.amazonaws.com/files/2025-08-01/928cd768-e781-4e6f-8ac1-eabfafc0dc16/ascreenshot.jpeg?tl_px=398,58\&br_px=2364,1157\&force_format=jpeg\&q=100\&width=1120.0\&wat=1\&wat_opacity=0.7\&wat_gravity=northwest\&wat_url=https://colony-recorder.s3.us-west-1.amazonaws.com/images/watermarks/FB923C_standard.png\&wat_pad=587,618)

10\. In the metadata section, you can set the priority

![](https://ajeuwbhvhr.cloudimg.io/https://colony-recorder.s3.amazonaws.com/files/2025-08-01/5dcda6f5-27f9-4c0e-ad39-637505cf1f19/ascreenshot.jpeg?tl_px=308,495\&br_px=2274,1594\&force_format=jpeg\&q=100\&width=1120.0\&wat=1\&wat_opacity=0.7\&wat_gravity=northwest\&wat_url=https://colony-recorder.s3.us-west-1.amazonaws.com/images/watermarks/FB923C_standard.png\&wat_pad=216,315)

11\. Click "Test Notifications"

![](https://ajeuwbhvhr.cloudimg.io/https://colony-recorder.s3.amazonaws.com/files/2025-08-01/b4b1efcf-3f75-48a0-b3ed-a744bed0796f/ascreenshot.jpeg?tl_px=317,495\&br_px=2283,1594\&force_format=jpeg\&q=100\&width=1120.0\&wat=1\&wat_opacity=0.7\&wat_gravity=northwest\&wat_url=https://colony-recorder.s3.us-west-1.amazonaws.com/images/watermarks/FB923C_standard.png\&wat_pad=830,500)

12\. Test Notifications:

1. Click "Test Notifications" at the bottom.
2. Click on "Run Test" and verify if the webhook is working correctly.

![](https://ajeuwbhvhr.cloudimg.io/https://colony-recorder.s3.amazonaws.com/files/2025-08-01/1d1fff97-f984-4710-9497-4d2ee1cb9049/ascreenshot.jpeg?tl_px=637,53\&br_px=2603,1151\&force_format=jpeg\&q=100\&width=1120.0\&wat=1\&wat_opacity=0.7\&wat_gravity=northwest\&wat_url=https://colony-recorder.s3.us-west-1.amazonaws.com/images/watermarks/FB923C_standard.png\&wat_pad=663,498)

13\. Finally click "Create and Publish".

![](https://ajeuwbhvhr.cloudimg.io/https://colony-recorder.s3.amazonaws.com/files/2025-08-01/309917fc-77b7-4416-be6e-1d85236cc16c/ascreenshot.jpeg?tl_px=974,495\&br_px=2940,1594\&force_format=jpeg\&q=100\&width=1120.0\&wat=1\&wat_opacity=0.7\&wat_gravity=northwest\&wat_url=https://colony-recorder.s3.us-west-1.amazonaws.com/images/watermarks/FB923C_standard.png\&wat_pad=942,506)


# Sentry

### Create an integration and generate the webhook

## Integrate Sentry

1\. Navigate to [https://workspace.pagerly.io/inbound](https://pagerly-git-feat-escalation-kritik-kapoors-projects.vercel.app/inbound)

![](https://ajeuwbhvhr.cloudimg.io/https://colony-recorder.s3.amazonaws.com/files/2025-07-31/7f83cc01-d395-4739-8447-aa1da0be4323/ascreenshot.jpeg?tl_px=0,0\&br_px=1528,854\&force_format=jpeg\&q=100\&width=1120.0\&wat=1\&wat_opacity=0.7\&wat_gravity=northwest\&wat_url=https://colony-recorder.s3.us-west-1.amazonaws.com/images/watermarks/FB923C_standard.png\&wat_pad=229,327)

2\. Click "Add Inbound Integration"

![](https://ajeuwbhvhr.cloudimg.io/https://colony-recorder.s3.amazonaws.com/files/2025-07-31/d9d24d56-d970-4e2d-99cb-7053815dd6e4/ascreenshot.jpeg?tl_px=1689,0\&br_px=2940,699\&force_format=jpeg\&q=100\&width=1120.0\&wat=1\&wat_opacity=0.7\&wat_gravity=northwest\&wat_url=https://colony-recorder.s3.us-west-1.amazonaws.com/images/watermarks/FB923C_standard.png\&wat_pad=887,181)

3\. 1. Set the display name for integration. 2. Select the team for this integration. 3. Select **"Sentry"** as Integration. 4. Click the "Add Integration" button.

![](https://ajeuwbhvhr.cloudimg.io/https://colony-recorder.s3.amazonaws.com/files/2025-07-31/7b7c9277-0fe7-478b-bf24-2dd038c425a3/ascreenshot.jpeg?tl_px=505,301\&br_px=2471,1400\&force_format=jpeg\&q=100\&width=1120.0\&wat=1\&wat_opacity=0.7\&wat_gravity=northwest\&wat_url=https://colony-recorder.s3.us-west-1.amazonaws.com/images/watermarks/FB923C_standard.png\&wat_pad=584,420)

4\. Sentry integrated successfully!

![](https://ajeuwbhvhr.cloudimg.io/https://colony-recorder.s3.amazonaws.com/files/2025-07-31/14d91967-5853-489d-b245-79a18b26aaa8/ascreenshot.jpeg?tl_px=393,0\&br_px=1922,854\&force_format=jpeg\&q=100\&width=1120.0\&wat=1\&wat_opacity=0.7\&wat_gravity=northwest\&wat_url=https://colony-recorder.s3.us-west-1.amazonaws.com/images/watermarks/FB923C_standard.png\&wat_pad=271,430)

5\. To update the display name, click the edit (Pen) icon.

![](https://ajeuwbhvhr.cloudimg.io/https://colony-recorder.s3.amazonaws.com/files/2025-07-31/ac46229a-5518-4e0f-875c-95f7d026fca5/ascreenshot.jpeg?tl_px=425,154\&br_px=1954,1009\&force_format=jpeg\&q=100\&width=1120.0\&wat=1\&wat_opacity=0.7\&wat_gravity=northwest\&wat_url=https://colony-recorder.s3.us-west-1.amazonaws.com/images/watermarks/FB923C_standard.png\&wat_pad=260,307)

6\. Edit the Display Name, then click the tick icon to save your changes.

![](https://ajeuwbhvhr.cloudimg.io/https://colony-recorder.s3.amazonaws.com/files/2025-07-31/7b4a4630-80a5-4659-b7a0-0d406bffe11a/ascreenshot.jpeg?tl_px=425,146\&br_px=1954,1001\&force_format=jpeg\&q=100\&width=1120.0\&wat=1\&wat_opacity=0.7\&wat_gravity=northwest\&wat_url=https://colony-recorder.s3.us-west-1.amazonaws.com/images/watermarks/FB923C_standard.png\&wat_pad=369,307)

7\. Generated the **Pagerly** webhook for **"Sentry"** integration.

![](https://ajeuwbhvhr.cloudimg.io/https://colony-recorder.s3.amazonaws.com/files/2025-07-31/d5024d24-cac6-487e-bf52-228cb2ad6314/ascreenshot.jpeg?tl_px=510,395\&br_px=2039,1250\&force_format=jpeg\&q=100\&width=1120.0\&wat=1\&wat_opacity=0.7\&wat_gravity=northwest\&wat_url=https://colony-recorder.s3.us-west-1.amazonaws.com/images/watermarks/FB923C_standard.png\&wat_pad=779,285)


# Prometheus

### Create an integration and generate the webhook

1\. Navigate to [https://workspace.pagerly.io/inbound](https://pagerly-git-feat-escalation-kritik-kapoors-projects.vercel.app/inbound)

![](https://ajeuwbhvhr.cloudimg.io/https://colony-recorder.s3.amazonaws.com/files/2025-07-31/40649cb3-08f8-4aa5-bcdb-24ede75b25f7/ascreenshot.jpeg?tl_px=0,0\&br_px=1528,854\&force_format=jpeg\&q=100\&width=1120.0\&wat=1\&wat_opacity=0.7\&wat_gravity=northwest\&wat_url=https://colony-recorder.s3.us-west-1.amazonaws.com/images/watermarks/FB923C_standard.png\&wat_pad=240,309)

2\. Click "Add Inbound Integration"

![](https://ajeuwbhvhr.cloudimg.io/https://colony-recorder.s3.amazonaws.com/files/2025-07-31/d14e7b95-b149-41d4-82df-c81f0319c948/ascreenshot.jpeg?tl_px=1689,0\&br_px=2940,699\&force_format=jpeg\&q=100\&width=1120.0\&wat=1\&wat_opacity=0.7\&wat_gravity=northwest\&wat_url=https://colony-recorder.s3.us-west-1.amazonaws.com/images/watermarks/FB923C_standard.png\&wat_pad=783,193)

3\. 1. Set the display name for integration. 2. Select the team for this integration. 3. Select **"Prometheus"** as Integration. 4. Click the "Add Integration" button.

![](https://ajeuwbhvhr.cloudimg.io/https://colony-recorder.s3.amazonaws.com/files/2025-07-31/31006cc2-9c6a-4290-9366-8d593b0bf242/ascreenshot.jpeg?tl_px=566,293\&br_px=2532,1391\&force_format=jpeg\&q=100\&width=1120.0\&wat=1\&wat_opacity=0.7\&wat_gravity=northwest\&wat_url=https://colony-recorder.s3.us-west-1.amazonaws.com/images/watermarks/FB923C_standard.png\&wat_pad=605,426)

4\. Prometheus integrated successfully!

![](https://ajeuwbhvhr.cloudimg.io/https://colony-recorder.s3.amazonaws.com/files/2025-07-31/fcb0b1ae-bd05-4025-a1fd-79b310413958/ascreenshot.jpeg?tl_px=375,0\&br_px=1904,854\&force_format=jpeg\&q=100\&width=1120.0\&wat=1\&wat_opacity=0.7\&wat_gravity=northwest\&wat_url=https://colony-recorder.s3.us-west-1.amazonaws.com/images/watermarks/FB923C_standard.png\&wat_pad=367,383)

5\. To update the display name, click the edit (Pen) icon.

![](https://ajeuwbhvhr.cloudimg.io/https://colony-recorder.s3.amazonaws.com/files/2025-07-31/d69f8678-1403-4a40-a6f3-174a6144fa22/ascreenshot.jpeg?tl_px=437,157\&br_px=1966,1012\&force_format=jpeg\&q=100\&width=1120.0\&wat=1\&wat_opacity=0.7\&wat_gravity=northwest\&wat_url=https://colony-recorder.s3.us-west-1.amazonaws.com/images/watermarks/FB923C_standard.png\&wat_pad=268,314)

6\. Edit the Display Name, then click the tick icon to save your changes.

![](https://ajeuwbhvhr.cloudimg.io/https://colony-recorder.s3.amazonaws.com/files/2025-07-31/336f0c26-31f6-4435-97a7-227d69d28e45/ascreenshot.jpeg?tl_px=433,127\&br_px=1962,982\&force_format=jpeg\&q=100\&width=1120.0\&wat=1\&wat_opacity=0.7\&wat_gravity=northwest\&wat_url=https://colony-recorder.s3.us-west-1.amazonaws.com/images/watermarks/FB923C_standard.png\&wat_pad=372,333)

7\. Generated the **Pagerly** webhook for **"Prometheus"** integration.

![](https://ajeuwbhvhr.cloudimg.io/https://colony-recorder.s3.amazonaws.com/files/2025-07-31/4ac5e74c-46b1-49f9-9f8e-eb4750bc6976/ascreenshot.jpeg?tl_px=516,437\&br_px=2045,1291\&force_format=jpeg\&q=100\&width=1120.0\&wat=1\&wat_opacity=0.7\&wat_gravity=northwest\&wat_url=https://colony-recorder.s3.us-west-1.amazonaws.com/images/watermarks/FB923C_standard.png\&wat_pad=808,280)


# Elastic Observability

## Create Elastic Alerting Rule with Pagerly Webhook Integration

1\. Go to your ES Cloud Console and on the menu plane, Click "Management"

![](https://ajeuwbhvhr.cloudimg.io/https://colony-recorder.s3.amazonaws.com/files/2025-09-08/8f9fedc7-0503-4b83-a50f-8f8c513c0ca3/ascreenshot.jpeg?tl_px=0,379\&br_px=2266,1646\&force_format=jpeg\&q=100\&width=1120.0\&wat=1\&wat_opacity=0.7\&wat_gravity=northwest\&wat_url=https://colony-recorder.s3.us-west-1.amazonaws.com/images/watermarks/FB923C_standard.png\&wat_pad=94,432)

2\. Click "Stack Management"

![](https://ajeuwbhvhr.cloudimg.io/https://colony-recorder.s3.amazonaws.com/files/2025-09-08/a69037a1-527c-4493-8b7d-93182e68ad50/ascreenshot.jpeg?tl_px=0,379\&br_px=2266,1646\&force_format=jpeg\&q=100\&width=1120.0\&wat=1\&wat_opacity=0.7\&wat_gravity=northwest\&wat_url=https://colony-recorder.s3.us-west-1.amazonaws.com/images/watermarks/FB923C_standard.png\&wat_pad=99,461)

3\. Click "Connectors"

![](https://ajeuwbhvhr.cloudimg.io/https://colony-recorder.s3.amazonaws.com/files/2025-09-08/0eee20f8-b783-4633-9333-5ce370aae7b5/ascreenshot.jpeg?tl_px=0,379\&br_px=2266,1646\&force_format=jpeg\&q=100\&width=1120.0\&wat=1\&wat_opacity=0.7\&wat_gravity=northwest\&wat_url=https://colony-recorder.s3.us-west-1.amazonaws.com/images/watermarks/FB923C_standard.png\&wat_pad=305,436)

4\. Click "Create connector"

![](https://ajeuwbhvhr.cloudimg.io/https://colony-recorder.s3.amazonaws.com/files/2025-09-08/a4fd9b07-c0cd-4393-ad44-61f778b11005/ascreenshot.jpeg?tl_px=0,0\&br_px=2266,1266\&force_format=jpeg\&q=100\&width=1120.0\&wat=1\&wat_opacity=0.7\&wat_gravity=northwest\&wat_url=https://colony-recorder.s3.us-west-1.amazonaws.com/images/watermarks/FB923C_standard.png\&wat_pad=930,63)

5\. Click "Webhook"

![](https://ajeuwbhvhr.cloudimg.io/https://colony-recorder.s3.amazonaws.com/files/2025-09-08/2bf8674e-9701-40d2-a1f9-9819decf4bca/ascreenshot.jpeg?tl_px=0,0\&br_px=2266,1266\&force_format=jpeg\&q=100\&width=1120.0\&wat=1\&wat_opacity=0.7\&wat_gravity=northwest\&wat_url=https://colony-recorder.s3.us-west-1.amazonaws.com/images/watermarks/FB923C_standard.png\&wat_pad=647,241)

6\. Click the "Connector name" field.

![](https://ajeuwbhvhr.cloudimg.io/https://colony-recorder.s3.amazonaws.com/files/2025-09-08/10f25b9c-7565-4856-9ef7-1269e9038e56/ascreenshot.jpeg?tl_px=0,0\&br_px=2266,1266\&force_format=jpeg\&q=100\&width=1120.0\&wat=1\&wat_opacity=0.7\&wat_gravity=northwest\&wat_url=https://colony-recorder.s3.us-west-1.amazonaws.com/images/watermarks/FB923C_standard.png\&wat_pad=635,199)

**Create Elastic Webhook in Pagerly**

7\. **Create Integration on Pagerly - Go to workspace.pagerly.io**

8\. Click "My Integrations"

![](https://ajeuwbhvhr.cloudimg.io/https://colony-recorder.s3.amazonaws.com/files/2025-09-08/de9bc18e-c54c-40b9-a509-6c8468ed385f/ascreenshot.jpeg?tl_px=0,0\&br_px=2266,1266\&force_format=jpeg\&q=100\&width=1120.0\&wat=1\&wat_opacity=0.7\&wat_gravity=northwest\&wat_url=https://colony-recorder.s3.us-west-1.amazonaws.com/images/watermarks/FB923C_standard.png\&wat_pad=114,146)

9\. Click "Incidents"

![](https://ajeuwbhvhr.cloudimg.io/https://colony-recorder.s3.amazonaws.com/files/2025-09-08/0a6e8271-76eb-48ca-bc1c-78d46ad61904/ascreenshot.jpeg?tl_px=0,0\&br_px=2266,1266\&force_format=jpeg\&q=100\&width=1120.0\&wat=1\&wat_opacity=0.7\&wat_gravity=northwest\&wat_url=https://colony-recorder.s3.us-west-1.amazonaws.com/images/watermarks/FB923C_standard.png\&wat_pad=119,221)

10\. Click "Add Inbound Integration"

![](https://ajeuwbhvhr.cloudimg.io/https://colony-recorder.s3.amazonaws.com/files/2025-09-08/c7fe6204-7de4-4da0-b700-9389dbefa974/ascreenshot.jpeg?tl_px=0,0\&br_px=2266,1266\&force_format=jpeg\&q=100\&width=1120.0\&wat=1\&wat_opacity=0.7\&wat_gravity=northwest\&wat_url=https://colony-recorder.s3.us-west-1.amazonaws.com/images/watermarks/FB923C_standard.png\&wat_pad=916,74)

11\. Click "Select team..."

![](https://ajeuwbhvhr.cloudimg.io/https://colony-recorder.s3.amazonaws.com/files/2025-09-08/88161e47-11ed-475c-a0cd-f76c0f637033/ascreenshot.jpeg?tl_px=0,205\&br_px=2266,1472\&force_format=jpeg\&q=100\&width=1120.0\&wat=1\&wat_opacity=0.7\&wat_gravity=northwest\&wat_url=https://colony-recorder.s3.us-west-1.amazonaws.com/images/watermarks/FB923C_standard.png\&wat_pad=422,277)

12\. Click "Elastic" under Integration .

![](https://ajeuwbhvhr.cloudimg.io/https://colony-recorder.s3.amazonaws.com/files/2025-09-08/b25f40b4-5212-4388-ad2f-ea795a47b3c7/ascreenshot.jpeg?tl_px=0,379\&br_px=2266,1646\&force_format=jpeg\&q=100\&width=1120.0\&wat=1\&wat_opacity=0.7\&wat_gravity=northwest\&wat_url=https://colony-recorder.s3.us-west-1.amazonaws.com/images/watermarks/FB923C_standard.png\&wat_pad=450,536)

13\. Click "Add Integration"

![](https://ajeuwbhvhr.cloudimg.io/https://colony-recorder.s3.amazonaws.com/files/2025-09-08/f229fcbe-7b4d-4f40-97b8-6fa48e32d61c/ascreenshot.jpeg?tl_px=0,379\&br_px=2266,1646\&force_format=jpeg\&q=100\&width=1120.0\&wat=1\&wat_opacity=0.7\&wat_gravity=northwest\&wat_url=https://colony-recorder.s3.us-west-1.amazonaws.com/images/watermarks/FB923C_standard.png\&wat_pad=677,338)

14\. Go to Your Integrations and click the integration created under your team

![](https://ajeuwbhvhr.cloudimg.io/https://colony-recorder.s3.amazonaws.com/files/2025-09-08/cffb77c6-0ea4-4ecf-86b6-62b1e0aa2e1d/ascreenshot.jpeg?tl_px=0,0\&br_px=2266,1266\&force_format=jpeg\&q=100\&width=1120.0\&wat=1\&wat_opacity=0.7\&wat_gravity=northwest\&wat_url=https://colony-recorder.s3.us-west-1.amazonaws.com/images/watermarks/FB923C_standard.png\&wat_pad=399,248)

15\. Copy the generated Webhook URL

![](https://ajeuwbhvhr.cloudimg.io/https://colony-recorder.s3.amazonaws.com/files/2025-09-08/581f482d-1872-4bd8-a8f4-29665a7e2f11/ascreenshot.jpeg?tl_px=0,379\&br_px=2266,1646\&force_format=jpeg\&q=100\&width=1120.0\&wat=1\&wat_opacity=0.7\&wat_gravity=northwest\&wat_url=https://colony-recorder.s3.us-west-1.amazonaws.com/images/watermarks/FB923C_standard.png\&wat_pad=430,281)

16\. Switch to tab Connectors - Elastic"

17\. Paste the Webhook under URL under Connector Settings

![](https://ajeuwbhvhr.cloudimg.io/https://colony-recorder.s3.amazonaws.com/files/2025-09-08/d045d654-5363-441c-9628-5469e086b487/ascreenshot.jpeg?tl_px=0,70\&br_px=2266,1337\&force_format=jpeg\&q=100\&width=1120.0\&wat=1\&wat_opacity=0.7\&wat_gravity=northwest\&wat_url=https://colony-recorder.s3.us-west-1.amazonaws.com/images/watermarks/FB923C_standard.png\&wat_pad=705,277)

18\. Click "None"

![](https://ajeuwbhvhr.cloudimg.io/https://colony-recorder.s3.amazonaws.com/files/2025-09-08/e9db1709-1582-4def-8544-6a8f283b0b30/ascreenshot.jpeg?tl_px=0,275\&br_px=2266,1542\&force_format=jpeg\&q=100\&width=1120.0\&wat=1\&wat_opacity=0.7\&wat_gravity=northwest\&wat_url=https://colony-recorder.s3.us-west-1.amazonaws.com/images/watermarks/FB923C_standard.png\&wat_pad=684,277)

19\. Add HTTP Header

![](https://ajeuwbhvhr.cloudimg.io/https://colony-recorder.s3.amazonaws.com/files/2025-09-08/2ae93502-9337-452d-8b93-84bfd7359c1e/ascreenshot.jpeg?tl_px=0,379\&br_px=2266,1646\&force_format=jpeg\&q=100\&width=1120.0\&wat=1\&wat_opacity=0.7\&wat_gravity=northwest\&wat_url=https://colony-recorder.s3.us-west-1.amazonaws.com/images/watermarks/FB923C_standard.png\&wat_pad=577,388)

20\. Click the "Key" field.

![](https://ajeuwbhvhr.cloudimg.io/https://colony-recorder.s3.amazonaws.com/files/2025-09-08/1e3dcf75-c7ab-414a-9a43-62986583d79c/ascreenshot.jpeg?tl_px=0,379\&br_px=2266,1646\&force_format=jpeg\&q=100\&width=1120.0\&wat=1\&wat_opacity=0.7\&wat_gravity=northwest\&wat_url=https://colony-recorder.s3.us-west-1.amazonaws.com/images/watermarks/FB923C_standard.png\&wat_pad=621,374)

21\. Add Key as Content-Type and Value as application/json

![](https://ajeuwbhvhr.cloudimg.io/https://colony-recorder.s3.amazonaws.com/files/2025-09-08/2905cb23-2780-4ca6-8d90-579151a6d7a3/ascreenshot.jpeg?tl_px=0,379\&br_px=2266,1646\&force_format=jpeg\&q=100\&width=1120.0\&wat=1\&wat_opacity=0.7\&wat_gravity=northwest\&wat_url=https://colony-recorder.s3.us-west-1.amazonaws.com/images/watermarks/FB923C_standard.png\&wat_pad=1040,432)

22\. Enter Connector Name as per your choice

![](https://ajeuwbhvhr.cloudimg.io/https://colony-recorder.s3.amazonaws.com/files/2025-09-08/9b9a5f76-559c-4daf-8939-183438bf7008/ascreenshot.jpeg?tl_px=0,0\&br_px=2266,1266\&force_format=jpeg\&q=100\&width=1120.0\&wat=1\&wat_opacity=0.7\&wat_gravity=northwest\&wat_url=https://colony-recorder.s3.us-west-1.amazonaws.com/images/watermarks/FB923C_standard.png\&wat_pad=672,217)

23\. Click "Save" and your Webhook Setting is Created

![](https://ajeuwbhvhr.cloudimg.io/https://colony-recorder.s3.amazonaws.com/files/2025-09-08/05049abd-3866-4dcc-aefe-0d5450418cde/ascreenshot.jpeg?tl_px=0,379\&br_px=2266,1646\&force_format=jpeg\&q=100\&width=1120.0\&wat=1\&wat_opacity=0.7\&wat_gravity=northwest\&wat_url=https://colony-recorder.s3.us-west-1.amazonaws.com/images/watermarks/FB923C_standard.png\&wat_pad=740,472)

**Trigger Webhook on Alerts**

24\. Click "Alerts"

![](https://ajeuwbhvhr.cloudimg.io/https://colony-recorder.s3.amazonaws.com/files/2025-09-08/b87c65bc-9bce-4265-9b7d-65bab66f31db/ascreenshot.jpeg?tl_px=0,0\&br_px=2266,1266\&force_format=jpeg\&q=100\&width=1120.0\&wat=1\&wat_opacity=0.7\&wat_gravity=northwest\&wat_url=https://colony-recorder.s3.us-west-1.amazonaws.com/images/watermarks/FB923C_standard.png\&wat_pad=48,176)

25\. Click "Manage Rules"

![](https://ajeuwbhvhr.cloudimg.io/https://colony-recorder.s3.amazonaws.com/files/2025-09-08/55903e30-8740-4abd-9956-279dd0da0f4a/ascreenshot.jpeg?tl_px=0,0\&br_px=2266,1266\&force_format=jpeg\&q=100\&width=1120.0\&wat=1\&wat_opacity=0.7\&wat_gravity=northwest\&wat_url=https://colony-recorder.s3.us-west-1.amazonaws.com/images/watermarks/FB923C_standard.png\&wat_pad=1019,158)

26\. Click "Create rule"

![](https://ajeuwbhvhr.cloudimg.io/https://colony-recorder.s3.amazonaws.com/files/2025-09-08/09e52be3-eb80-49d2-acc7-32db512b4fb3/ascreenshot.jpeg?tl_px=0,0\&br_px=2266,1266\&force_format=jpeg\&q=100\&width=1120.0\&wat=1\&wat_opacity=0.7\&wat_gravity=northwest\&wat_url=https://colony-recorder.s3.us-west-1.amazonaws.com/images/watermarks/FB923C_standard.png\&wat_pad=972,105)

27\. Choose a rule type as you need. For the purpose of example we are choosing Metric Threshold

![](https://ajeuwbhvhr.cloudimg.io/https://colony-recorder.s3.amazonaws.com/files/2025-09-08/4fdbdaa3-7591-4d5f-8749-57919dd4da4a/ascreenshot.jpeg?tl_px=0,0\&br_px=2266,1266\&force_format=jpeg\&q=100\&width=1120.0\&wat=1\&wat_opacity=0.7\&wat_gravity=northwest\&wat_url=https://colony-recorder.s3.us-west-1.amazonaws.com/images/watermarks/FB923C_standard.png\&wat_pad=362,85)

28\. Click "Select a field"

![](https://ajeuwbhvhr.cloudimg.io/https://colony-recorder.s3.amazonaws.com/files/2025-09-08/64096d54-8bd4-4f1b-97bd-bb5fa9177e0d/ascreenshot.jpeg?tl_px=0,0\&br_px=2266,1266\&force_format=jpeg\&q=100\&width=1120.0\&wat=1\&wat_opacity=0.7\&wat_gravity=northwest\&wat_url=https://colony-recorder.s3.us-west-1.amazonaws.com/images/watermarks/FB923C_standard.png\&wat_pad=574,214)

29\. Configure your Alert

![](https://ajeuwbhvhr.cloudimg.io/https://colony-recorder.s3.amazonaws.com/files/2025-09-08/e3ff1abd-a2b3-45b6-89c6-41d1b7293665/ascreenshot.jpeg?tl_px=0,211\&br_px=2266,1478\&force_format=jpeg\&q=100\&width=1120.0\&wat=1\&wat_opacity=0.7\&wat_gravity=northwest\&wat_url=https://colony-recorder.s3.us-west-1.amazonaws.com/images/watermarks/FB923C_standard.png\&wat_pad=491,277)

30\. Under Actions, click on Add Action

![](https://ajeuwbhvhr.cloudimg.io/https://colony-recorder.s3.amazonaws.com/files/2025-09-08/a2ec1253-1658-4223-b2f8-b04c853b92b8/ascreenshot.jpeg?tl_px=0,379\&br_px=2266,1646\&force_format=jpeg\&q=100\&width=1120.0\&wat=1\&wat_opacity=0.7\&wat_gravity=northwest\&wat_url=https://colony-recorder.s3.us-west-1.amazonaws.com/images/watermarks/FB923C_standard.png\&wat_pad=665,508)

31\. Choose the Webhook Connector you created previously

![](https://ajeuwbhvhr.cloudimg.io/https://colony-recorder.s3.amazonaws.com/files/2025-09-08/6900e3ec-9b1c-4440-add3-6c3a451a9fe2/ascreenshot.jpeg?tl_px=0,379\&br_px=2266,1646\&force_format=jpeg\&q=100\&width=1120.0\&wat=1\&wat_opacity=0.7\&wat_gravity=northwest\&wat_url=https://colony-recorder.s3.us-west-1.amazonaws.com/images/watermarks/FB923C_standard.png\&wat_pad=486,329)

32. Add the following body payload in the message\
    \ <br>

![](https://ajeuwbhvhr.cloudimg.io/https://colony-recorder.s3.amazonaws.com/files/2025-09-08/e6d42649-1f9e-410c-8646-c5b645a2fa82/ascreenshot.jpeg?tl_px=0,379\&br_px=2266,1646\&force_format=jpeg\&q=100\&width=1120.0\&wat=1\&wat_opacity=0.7\&wat_gravity=northwest\&wat_url=https://colony-recorder.s3.us-west-1.amazonaws.com/images/watermarks/FB923C_standard.png\&wat_pad=481,371)

33\.

![](https://ajeuwbhvhr.cloudimg.io/https://colony-recorder.s3.amazonaws.com/files/2025-09-08/8987edf6-a570-4e13-b009-43ae03744ce1/ascreenshot.jpeg?tl_px=0,379\&br_px=2266,1646\&force_format=jpeg\&q=100\&width=1120.0\&wat=1\&wat_opacity=0.7\&wat_gravity=northwest\&wat_url=https://colony-recorder.s3.us-west-1.amazonaws.com/images/watermarks/FB923C_standard.png\&wat_pad=835,387)

34\. Click "Settings"

![](https://ajeuwbhvhr.cloudimg.io/https://colony-recorder.s3.amazonaws.com/files/2025-09-08/c6ae1acd-3c9d-4b7d-bd8b-3b101b42d8c3/ascreenshot.jpeg?tl_px=0,275\&br_px=2266,1542\&force_format=jpeg\&q=100\&width=1120.0\&wat=1\&wat_opacity=0.7\&wat_gravity=northwest\&wat_url=https://colony-recorder.s3.us-west-1.amazonaws.com/images/watermarks/FB923C_standard.png\&wat_pad=461,277)

35\. Under Settings , make sure the action frequency is set for each alert : on status changes. and Run when: Alert

![](https://ajeuwbhvhr.cloudimg.io/https://colony-recorder.s3.amazonaws.com/files/2025-09-08/f14b0fd4-b901-41ae-b642-eaa5c4838793/ascreenshot.jpeg?tl_px=0,379\&br_px=2266,1646\&force_format=jpeg\&q=100\&width=1120.0\&wat=1\&wat_opacity=0.7\&wat_gravity=northwest\&wat_url=https://colony-recorder.s3.us-west-1.amazonaws.com/images/watermarks/FB923C_standard.png\&wat_pad=412,385)

36\. Create another action for the same alert. This time for resolution

![](https://ajeuwbhvhr.cloudimg.io/https://colony-recorder.s3.amazonaws.com/files/2025-09-08/22c6fe42-dc39-4381-915c-ee08a31d7541/ascreenshot.jpeg?tl_px=0,379\&br_px=2266,1646\&force_format=jpeg\&q=100\&width=1120.0\&wat=1\&wat_opacity=0.7\&wat_gravity=northwest\&wat_url=https://colony-recorder.s3.us-west-1.amazonaws.com/images/watermarks/FB923C_standard.png\&wat_pad=471,341)

37\. Add the same body payload in the message

```xjson
{
  "rule_url": "{{rule.url}}",
  "rule_name": "{{rule.name}}",
  "rule_type": "{{rule.type}}",
  "rule_params": "{{rule.params}}",
  "alert_id": "{{alert.id}}",
  "alert_uuid": "{{alert.uuid}}",
  "alert_actionGroup": "{{alert.actionGroup}}",
  "alert_actionGroupName": "{{alert.actionGroupName}}",
  "context_alertDetailsUrl": "{{context.alertDetailsUrl}}",
  "context_alertState": "{{context.alertState}}",
  "context_reason": "{{context.reason}}",
  "context_value": "{{context.value}}",
  "context_metric": "{{context.metric}}",
  "context_tags": "{{context.tags}}",
  "context_group": "{{context.group}}",
  "context_threshold": "{{context.threshold}}"
}
```

![](https://ajeuwbhvhr.cloudimg.io/https://colony-recorder.s3.amazonaws.com/files/2025-09-08/1704d2c9-eeae-446c-b037-fec42ed3f7da/ascreenshot.jpeg?tl_px=0,0\&br_px=2266,1646\&force_format=jpeg\&q=100\&width=1120.0)

38\. Click "Settings"

![](https://ajeuwbhvhr.cloudimg.io/https://colony-recorder.s3.amazonaws.com/files/2025-09-08/fddfd3d3-fe1f-4eb1-a87b-a583e477d971/ascreenshot.jpeg?tl_px=0,379\&br_px=2266,1646\&force_format=jpeg\&q=100\&width=1120.0\&wat=1\&wat_opacity=0.7\&wat_gravity=northwest\&wat_url=https://colony-recorder.s3.us-west-1.amazonaws.com/images/watermarks/FB923C_standard.png\&wat_pad=453,288)

39\. Under Settings , make sure the action frequency is set for each alert : on status changes. and Run when: Recovered

![](https://ajeuwbhvhr.cloudimg.io/https://colony-recorder.s3.amazonaws.com/files/2025-09-08/c7c8be7f-7676-47e4-8a9d-2d540c38f906/ascreenshot.jpeg?tl_px=0,379\&br_px=2266,1646\&force_format=jpeg\&q=100\&width=1120.0\&wat=1\&wat_opacity=0.7\&wat_gravity=northwest\&wat_url=https://colony-recorder.s3.us-west-1.amazonaws.com/images/watermarks/FB923C_standard.png\&wat_pad=785,515)

40\. Click "Create rule" and You are good to go!

![](https://ajeuwbhvhr.cloudimg.io/https://colony-recorder.s3.amazonaws.com/files/2025-09-08/ec18de51-ebec-4909-b0c5-6b666cc20236/ascreenshot.jpeg?tl_px=0,379\&br_px=2266,1646\&force_format=jpeg\&q=100\&width=1120.0\&wat=1\&wat_opacity=0.7\&wat_gravity=northwest\&wat_url=https://colony-recorder.s3.us-west-1.amazonaws.com/images/watermarks/FB923C_standard.png\&wat_pad=979,516)

41\. Switch to workspace.pagerly.io

42\. Click "PAYLOAD MAPPING" to update any mappings for incident creation

![](https://ajeuwbhvhr.cloudimg.io/https://colony-recorder.s3.amazonaws.com/files/2025-09-08/58f3b99f-b5c3-44ea-a009-515b6f515542/ascreenshot.jpeg?tl_px=0,0\&br_px=2266,1266\&force_format=jpeg\&q=100\&width=1120.0\&wat=1\&wat_opacity=0.7\&wat_gravity=northwest\&wat_url=https://colony-recorder.s3.us-west-1.amazonaws.com/images/watermarks/FB923C_standard.png\&wat_pad=151,184)


# CubeAPM

### Create an integration and generate the webhook

1\. Navigate to <https://workspace.pagerly.io/inbound>

2\. Click "Add Inbound Integration"

3\. 1. Set the display name for integration. 2. Select the team for this integration. 3. Select **"CubeAPM"** as Integration. 4. Click the "Add Integration" button.

4\. CubeAPM integrated successfully!

5\. To update the display name, click the edit (Pen) icon.

6\. Edit the Display Name, then click the tick icon to save your changes.

7\. Generated the **Pagerly** webhook for **"CubeAPM"** integration.

### Configure CubeAPM to create an incident

1\. Log into your **CubeAPM** dashboard.

2\. Navigate to **Settings** > **Integrations** or **Notifications**.

3\. Click **Add Webhook** or **Add Notification Channel**.

4\. Set the **Webhook URL** to the Pagerly webhook URL generated above.

5\. Set the **Method** to `POST` and the **Content-Type** header to `application/json`.

6\. Configure alert conditions and thresholds as needed.

7\. Save the configuration and test the webhook to verify the integration is working correctly.

For more information, reach out to us at <hello@pagerly.io>.


# New Relic

Create Pagerly incidents automatically from New Relic alerts.

### Create the integration in Pagerly

1\. Navigate to <https://workspace.pagerly.io/inbound> and click **"Add Inbound Integration"**.

2\. Set a display name, select the team this integration belongs to, choose the integration below, and click **"Add Integration"**.

3\. Copy the generated webhook URL - you will paste it into the tool in the next section.

### Configure New Relic

1\. In New Relic go to **Alerts → Destinations** and create a new **Webhook** destination.

2\. Paste the Pagerly webhook URL into **Endpoint URL** and save.

3\. Go to the **Workflows** tab and create a workflow. Under **Notify**, choose **Webhook** and select the destination you just created.

4\. Paste the following into the **Template** field:

```json
{
  "id": {{ json issueId }},
  "title": {{ json annotations.title.[0] }},
  "state": {{ json state }},
  "issueUrl": {{ json issuePageUrl }},
  "priority": {{ json priority }},
  "impactedEntities": {{ json entitiesData.names }}
}
```

`id`, `title` and `state` are required - the rest is optional context.

5\. Click **Send test notification**. Set the sample payload `state` to `ACTIVATED` so the alert appears.

6\. Activate the workflow.

### Notes

* **Deduplication** uses `id`. Repeated notifications for the same issue update the open incident instead of creating another.
* **Severity** comes from `priority`: `CRITICAL` and `HIGH` map to SEV 1, `MEDIUM` to SEV 2, `LOW` to SEV 3.
* **Resolution**: a `state` of `CLOSED` resolves the incident.


# Dynatrace

Create Pagerly incidents automatically from Dynatrace problems.

### Create the integration in Pagerly

1\. Navigate to <https://workspace.pagerly.io/inbound> and click **"Add Inbound Integration"**.

2\. Set a display name, select the team this integration belongs to, choose the integration below, and click **"Add Integration"**.

3\. Copy the generated webhook URL - you will paste it into the tool in the next section.

### Configure Dynatrace

1\. In Dynatrace go to **Settings → Integration → Problem notifications** and select **Custom integration**.

2\. Paste the Pagerly webhook URL into the **Webhook URL** field.

3\. Leave the default payload - Pagerly reads Dynatrace's standard placeholders. For reference, the fields used are:

```json
{
  "ProblemID": "{ProblemID}",
  "ProblemTitle": "{ProblemTitle}",
  "ProblemDetailsText": "{ProblemDetailsText}",
  "ProblemImpact": "{ProblemImpact}",
  "ProblemSeverity": "{ProblemSeverity}",
  "ProblemURL": "{ProblemURL}",
  "State": "{State}"
}
```

4\. Click **Send test notification**, then **Save**.

### Notes

* **Deduplication** uses `ProblemID`, so a problem that reopens updates the same incident.
* **Severity** comes from `ProblemSeverity`: `ERROR` and `AVAILABILITY` map to SEV 1, `PERFORMANCE` and `RESOURCE` to SEV 2, `CUSTOM` to SEV 3.
* **Resolution**: a `State` of `RESOLVED` resolves the incident.


# Splunk

Create Pagerly incidents automatically from Splunk alerts.

### Create the integration in Pagerly

1\. Navigate to <https://workspace.pagerly.io/inbound> and click **"Add Inbound Integration"**.

2\. Set a display name, select the team this integration belongs to, choose the integration below, and click **"Add Integration"**.

3\. Copy the generated webhook URL - you will paste it into the tool in the next section.

### Configure Splunk

1\. Open the saved search you want to alert on and click **Save As → Alert**, or edit an existing alert.

2\. At the bottom of the alert configuration, click **Add actions +** and choose **Webhook**.

3\. Paste the Pagerly webhook URL into the **URL** field.

4\. Save the alert.

Splunk's webhook action sends a fixed payload, so there is nothing to paste:

```json
{
  "sid": "...",
  "search_name": "Checkout errors above threshold",
  "results_link": "https://splunk.example.com/...",
  "result": { "count": "128" },
  "owner": "admin",
  "app": "search"
}
```

### Notes

* **Deduplication** uses `search_name`, not `sid`. `sid` is unique to each firing, so keying on it would open a new incident every time the search ran. Using the search name groups repeated firings into one open incident.
* **Severity and status** are not present in Splunk's native payload, so both fall back to defaults. If your search emits them, point **Payload Mapping** at the relevant field.


# Honeycomb

Create Pagerly incidents automatically from Honeycomb triggers and SLO burn alerts.

### Create the integration in Pagerly

1\. Navigate to <https://workspace.pagerly.io/inbound> and click **"Add Inbound Integration"**.

2\. Set a display name, select the team this integration belongs to, choose the integration below, and click **"Add Integration"**.

3\. Copy the generated webhook URL - you will paste it into the tool in the next section.

### Configure Honeycomb

1\. In Honeycomb go to **Team settings → Integrations** and add a new integration with **Provider: Webhook**.

2\. Paste the Pagerly webhook URL.

3\. Under **Customize Webhook Payload**, paste:

```json
{
  "title": "{{ .Alert.Summary }}",
  "description": "{{ .Description }}",
  "source_url": "{{ .Resource.URL }}",
  "status": "{{ .Alert.Status }}",
  "deduplication_key": "{{ .Alert.InstanceID }}",
  "metadata": {
    "environment": "{{ .Environment }}",
    "name": "{{ .Name }}",
    "result_url": "{{ .Result.URL }}"
  }
}
```

4\. Attach the webhook to a **Trigger** or **SLO Burn Alert**.

### Notes

* **Deduplication** uses `.Alert.InstanceID`. Do not use the `X-Honeycomb-Webhook-Delivery-ID` header - that is constant across *retries of one delivery*, not across firings of the same alert.
* **Resolution**: `.Alert.Status` of `OK` resolves the incident; `TRIGGERED` opens it.


# Sumo Logic

Create Pagerly incidents automatically from Sumo Logic monitors.

### Create the integration in Pagerly

1\. Navigate to <https://workspace.pagerly.io/inbound> and click **"Add Inbound Integration"**.

2\. Set a display name, select the team this integration belongs to, choose the integration below, and click **"Add Integration"**.

3\. Copy the generated webhook URL - you will paste it into the tool in the next section.

### Configure Sumo Logic

1\. In Sumo Logic go to **Manage Data → Monitoring → Connections**, click **+** and select **Webhook**.

2\. Give the connection a name, and paste the Pagerly webhook URL into **URL**.

3\. Paste this into **Alert payload**:

```json
{
  "title": "{{Name}}",
  "description": "{{Description}}",
  "source_url": "{{AlertResponseURL}}",
  "status": "firing",
  "deduplication_key": "{{Id}}",
  "metadata": {
    "monitor_type": "{{MonitorType}}",
    "detection_method": "{{DetectionMethod}}",
    "trigger": { "type": "{{TriggerType}}", "condition": "{{TriggerCondition}}" }
  }
}
```

4\. Paste this into **Resolve payload** - identical apart from `status`:

```json
{
  "title": "{{Name}}",
  "description": "{{Description}}",
  "source_url": "{{AlertResponseURL}}",
  "status": "resolved",
  "deduplication_key": "{{Id}}",
  "metadata": {
    "monitor_type": "{{MonitorType}}",
    "detection_method": "{{DetectionMethod}}",
    "trigger": { "type": "{{TriggerType}}", "condition": "{{TriggerCondition}}" }
  }
}
```

5\. Click **Test Alert**, then **Test Recovery** to confirm the incident resolves. Save the connection.

### Notes

* Sumo Logic sends recovery through a **separate payload**. If you skip step 4, incidents open but never resolve.
* **Deduplication** uses `deduplication_key` (`{{Id}}`).
* **Severity** comes from `metadata.trigger.type`: `Critical` maps to SEV 1, `Warning` and `MissingData` to SEV 2.


# BugSnag

Create Pagerly incidents automatically from BugSnag errors.

### Create the integration in Pagerly

1\. Navigate to <https://workspace.pagerly.io/inbound> and click **"Add Inbound Integration"**.

2\. Set a display name, select the team this integration belongs to, choose the integration below, and click **"Add Integration"**.

3\. Copy the generated webhook URL - you will paste it into the tool in the next section.

### Configure BugSnag

1\. In BugSnag open the project and go to **Settings → Data forwarding**.

2\. Enable the **Webhook** integration and paste the Pagerly webhook URL.

3\. Choose which events forward - typically **new error** and **error state change**.

BugSnag's payload is fixed, so there is nothing to paste.

### Notes

* **Deduplication** uses `error.errorId`, so repeated occurrences of the same error update one incident.
* **Severity** comes from `error.severity`: `error` maps to SEV 1, `warning` to SEV 2, `info` to SEV 3.
* **Resolution** comes from `error.status`, not the trigger: `fixed`, `snoozed` and `ignored` all resolve the incident, `open` keeps it open.


# Pingdom

Create Pagerly incidents automatically from Pingdom check failures.

### Create the integration in Pagerly

1\. Navigate to <https://workspace.pagerly.io/inbound> and click **"Add Inbound Integration"**.

2\. Set a display name, select the team this integration belongs to, choose the integration below, and click **"Add Integration"**.

3\. Copy the generated webhook URL - you will paste it into the tool in the next section.

### Configure Pingdom

1\. In Pingdom go to **Integrations → Integrations** and click **Add integration**.

2\. Choose **Webhook**, give it a name, and paste the Pagerly webhook URL.

3\. Open the checks that should page and enable the integration under **Connect integrations**.

Pingdom's payload is fixed, so there is nothing to paste.

### Notes

* **Deduplication** uses `check_id`, so a flapping check updates one incident.
* **Severity** comes from `importance_level`: `HIGH` maps to SEV 1, `LOW` to SEV 3.
* **Resolution**: a `current_state` of `UP` resolves the incident.


# Checkly

Create Pagerly incidents automatically from Checkly check failures.

### Create the integration in Pagerly

1\. Navigate to <https://workspace.pagerly.io/inbound> and click **"Add Inbound Integration"**.

2\. Set a display name, select the team this integration belongs to, choose the integration below, and click **"Add Integration"**.

3\. Copy the generated webhook URL - you will paste it into the tool in the next section.

### Configure Checkly

1\. In Checkly go to **Alerts → Alert channels** and add a **Webhook** channel.

2\. Set **Method** to `POST` and paste the Pagerly webhook URL.

3\. Paste this into the **Body**:

```json
{
  "check_id": "{{CHECK_ID}}",
  "check_name": "{{CHECK_NAME}}",
  "check_type": "{{CHECK_TYPE}}",
  "alert_title": "{{ALERT_TITLE}}",
  "alert_type": "{{ALERT_TYPE}}",
  "link": "{{RESULT_LINK}}",
  "run_location": "{{RUN_LOCATION}}",
  "started_at": "{{STARTED_AT}}",
  "response_time": "{{RESPONSE_TIME}}"
}
```

4\. Subscribe the checks or groups that should page, and save.

### Notes

* The `{{CHECK_ID}}` form is a Checkly **variable**; the JSON key Pagerly reads is the lowercase `check_id` on the left. Keep the keys exactly as above.
* **Deduplication** uses `check_id`, so a flapping check updates one incident.
* **Severity** comes from `alert_type`: `ALERT_FAILURE` maps to SEV 1, `ALERT_DEGRADED` to SEV 2.
* **Resolution**: `ALERT_RECOVERY` and `ALERT_DEGRADED_RECOVERY` resolve the incident.


# StatusCake

Create Pagerly incidents automatically from StatusCake test failures.

### Create the integration in Pagerly

1\. Navigate to <https://workspace.pagerly.io/inbound> and click **"Add Inbound Integration"**.

2\. Set a display name, select the team this integration belongs to, choose the integration below, and click **"Add Integration"**.

3\. Copy the generated webhook URL - you will paste it into the tool in the next section.

### Configure StatusCake

1\. In StatusCake go to **Alerting → Contact groups** and edit or create a contact group.

2\. Paste the Pagerly webhook URL into the **Webhook URL** field and save.

3\. Assign that contact group to the uptime tests that should page.

StatusCake's payload is fixed, so there is nothing to paste.

### Notes

* **Deduplication** uses `TestID`.
* **Resolution**: a `Status` of `Up` resolves the incident; `Down` opens it at SEV 1.


# AWS SNS

Create Pagerly incidents from any AWS service that publishes to SNS.

Use this when you want alerts from AWS services other than CloudWatch alarms - anything that can publish to an SNS topic. For CloudWatch alarms specifically, use [AWS Cloudwatch](/incidents-and-alerting/integrations/aws-cloudwatch), which understands the alarm payload directly.

### Create the integration in Pagerly

1\. Navigate to <https://workspace.pagerly.io/inbound> and click **"Add Inbound Integration"**.

2\. Set a display name, select the team this integration belongs to, choose the integration below, and click **"Add Integration"**.

3\. Copy the generated webhook URL - you will paste it into the tool in the next section.

### Configure AWS SNS

1\. In the AWS console open **SNS → Topics** and select or create a topic.

2\. Click **Create subscription**.

3\. Set **Protocol** to `HTTPS` and paste the Pagerly webhook URL into **Endpoint**.

4\. Create the subscription. Pagerly confirms it automatically.

### Notes

* **Deduplication** uses the SNS `Subject`, not `MessageId` - `MessageId` is unique to every delivery, so keying on it would open a new incident each time. Give your publishers a stable, meaningful `Subject`.
* If `Message` contains JSON, Pagerly unwraps it and maps fields from inside. Plain-text messages are used as-is.


# Pagerly Incident Response

Pagerly an incident management ChatOps bot for Slack to allow your teams to easily and effectively identify and manage technical incidents impacting your cloud infrastructure, your products

With Pagerly, you can now let Pagerly focus on creating resources, assembling participants, sending out notifications, tracking tasks, and assisting with post-incident reviews; allowing you to focus on actually fixing the issue!

Pagerly helps us effectively manage security incidents by deeply integrating with existing tools used throughout an organization (Slack, GSuite, Jira, etc.,) Pagerly is able to leverage the existing familiarity of these tools to provide orchestration instead of introducing another tool.All of the ad-hoc things you’re doing to manage incidents today, done for you, and a bunch of other things you should've been doing, but have not had the time

#### Incident response without context switching <a href="#incident-response-without-context-switching" id="incident-response-without-context-switching"></a>

* **Focus on the Incident, rest Pagerly would take care**
* **Lower MTTR (Mean Time To Resolve)**
* **Incident Response without Context Switching** Handle incidents without the need to switch between different platforms or tools. Respond seamlessly using a purpose-built Slack interface, streamlining your incident management process.
* **Conduct the Entire Incident in Slack** Manage the entire incident lifecycle within Slack, allowing for smooth collaboration among team members. This streamlined ChatOps approach ensures efficient communication and problem-solving.
* **Seamless Collaboration with a Purposeful Slack Experience** Experience a purposefully-designed Slack environment that facilitates effortless collaboration. This setup optimizes ChatOps functionality, making it even better than you imagined.
* **Empower Responders and Eliminate Guesswork** Equip every engineer to become a confident incident responder by providing step-by-step guidance tailored to your specific workflows. Remove uncertainty and empower your team to handle incidents with ease.
* **Unified Access to Data and Tools** Integrate all your essential tools directly with Pagerly, creating a centralized entry point for responders. This consolidates data, providing a reliable single source of truth for thorough analysis and resolution.

#### Customization with your own workflows <a href="#customization-with-your-own-workflows" id="customization-with-your-own-workflows"></a>

With Pagerly, users can enjoy the luxury of creating customizations and workflows tailored to their specific needs for incident management. This flexibility empowers teams to implement efficient processes aligned with their organization's unique requirements, enhancing incident resolution and overall security posture. Check full details in [Customisation and Workflows](https://incidence.pagerly.io/pagerly-incidence-response/customisation-and-workflows)

#### What it Does For You ([Full Details in Next Section](https://incidence.pagerly.io/pagerly-incidence-response/overview)) <a href="#what-it-does-for-you-full-details-in-next-section" id="what-it-does-for-you-full-details-in-next-section"></a>

* Helps you declare and run incidents. All the automation you'll need to organize, strategize, and explain
* Assists in identifying and notifying the appropriate personnel to handle incidents, automatically adding groups or users to address urgent situations promptly.
* Manages the gathering and structuring of information, documentation, and evidence related to incidents. Automatically generates postmortem documents with a chronological timeline and attached evidence, while collecting relevant data.
* Seamlessly integrates with your preferred tools, allowing teams to be paged through PagerDuty, uploading postmortem reports to Confluence, updating Statuspage directly from the communication channel, and instantly generating Zoom links when needed.


# Overview

<figure><img src="/files/gIXSiq8BXVcOqjYsFSB3" alt=""><figcaption></figcaption></figure>

* **Create a war-room Slack channel** to gather resources and handle incidents.
* War Room Channel **stays up to date** with all the following information :
  * Incident Status
  * Incident ETA
  * Current Assignee
  * Business Impact
  * Action Item Created
  * Additional Information (Customization)
* **Assistance** in war-room channel
  * Automatically Created Zoom Channel
  * Automatically Jira main ticket for tracking issue
  * Links to all dashboards
  * Additional Information (Customization)
* **Ticketing Update:**
  * **2-way sync of comments on Jira** and Slack Channel. The following information would be synced
    * Severity SLA
    * Ticketing Board
    * Assignee
    * Action Items :
      1. Ticketing Board
      2. Assignee
    * Taggings: Labels and Components
  * **Creation of action items.**
    * Severity SLA
    * Ticketing Board
    * Assignee
    * Action Items :
      1. Ticketing Board
      2. Assignee
    * Taggings: Labels and Components
* **Paging Oncalls** for other teams
* **Automatically RCA / Postmortem** Documentation
  * Choose RCA Template with auto-filled with the following information
    * Business Impact
    * MTTR
    * Root cause
  * **Automatic Timeline Generation**
    * Status changes
    * Severity changes
    * User role assignments
    * Pinning Slack Conversations
      * Messages - these are timestamped and added to the RCA showing which user sent the message
      * Images - these are added to the RCA as attachments - note that if an image is attached with a message, only the picture is attached to the incident
  * Automatically Add Action Items Generated
* **Send out internal status updates** to other users/ stakeholders
  * Send updates via Slack
  * Send updates via Email
* **Scheduled Actions**

  By default, the app will look for incidents that are not resolved that are older than 7 days. You may adjust this behaviour via the scheduler module if you wish.
* **Summarization**
* **Dedupe**
* **Reporting**

**With Pagerly, you have the liberty to add customization for your use case**


# Video Demo

{% embed url="<https://www.loom.com/share/2abbdb93ab004afa854e09134f9d2f8d?sid=fb097e84-6e5b-4197-9638-9dbaedc39234>" fullWidth="true" %}


# Customization & Workflow

We realise each team and engineers love to according to the workflows they like

\
With Pagerly services, you have the ability to create your own workflows and customize them according to your needs.At Pagerly, we understand the unique needs of your organization. Our platform offers extensive customization options to tailor the incident management process to your specific requirements. From incident workflows to report formatting, we put you in control.

Feel free to reach out to our support team for personalized assistance with customizing your incident management setup. We're here to help you get the most out of Pagerly and ensure seamless incident management for your business.

Following is the **NOT AN EXHAUSTIVE LIST** of customisation we support. These are the common themes we have encountered for customisation

1. 1.**Ticket routing and creation**
   1. 1.Severity SLA
   2. 2.Ticketing Board
   3. 3.Assignee
   4. 4.Action Items :
      1. 1.Ticketing Board
      2. 2.Assignee
   5. 5.Taggings: Labels and Components
2. 2.**RCA Templates** Root Cause Analysis (RCA) is a crucial process for identifying the underlying causes of incidents or issues. Our platform provides customizable RCA templates to streamline the RCA process and ensure comprehensive incident analysis. With our RCA templates, you can:
   * Document incident details, timelines, and affected services.
   * Identify contributing factors and potential causes of the incident.
   * Conduct a thorough investigation to pinpoint the root cause.
   * Propose and implement effective corrective and preventive actions.
   * Collaborate with teams to gain insights and build a knowledge base.
3. 3.**Teams and Services**
   * **Service Categorization:** Group your technical services into logical categories based on their functionalities or ownership, making it simple to identify which teams are responsible for each service.
   * **Incident Routing:** Set up automatic incident routing based on the affected service. When an incident occurs, it will be directed to the appropriate team or team members responsible for that specific service.
   * **Service Ownership:** Assign clear ownership for each technical service, enabling efficient communication and accountability during incident resolution.
   * **Dependencies Mapping:** Map dependencies between services to better understand the impact of an incident on other interconnected services. This aids in prioritizing incident response efforts.
4. **Links for Debugging**To streamline the debugging process and expedite incident resolution, our platform offers links with popular debugging tools.
5. 5.**Runbook**Ensuring all incident response procedures and best practices are readily available during critical situations. With the Runbook integration, you can:
   * Access detailed step-by-step instructions and procedures for incident resolution.
6. 6.**Reporting**Our platform empowers you with customizable incident reports and analytics to improve incident management. Generate insightful reports to:
   * Track incident trends and patterns over time.
   * Monitor the efficiency of RCA and incident resolution efforts.
   * Identify areas for improvement and implement data-driven changes.


# Postmortems

Generate, edit, publish and export AI-assisted postmortems for your resolved incidents — hosted natively in Pagerly.

Pagerly generates a postmortem for you the moment an incident is resolved, drafts it with AI from the incident's own history, and lets your team review, edit and publish it — all without leaving Pagerly. When you're ready, export a copy to Confluence or Notion.

## Generating a postmortem

A postmortem can be created once an incident is **Resolved**.

* **From Slack** — when an incident is resolved, Pagerly posts a **📝 Generate Postmortem** button into the incident thread. Click it and Pagerly drafts the document, then replies with a link to open it.
* **From the dashboard** — open the incident and click **Generate Postmortem** in the right-hand panel.

The draft is written by AI from everything Pagerly already knows about the incident:

* Title, description, severity, team and trigger source
* The full update timeline (status changes, severity changes, role assignments, comments)
* Time to resolve
* Any AI investigation findings gathered during the incident

If AI is unavailable, Pagerly still creates the postmortem with a pre-filled timeline and empty sections for you to complete — you're never blocked.

## Sections

Every postmortem is organised into editable sections:

* **Summary**
* **Impact**
* **Root Cause**
* **What Went Well**
* **What Went Wrong**
* **Timeline** — a chronological record compiled from the incident's lifecycle events and comments
* **Suggested Action Items** — AI-proposed follow-ups you can turn into tracked action items in one click

An **AI-generated draft — please review** note is shown on fresh drafts so nobody mistakes them for a reviewed document.

## Editing & publishing

Each section is editable inline (Markdown supported and rendered). A postmortem moves through two states:

* **Draft** — work in progress, freely editable
* **Published** — the reviewed, final version

Click **Publish** when the review is complete. Suggested action items each have an **Add as action item** button that creates a tracked [action item](/incident-response/action-items) linked to the incident.

## The Postmortems page

A dedicated **Postmortems** page (under **Incidents & Paging** in the dashboard) lists every postmortem in your workspace with its status (Draft / Published), whether it was AI-generated, and when it was created and last updated. Filter by status, and click any row to open the full postmortem on its own page.

## Export to Confluence or Notion

Pagerly is the source of truth for the postmortem; export publishes a copy to your documentation tool and stores the link back on the postmortem.

* **Confluence** — uses your existing Confluence connection. Set the destination **space key** in the incident settings (defaults to `P`).
* **Notion** — paste a Notion internal-integration token and the parent page id in the incident settings.

Use the **Export** dropdown on the postmortem and pick Confluence or Notion. Once exported, a link to the external copy is shown on the postmortem.

{% hint style="info" %}
Export destinations are configured per team under **Incident Settings → Postmortem Export & Issue Tracking**.
{% endhint %}


# Action Items

Capture follow-up work during or after an incident, assign owners and priorities, sync to Jira/Linear, and never let a follow-up slip.

Action items are the follow-up tasks that come out of an incident — "add alerting for the connection pool", "write a runbook", "fix the retry logic". Pagerly lets you capture them at any point (during the incident or in the postmortem), assign an owner and priority, push them to your issue tracker, and chases the ones that go overdue.

## Creating action items

You can create action items from three places — during an active incident **or** after resolution:

* **From Slack** — open the incident message's action menu (**⋯**) and choose **✅ Add Action Item**. A form opens for the title, details, assignee and due date.
* **From the dashboard** — on the incident page, open the **Action Items** tab and click **+ Add action item**.
* **From the postmortem** — click **Add as action item** on any AI-suggested follow-up.
* **Via MCP / AI** — see [MCP tools](#mcp-tools) below.

## Fields

| Field           | Notes                                            |
| --------------- | ------------------------------------------------ |
| **Title**       | What needs to be done (required)                 |
| **Description** | Optional details                                 |
| **Assignee**    | The owner, by email / Slack user                 |
| **Due date**    | When it's due                                    |
| **Priority**    | `P1` (highest) → `P4`                            |
| **Status**      | `Open` → `In Progress` → `Done`                  |
| **Team**        | Inherited automatically from the linked incident |

## Assigning & updating

Assign or reassign an owner, change the priority or status, and edit details from either Slack (at creation) or the dashboard (any time). Priorities are shown as colour-coded badges (P1 red → P4 grey) everywhere action items appear.

## Sync to Jira / Linear

Push an action item to your issue tracker as a standalone task. Click **Sync** on the action item; Pagerly creates the issue and stores a link back to it.

* **Jira** — set the destination **project key** in the incident settings.
* **Linear** — set the destination **team id** in the incident settings (or Pagerly uses your first Linear team).

If no tracker is configured, the Sync action tells you so and does nothing — it fails safe.

## The Action Items page

A dedicated **Action Items** page (under **Incidents & Paging**) lists every action item across all incidents, so open follow-ups are never buried inside individual incidents. Filter by:

* **Status** (Open / In Progress / Done)
* **Priority** (P1–P4)
* **Team**
* **Incident**

Each row links back to its incident, and status can be changed inline.

## Overdue reminders

Pagerly runs a daily check and **DMs the assignee** about any action item that's past its due date and not yet Done, with a **Mark done** button right in the message. This is what keeps postmortem follow-ups from quietly dying in a list.

## MCP tools

If you use Pagerly's [Remote MCP Server](/sre-ai-agent/remote-mcp-server), action items are fully available to AI clients:

* `pagerly_create_action_item` — create an item, optionally linked to an incident and assigned to someone
* `pagerly_list_action_items` — list/filter by incident, assignee, status or open-only
* `pagerly_update_action_item` — change status, reassign, or edit title/description/due date

This lets you say things like *"create an action item to add DB alerting, assign it to priya@, due Friday"* or *"what open action items does the payments team have?"*


# Incident Roles & Update Reminders

Assign named response roles (Incident Commander, Comms Lead, Scribe, Ops Lead) and keep the incident channel updated with status-update reminders.

Beyond the single assignee, Pagerly lets you assign named **response roles** for a coordinated response, and set **status-update reminders** so the incident channel never goes quiet.

## Incident roles

The assignee stays the primary owner used for paging and escalation. Roles add clear responsibilities on top:

| Role                   | Responsibility                    |
| ---------------------- | --------------------------------- |
| **Incident Commander** | Owns overall coordination         |
| **Comms Lead**         | Handles stakeholder communication |
| **Scribe**             | Documents the incident timeline   |
| **Ops Lead**           | Drives the technical response     |

**Assigning a role**

* **From Slack** — incident action menu (**⋯**) → **👤 Assign Role** → pick the role and the person. Leaving the person empty unassigns the role.
* **From the dashboard** — use the **Roles & Updates** panel on the incident page.

When a role is assigned, Pagerly posts it into the incident thread and records it on the incident timeline (so it flows into the [postmortem](/incident-response/postmortems)).

## Status-update reminders

Keep stakeholders informed by scheduling a nudge for the next status update.

* **Set a reminder** — incident action menu → **⏰ Set Update Reminder** (or the **Update reminder** control on the dashboard). Choose 15 / 30 / 60 / 120 / 240 minutes.
* **When it's due** — Pagerly posts a nudge into the incident thread mentioning the assignee, with **Post update** and **Snooze 15m** buttons.
* **Auto-clear** — posting an update or a comment on the incident clears the pending reminder automatically, so you're only nudged when the channel actually goes quiet.


# Auto-Create Incident Channel

Optionally spin up a dedicated Slack channel per incident, scoped by severity, instead of threading updates in the team channel.

By default Pagerly runs an incident as a message and thread in your team (or a custom) channel. For higher-severity incidents you may want a **dedicated war-room channel** instead. Pagerly can create one automatically when an incident is declared.

## How it works

When enabled, on incident creation Pagerly:

1. Creates a dedicated Slack channel named after the incident (e.g. `inc-<title>-<id>`).
2. Sets the channel topic to the severity and title.
3. Invites the assignee and any responders.
4. Posts the incident message into that channel (so all updates, roles, reminders and comments live there).

## Configuration

Configure this per team under **Incident Settings → Channel & Update Reminders**:

* **Create a dedicated Slack channel per incident** — the on/off toggle.
* **Severities** — choose which severities get their own channel (e.g. only **SEV 1**). Leaving the list empty means *all* severities get a channel.

{% hint style="info" %}
Auto-creating channels requires the Slack app to have permission to create and invite to channels (`channels:manage`, `channels:write.invites`). If the toggle is off, no extra permissions are needed and incidents continue to thread in the team channel as before.
{% endhint %}

This keeps low-severity noise threaded while giving major incidents a focused space — without forcing channel sprawl on every alert.


# Integrations

Pagerly Incidence Response integrates with a wide range of tools to streamline your incident management workflow. Each integration listed below comes with its unique set of functionalities and benefits.

**As part of customisation, we can always extend** and integrate with the tool of your choice.

## Integration Categories

### 🎫 Ticketing Integrations

| Integration                                      | Description                                                                             |
| ------------------------------------------------ | --------------------------------------------------------------------------------------- |
| [Jira](/incident-response/integrations/jira)     | Issue and project tracking for task management, bug tracking, and project collaboration |
| [GitHub](/incident-response/integrations/github) | Software development platform with issue tracking and project management                |

### 📟 Paging Tools Integrations

| Integration                                            | Description                                                                          |
| ------------------------------------------------------ | ------------------------------------------------------------------------------------ |
| [PagerDuty](/incident-response/integrations/pagerduty) | Real-time alerting and incident management platform                                  |
| [OpsGenie](/incident-response/integrations/opsgenie)   | Modern incident management platform for managing and resolving incidents efficiently |

### 📹 Meeting Integrations

| Integration                                                | Description                                                                        |
| ---------------------------------------------------------- | ---------------------------------------------------------------------------------- |
| [Zoom](/incident-response/integrations/zoom)               | Video conferencing for seamless video meetings, webinars, and online collaboration |
| [Google Meet](/incident-response/integrations/google-meet) | Video meetings integrated with Google services for enhanced collaboration          |

### 💬 Collaboration Integrations

| Integration                                    | Description                                            |
| ---------------------------------------------- | ------------------------------------------------------ |
| [Gmail](/incident-response/integrations/gmail) | Email integration for collaboration and status updates |

### 📊 Monitoring and Analytics Integrations

| Integration                                        | Description                                                                                               |
| -------------------------------------------------- | --------------------------------------------------------------------------------------------------------- |
| [Datadog](/incident-response/integrations/datadog) | Monitoring and analytics platform providing deep insights into application and infrastructure performance |

### 📢 Status Communication

| Integration                                              | Description                                                                                                      |
| -------------------------------------------------------- | ---------------------------------------------------------------------------------------------------------------- |
| [Statuspage](/incident-response/integrations/statuspage) | Status and incident communication tool for keeping users informed about application status and ongoing incidents |

For more integrations or custom integration requests, reach out to us at <hello@pagerly.io>.


# Jira

## Overview

Jira is an issue and project tracking tool widely used for task management, bug tracking, and project collaboration. Pagerly integrates with Jira to streamline your incident management workflow.

## Key Features

* **Automatic Ticket Creation** — Pagerly can automatically create Jira tickets when an incident is triggered
* **Severity-Based Routing** — Route incidents to the appropriate Jira board based on severity level
* **Action Items Tracking** — Create and track action items as Jira issues linked to incidents
* **RCA Documentation** — Link Root Cause Analysis documentation directly to Jira tickets
* **Status Sync** — Keep incident status synchronized between Pagerly and Jira

## Setup

To configure Jira with Pagerly Incidence Response:

1. Navigate to your Pagerly workspace settings
2. Go to **Integrations** → **Jira**
3. Connect your Jira account by providing your Jira domain and API credentials
4. Configure the project and issue type mappings for incident tickets

For detailed setup instructions, see the [Jira Integration Guide](/integrations/integration-with-jira).

## Need Help?

For assistance with Jira integration setup, reach out to us at <hello@pagerly.io>.


# GitHub

## Overview

GitHub is primarily a software development platform that can also be used for issue tracking and project management. Pagerly integrates with GitHub to connect your incident management workflow with your development process.

## Key Features

* **Issue Creation** — Automatically create GitHub issues when incidents are triggered
* **Repository Linking** — Link incidents to specific repositories and codebases
* **Pull Request Tracking** — Track fixes and patches related to incidents
* **Deployment Correlation** — Correlate incidents with recent deployments and commits
* **Action Items** — Create GitHub issues for incident follow-up action items

## Setup

To configure GitHub with Pagerly Incidence Response:

1. Navigate to your Pagerly workspace settings
2. Go to **Integrations** → **GitHub**
3. Authorize Pagerly to access your GitHub organization
4. Configure repository and issue label mappings

## Need Help?

For assistance with GitHub integration setup, reach out to us at <hello@pagerly.io>.


# PagerDuty

## Overview

PagerDuty is a paging tool that enables real-time alerting and on-call management. Pagerly integrates with PagerDuty to unify your incident alerting and response workflows.

## Key Features

* **Alert Ingestion** — Receive PagerDuty alerts and create corresponding incidents in Pagerly
* **On-Call Sync** — Sync PagerDuty on-call schedules with Pagerly teams
* **Escalation Policies** — Leverage PagerDuty escalation policies within Pagerly workflows
* **Bi-directional Status Sync** — Keep incident status synchronized between both platforms
* **Acknowledgment Tracking** — Track alert acknowledgments across both systems

## Setup

To configure PagerDuty with Pagerly Incidence Response:

1. Navigate to your Pagerly workspace settings
2. Go to **Integrations** → **PagerDuty**
3. Connect your PagerDuty account using your API key
4. Map PagerDuty services to Pagerly teams

For retrieving your PagerDuty API key, see [Retrieving PagerDuty API Key](/integrations/integrating-with-your-paging-tool/retrieving-pagerduty-api-key).

## Need Help?

For assistance with PagerDuty integration setup, reach out to us at <hello@pagerly.io>.


# OpsGenie

## Overview

OpsGenie is a modern incident management platform that helps manage and resolve incidents efficiently. Pagerly integrates with OpsGenie to enhance your incident response capabilities.

## Key Features

* **Alert Integration** — Receive OpsGenie alerts and create incidents automatically in Pagerly
* **On-Call Schedule Sync** — Sync OpsGenie on-call schedules with Pagerly teams
* **Escalation Support** — Leverage OpsGenie escalation rules within Pagerly workflows
* **Team Routing** — Route incidents to the right team based on OpsGenie alert routing rules
* **Status Synchronization** — Keep incident status in sync between OpsGenie and Pagerly

## Setup

To configure OpsGenie with Pagerly Incidence Response:

1. Navigate to your Pagerly workspace settings
2. Go to **Integrations** → **OpsGenie**
3. Connect your OpsGenie account using your API key
4. Map OpsGenie teams to Pagerly teams

For retrieving your OpsGenie API key, see [Retrieving OpsGenie API Key](/integrations/integrating-with-your-paging-tool/retrieving-opsgenie-api-key).

## Need Help?

For assistance with OpsGenie integration setup, reach out to us at <hello@pagerly.io>.


# Zoom

## Overview

Zoom is a popular video conferencing solution that enables seamless video meetings, webinars, and online collaboration. Pagerly integrates with Zoom to facilitate real-time communication during incidents.

## Key Features

* **Auto-Create War Rooms** — Automatically create Zoom meetings when an incident is triggered
* **Meeting Links in Incidents** — Include Zoom meeting links directly in incident channels
* **One-Click Join** — Responders can join incident calls with a single click from Slack
* **Recording Support** — Record incident war room meetings for post-incident review
* **Calendar Integration** — Schedule follow-up meetings and post-mortems

## Setup

To configure Zoom with Pagerly Incidence Response:

1. Navigate to your Pagerly workspace settings
2. Go to **Integrations** → **Zoom**
3. Authorize Pagerly to access your Zoom account
4. Configure automatic meeting creation preferences for incidents

## Need Help?

For assistance with Zoom integration setup, reach out to us at <hello@pagerly.io>.


# Google Meet

## Overview

Google Meet provides seamless video meetings integrated with Google services such as Google Drive, Calendar, and Gmail to enhance collaboration and productivity. Pagerly integrates with Google Meet to support real-time incident communication.

## Key Features

* **Auto-Create Meetings** — Automatically create Google Meet calls when an incident is triggered
* **Meeting Links in Incidents** — Include Google Meet links directly in incident channels
* **Google Calendar Integration** — Schedule post-incident reviews and follow-up meetings
* **Google Workspace Sync** — Leverage your existing Google Workspace setup for incident collaboration
* **One-Click Join** — Responders can join incident calls directly from Slack

## Setup

To configure Google Meet with Pagerly Incidence Response:

1. Navigate to your Pagerly workspace settings
2. Go to **Integrations** → **Google Meet**
3. Connect your Google Workspace account
4. Configure automatic meeting creation preferences for incidents

## Need Help?

For assistance with Google Meet integration setup, reach out to us at <hello@pagerly.io>.


# Gmail

## Overview

Gmail integration with Pagerly enhances collaboration by enabling email-based status updates and notifications during incident management.

## Key Features

* **Email Notifications** — Send incident status updates and alerts via Gmail
* **Stakeholder Communication** — Automatically notify stakeholders via email when incidents are created or updated
* **Status Update Emails** — Send periodic status updates to relevant parties during active incidents
* **Resolution Notifications** — Send resolution and post-mortem summaries via email
* **Distribution List Support** — Send updates to Gmail distribution lists and groups

## Setup

To configure Gmail with Pagerly Incidence Response:

1. Navigate to your Pagerly workspace settings
2. Go to **Integrations** → **Gmail**
3. Connect your Google Workspace account
4. Configure email notification preferences and distribution lists

## Need Help?

For assistance with Gmail integration setup, reach out to us at <hello@pagerly.io>.


# Datadog

## Overview

Datadog is a powerful monitoring and analytics platform that provides deep insights into the performance of applications and infrastructure. Pagerly integrates with Datadog to connect your monitoring data with your incident response workflow.

## Key Features

* **Monitor Alerts** — Receive Datadog monitor alerts and create incidents automatically in Pagerly
* **Dashboard Links** — Include relevant Datadog dashboard links in incident channels
* **Metric Correlation** — Correlate incidents with Datadog metrics and traces
* **APM Integration** — Link application performance data to incident investigations
* **Custom Webhooks** — Configure custom webhook payloads for fine-grained incident creation

## Setup

To configure Datadog with Pagerly Incidence Response:

1. Navigate to your Pagerly workspace settings
2. Go to **Integrations** → **Datadog**
3. Connect your Datadog account using your API and Application keys
4. Configure monitor notification channels and incident routing

For detailed webhook setup, see [Datadog Integration Guide](/incidents-and-alerting/integrations/datadog).

## Need Help?

For assistance with Datadog integration setup, reach out to us at <hello@pagerly.io>.


# Statuspage

## Overview

Statuspage is a status and incident communication tool that allows users to stay informed about the status of applications and ongoing incidents. Pagerly integrates with Statuspage to automate incident communication with your users.

## Key Features

* **Automatic Status Updates** — Automatically update your Statuspage when incidents are created or resolved in Pagerly
* **Component Status Sync** — Sync component status between Pagerly incidents and Statuspage
* **Incident Communication** — Post incident updates to your Statuspage directly from Pagerly
* **Maintenance Notices** — Create and manage maintenance notices from your incident workflow
* **Subscriber Notifications** — Trigger Statuspage subscriber notifications based on incident events

## Setup

To configure Statuspage with Pagerly Incidence Response:

1. Navigate to your Pagerly workspace settings
2. Go to **Integrations** → **Statuspage**
3. Connect your Statuspage account
4. Map Pagerly teams and services to Statuspage components

For more on status pages, see [Beautiful Status Pages](/status-pages-and-monitoring/beautiful-status-pages).

## Need Help?

For assistance with Statuspage integration setup, reach out to us at <hello@pagerly.io>.


# Self Hosted

This sections covers If you are looking for a self hosted version of Incidence Response

With seamless accessibility through the cloud, users can easily leverage its powerful features, scalability, and continuous updates to enhance their workflow and productivity. However, recognizing the unique requirements of some businesses, we also provide a flexible self-hosted option. This allows organizations to deploy and manage the software on their own infrastructure, providing them with complete control over data security and customization. Whether users prefer the convenience of SaaS or the autonomy of self-hosting, our product ensures a reliable and feature-rich experience, empowering businesses to thrive in their respective domains while meeting their specific operational preferences.

Following are the aspects/pros of self hosted version of Incidence Response

1. Own Slack App with Whitelabeled in your brand
2. Own your own data
   1. Own Incident Data in your cloud
   2. Your own Slack App will read messages
   3. You maintain your own integrations
3. Choose your own workflows


# Contact Us

For any demo, queries, requests you can always contact us

* Send the mail to <hello@pagerly.io>


# Public Status Pages

### Setup Link

You can directly install Pagerly Status Page App ([Link](https://manage.pagerly.io))

Pagerly Status Page App offers a comprehensive solution to manage and display the status of services with real-time updates, customizable design, and subscriber notifications. Host your status page on a custom domain and include detailed service-level timelines for clarity and professional presentation.

### **Customers Live Status Pages**

* SyncMyGroup : [https://status.syncmygroup.com](https://status.syncmygroup.com/)

### Why Pagerly Status Pages are the best

* **Real-Time Updates:** Instantly update status pages with both manual and automated workflows to keep everyone informed about incidents as they happen.

<figure><img src="/files/FujwYdJyxgUHD0bK14qM" alt=""><figcaption></figcaption></figure>

* **Customization:** Design your status page to align with your brand's aesthetics, providing a cohesive and professional look.

<figure><img src="/files/229QHCbOpYpf9TYQrqmS" alt=""><figcaption></figcaption></figure>

* **Subscriber Notifications:** Allow customers to subscribe to updates via email, RSS/Atom feeds, or webhooks to ensure they never miss important alerts.

<figure><img src="/files/swlk9Zvjzuz8Yscamrdr" alt=""><figcaption></figcaption></figure>

<figure><img src="/files/uirGlPdYgvlhqrvb5dOM" alt=""><figcaption></figcaption></figure>

* **Custom Domain Hosting:** Host your status page on a custom domain without incurring extra costs, maintaining brand consistency.

<figure><img src="/files/9bxtoOYabSy1uj52DqRX" alt=""><figcaption></figcaption></figure>

* **Service Level Details:** Offer detailed timelines for each component or service, helping users understand the status and history at a glance.

<figure><img src="/files/9eg2Va3HYcBJPzJfF1pm" alt=""><figcaption></figcaption></figure>

Follow next steps for creating status page in seconds


# Status Page Settings in Pagerly

## Status Page Settings in Pagerly

1\. Navigate to <https://manage.pagerly.io/settings>

![](https://ajeuwbhvhr.cloudimg.io/https://colony-recorder.s3.amazonaws.com/files/2025-06-05/4cdd7260-d35e-4218-89ab-ef6ab1e930df/ascreenshot.jpeg?tl_px=0,0\&br_px=1528,854\&force_format=jpeg\&q=100\&width=1120.0\&wat=1\&wat_opacity=0.7\&wat_gravity=northwest\&wat_url=https://colony-recorder.s3.us-west-1.amazonaws.com/images/watermarks/FB923C_standard.png\&wat_pad=264,243)

2\. 1. Set page name. 2. Add support link or email. 3. Add website URL. 4. Set timezone. 5. Add logo (light-mode and dark-mode) and favicon. 6. Click "Save".

![](https://ajeuwbhvhr.cloudimg.io/https://colony-recorder.s3.amazonaws.com/files/2025-06-05/a744cadf-67db-4b56-a51f-a6fb604503ae/ascreenshot.jpeg?tl_px=0,55\&br_px=2752,1594\&force_format=jpeg\&q=100\&width=1120.0\&wat=1\&wat_opacity=0.7\&wat_gravity=northwest\&wat_url=https://colony-recorder.s3.us-west-1.amazonaws.com/images/watermarks/FB923C_standard.png\&wat_pad=483,550)

3\. Status page settings updated successfully!

![](https://ajeuwbhvhr.cloudimg.io/https://colony-recorder.s3.amazonaws.com/files/2025-06-05/411fe24e-0df7-4845-bf87-8b81400bd872/ascreenshot.jpeg?tl_px=1411,739\&br_px=2940,1593\&force_format=jpeg\&q=100\&width=1120.0\&wat=1\&wat_opacity=0.7\&wat_gravity=northwest\&wat_url=https://colony-recorder.s3.us-west-1.amazonaws.com/images/watermarks/FB923C_standard.png\&wat_pad=725,444)


# Creating and Editing a Group Component

##

1\. Navigate to <https://manage.pagerly.io/components>

![](https://ajeuwbhvhr.cloudimg.io/https://colony-recorder.s3.amazonaws.com/files/2025-06-05/360d9bcb-f9c1-4f75-ac04-c5dff13c1c19/ascreenshot.jpeg?tl_px=0,80\&br_px=1528,935\&force_format=jpeg\&q=100\&width=1120.0\&wat=1\&wat_opacity=0.7\&wat_gravity=northwest\&wat_url=https://colony-recorder.s3.us-west-1.amazonaws.com/images/watermarks/FB923C_standard.png\&wat_pad=261,277)

2\. Click "Add Group Component"

![](https://ajeuwbhvhr.cloudimg.io/https://colony-recorder.s3.amazonaws.com/files/2025-06-05/041b4951-8da3-4cac-83fd-c4c468f9db96/ascreenshot.jpeg?tl_px=1411,0\&br_px=2940,854\&force_format=jpeg\&q=100\&width=1120.0\&wat=1\&wat_opacity=0.7\&wat_gravity=northwest\&wat_url=https://colony-recorder.s3.us-west-1.amazonaws.com/images/watermarks/FB923C_standard.png\&wat_pad=893,51)

3\. Add the group component name and click "Create Group".

![](https://ajeuwbhvhr.cloudimg.io/https://colony-recorder.s3.amazonaws.com/files/2025-06-05/75295f8d-999b-4795-9e2b-c3cf5381429c/ascreenshot.jpeg?tl_px=737,384\&br_px=2266,1239\&force_format=jpeg\&q=100\&width=1120.0\&wat=1\&wat_opacity=0.7\&wat_gravity=northwest\&wat_url=https://colony-recorder.s3.us-west-1.amazonaws.com/images/watermarks/FB923C_standard.png\&wat_pad=642,381)

4\. Group created successfully!

![](https://ajeuwbhvhr.cloudimg.io/https://colony-recorder.s3.amazonaws.com/files/2025-06-05/99faa849-8679-48ea-9ce5-3e4eba5ccd86/ascreenshot.jpeg?tl_px=497,623\&br_px=1748,1322\&force_format=jpeg\&q=100\&width=1120.0\&wat=1\&wat_opacity=0.7\&wat_gravity=northwest\&wat_url=https://colony-recorder.s3.us-west-1.amazonaws.com/images/watermarks/FB923C_standard.png\&wat_pad=493,444)

5\. Click this 'Edit' icon to update the group component name.

![](https://ajeuwbhvhr.cloudimg.io/https://colony-recorder.s3.amazonaws.com/files/2025-06-05/779affc8-e3cd-4ffc-bf7b-843b93c88787/ascreenshot.jpeg?tl_px=269,590\&br_px=1798,1445\&force_format=jpeg\&q=100\&width=1120.0\&wat=1\&wat_opacity=0.7\&wat_gravity=northwest\&wat_url=https://colony-recorder.s3.us-west-1.amazonaws.com/images/watermarks/FB923C_standard.png\&wat_pad=523,277)

6\. Updating group component name.

![](https://ajeuwbhvhr.cloudimg.io/https://colony-recorder.s3.amazonaws.com/files/2025-06-05/c6e89b25-ffb7-40c4-a4ac-f5c5763b218f/ascreenshot.jpeg?tl_px=747,425\&br_px=2276,1279\&force_format=jpeg\&q=100\&width=1120.0\&wat=1\&wat_opacity=0.7\&wat_gravity=northwest\&wat_url=https://colony-recorder.s3.us-west-1.amazonaws.com/images/watermarks/FB923C_standard.png\&wat_pad=698,345)

7\. Group component name updated successfully!

![](https://ajeuwbhvhr.cloudimg.io/https://colony-recorder.s3.amazonaws.com/files/2025-06-05/6626e045-158e-4d51-bbf1-369ed61646eb/ascreenshot.jpeg?tl_px=367,716\&br_px=1896,1571\&force_format=jpeg\&q=100\&width=1120.0\&wat=1\&wat_opacity=0.7\&wat_gravity=northwest\&wat_url=https://colony-recorder.s3.us-west-1.amazonaws.com/images/watermarks/FB923C_standard.png\&wat_pad=524,276)

8\. Click the 'Trash' icon to delete the group component.

![](https://ajeuwbhvhr.cloudimg.io/https://colony-recorder.s3.amazonaws.com/files/2025-06-05/39396db2-2720-41c7-9f2d-3a7a65589404/ascreenshot.jpeg?tl_px=489,578\&br_px=2018,1433\&force_format=jpeg\&q=100\&width=1120.0\&wat=1\&wat_opacity=0.7\&wat_gravity=northwest\&wat_url=https://colony-recorder.s3.us-west-1.amazonaws.com/images/watermarks/FB923C_standard.png\&wat_pad=524,276)

9\. Click "Delete"

![](https://ajeuwbhvhr.cloudimg.io/https://colony-recorder.s3.amazonaws.com/files/2025-06-05/2d05b579-b147-42a2-acd4-155bbd6809bd/ascreenshot.jpeg?tl_px=700,403\&br_px=2229,1257\&force_format=jpeg\&q=100\&width=1120.0\&wat=1\&wat_opacity=0.7\&wat_gravity=northwest\&wat_url=https://colony-recorder.s3.us-west-1.amazonaws.com/images/watermarks/FB923C_standard.png\&wat_pad=693,347)

10\. Group component deleted

![](https://ajeuwbhvhr.cloudimg.io/https://colony-recorder.s3.amazonaws.com/files/2025-06-05/a6d96797-76d0-4224-91e7-071953a7b33f/ascreenshot.jpeg?tl_px=1411,739\&br_px=2940,1593\&force_format=jpeg\&q=100\&width=1120.0\&wat=1\&wat_opacity=0.7\&wat_gravity=northwest\&wat_url=https://colony-recorder.s3.us-west-1.amazonaws.com/images/watermarks/FB923C_standard.png\&wat_pad=606,442)


# Update component's status

##

1\. Select the component.

![](https://ajeuwbhvhr.cloudimg.io/https://colony-recorder.s3.amazonaws.com/files/2025-06-05/9f115b85-fc1c-428f-a7c2-fd258d075f3a/ascreenshot.jpeg?tl_px=1203,48\&br_px=2732,903\&force_format=jpeg\&q=100\&width=1120.0\&wat=1\&wat_opacity=0.7\&wat_gravity=northwest\&wat_url=https://colony-recorder.s3.us-west-1.amazonaws.com/images/watermarks/FB923C_standard.png\&wat_pad=524,277)

2\. Select the updated status.

![](https://ajeuwbhvhr.cloudimg.io/https://colony-recorder.s3.amazonaws.com/files/2025-06-05/90070a3a-c911-498a-92b0-4ad49fb53299/ascreenshot.jpeg?tl_px=188,55\&br_px=2940,1594\&force_format=jpeg\&q=100\&width=1120.0\&wat=1\&wat_opacity=0.7\&wat_gravity=northwest\&wat_url=https://colony-recorder.s3.us-west-1.amazonaws.com/images/watermarks/FB923C_standard.png\&wat_pad=550,423)

3\. Click "Save"

![](https://ajeuwbhvhr.cloudimg.io/https://colony-recorder.s3.amazonaws.com/files/2025-06-05/364b44f4-ba68-4394-9ce7-458899df069a/ascreenshot.jpeg?tl_px=652,495\&br_px=2618,1594\&force_format=jpeg\&q=100\&width=1120.0\&wat=1\&wat_opacity=0.7\&wat_gravity=northwest\&wat_url=https://colony-recorder.s3.us-west-1.amazonaws.com/images/watermarks/FB923C_standard.png\&wat_pad=594,407)


# Add component to a group

##

1\. Select the component.

![](https://ajeuwbhvhr.cloudimg.io/https://colony-recorder.s3.amazonaws.com/files/2025-06-05/937ede52-6b0a-458a-a4af-c1edcd9b621b/ascreenshot.jpeg?tl_px=1157,24\&br_px=2686,879\&force_format=jpeg\&q=100\&width=1120.0\&wat=1\&wat_opacity=0.7\&wat_gravity=northwest\&wat_url=https://colony-recorder.s3.us-west-1.amazonaws.com/images/watermarks/FB923C_standard.png\&wat_pad=523,276)

2\. Select the group you want to add the component to.

![](https://ajeuwbhvhr.cloudimg.io/https://colony-recorder.s3.amazonaws.com/files/2025-06-05/60071a39-b7e7-41fa-87be-3de7f2bd2dff/ascreenshot.jpeg?tl_px=601,495\&br_px=2566,1594\&force_format=jpeg\&q=100\&width=1120.0\&wat=1\&wat_opacity=0.7\&wat_gravity=northwest\&wat_url=https://colony-recorder.s3.us-west-1.amazonaws.com/images/watermarks/FB923C_standard.png\&wat_pad=524,413)

3\. Click "Save"

![](https://ajeuwbhvhr.cloudimg.io/https://colony-recorder.s3.amazonaws.com/files/2025-06-05/07690267-708e-49bf-bd02-14e12f716716/ascreenshot.jpeg?tl_px=817,739\&br_px=2346,1593\&force_format=jpeg\&q=100\&width=1120.0\&wat=1\&wat_opacity=0.7\&wat_gravity=northwest\&wat_url=https://colony-recorder.s3.us-west-1.amazonaws.com/images/watermarks/FB923C_standard.png\&wat_pad=698,354)

4\. Component successfully added to the group.

![](https://ajeuwbhvhr.cloudimg.io/https://colony-recorder.s3.amazonaws.com/files/2025-06-05/e0379c31-170d-46c3-b50b-d8ff848727aa/ascreenshot.jpeg?tl_px=393,622\&br_px=1922,1476\&force_format=jpeg\&q=100\&width=1120.0\&wat=1\&wat_opacity=0.7\&wat_gravity=northwest\&wat_url=https://colony-recorder.s3.us-west-1.amazonaws.com/images/watermarks/FB923C_standard.png\&wat_pad=374,400)


# Creating an incident

1\. Navigate to <https://manage.pagerly.io/notices>

![](https://ajeuwbhvhr.cloudimg.io/https://colony-recorder.s3.amazonaws.com/files/2025-06-05/7281ec09-7564-4604-859e-7f43d1e4eed1/ascreenshot.jpeg?tl_px=0,85\&br_px=1528,940\&force_format=jpeg\&q=100\&width=1120.0\&wat=1\&wat_opacity=0.7\&wat_gravity=northwest\&wat_url=https://colony-recorder.s3.us-west-1.amazonaws.com/images/watermarks/FB923C_standard.png\&wat_pad=183,446)

2\. Click "Add Incident"

![](https://ajeuwbhvhr.cloudimg.io/https://colony-recorder.s3.amazonaws.com/files/2025-06-05/7d40b402-5675-473e-8ffd-5a896db4883b/ascreenshot.jpeg?tl_px=1411,0\&br_px=2940,854\&force_format=jpeg\&q=100\&width=1120.0\&wat=1\&wat_opacity=0.7\&wat_gravity=northwest\&wat_url=https://colony-recorder.s3.us-west-1.amazonaws.com/images/watermarks/FB923C_standard.png\&wat_pad=873,172)

3\. 1. Add incident title. 2. Add an incident description (optional). 3. Set incident status. 4. Add affected components along with their status, respectively. 5. Click "Add Incident".

![](https://ajeuwbhvhr.cloudimg.io/https://colony-recorder.s3.amazonaws.com/files/2025-06-05/6e7afb7a-818c-4e3a-b4d1-4729190161d4/ascreenshot.jpeg?tl_px=188,55\&br_px=2940,1594\&force_format=jpeg\&q=100\&width=1120.0\&wat=1\&wat_opacity=0.7\&wat_gravity=northwest\&wat_url=https://colony-recorder.s3.us-west-1.amazonaws.com/images/watermarks/FB923C_standard.png\&wat_pad=622,525)

4\. Incident created successfully!

![](https://ajeuwbhvhr.cloudimg.io/https://colony-recorder.s3.amazonaws.com/files/2025-06-05/5249dd76-3866-48a7-b55c-e034b4dea59b/ascreenshot.jpeg?tl_px=486,27\&br_px=2015,882\&force_format=jpeg\&q=100\&width=1120.0\&wat=1\&wat_opacity=0.7\&wat_gravity=northwest\&wat_url=https://colony-recorder.s3.us-west-1.amazonaws.com/images/watermarks/FB923C_standard.png\&wat_pad=383,517)


# Adding an incident update

1\. Select the incident to redirect to the incident details page.

![](https://ajeuwbhvhr.cloudimg.io/https://colony-recorder.s3.amazonaws.com/files/2025-06-05/6d411157-5cba-46d2-ad25-9ef67ffe9e6e/ascreenshot.jpeg?tl_px=383,25\&br_px=1912,880\&force_format=jpeg\&q=100\&width=1120.0\&wat=1\&wat_opacity=0.7\&wat_gravity=northwest\&wat_url=https://colony-recorder.s3.us-west-1.amazonaws.com/images/watermarks/FB923C_standard.png\&wat_pad=436,444)

2\. Click "Add Update".

![](https://ajeuwbhvhr.cloudimg.io/https://colony-recorder.s3.amazonaws.com/files/2025-06-05/5e9b135e-4f7a-4a0e-b9fa-8a0dd2293ba8/ascreenshot.jpeg?tl_px=486,48\&br_px=2452,1146\&force_format=jpeg\&q=100\&width=1120.0\&wat=1\&wat_opacity=0.7\&wat_gravity=northwest\&wat_url=https://colony-recorder.s3.us-west-1.amazonaws.com/images/watermarks/FB923C_standard.png\&wat_pad=315,270)

3\. 1. Update status. 2. Date and time of update. 3. Add update description (optional). 4. Add affected components and their status, respectively (optional). 5. Click "Add Update".

![](https://ajeuwbhvhr.cloudimg.io/https://colony-recorder.s3.amazonaws.com/files/2025-06-05/f1f7696d-66db-4a75-a518-04628ba7af07/ascreenshot.jpeg?tl_px=34,55\&br_px=2786,1594\&force_format=jpeg\&q=100\&width=1120.0\&wat=1\&wat_opacity=0.7\&wat_gravity=northwest\&wat_url=https://colony-recorder.s3.us-west-1.amazonaws.com/images/watermarks/FB923C_standard.png\&wat_pad=524,564)

4\. Incident update added successfully!

![](https://ajeuwbhvhr.cloudimg.io/https://colony-recorder.s3.amazonaws.com/files/2025-06-05/50560def-e550-47c4-96e9-1e5507641e35/ascreenshot.jpeg?tl_px=451,134\&br_px=1980,989\&force_format=jpeg\&q=100\&width=1120.0\&wat=1\&wat_opacity=0.7\&wat_gravity=northwest\&wat_url=https://colony-recorder.s3.us-west-1.amazonaws.com/images/watermarks/FB923C_standard.png\&wat_pad=524,277)


# Creating a Maintenance Notice

1\. Navigate to <https://manage.pagerly.io/notices>

![](https://ajeuwbhvhr.cloudimg.io/https://colony-recorder.s3.amazonaws.com/files/2025-06-05/ae107d82-d756-484b-974a-72994ed1d4e5/ascreenshot.jpeg?tl_px=0,0\&br_px=1528,854\&force_format=jpeg\&q=100\&width=1120.0\&wat=1\&wat_opacity=0.7\&wat_gravity=northwest\&wat_url=https://colony-recorder.s3.us-west-1.amazonaws.com/images/watermarks/FB923C_standard.png\&wat_pad=236,507)

2\. Switch to the "MAINTENANCES" tab.

![](https://ajeuwbhvhr.cloudimg.io/https://colony-recorder.s3.amazonaws.com/files/2025-06-05/d8a687fc-54f7-4d43-b40f-85216f2c661a/ascreenshot.jpeg?tl_px=453,0\&br_px=1982,854\&force_format=jpeg\&q=100\&width=1120.0\&wat=1\&wat_opacity=0.7\&wat_gravity=northwest\&wat_url=https://colony-recorder.s3.us-west-1.amazonaws.com/images/watermarks/FB923C_standard.png\&wat_pad=524,167)

3\. Click "Add Maintenance"

![](https://ajeuwbhvhr.cloudimg.io/https://colony-recorder.s3.amazonaws.com/files/2025-06-05/c0a9a637-dcad-493e-8f20-e3ec6c381540/ascreenshot.jpeg?tl_px=974,0\&br_px=2940,1098\&force_format=jpeg\&q=100\&width=1120.0\&wat=1\&wat_opacity=0.7\&wat_gravity=northwest\&wat_url=https://colony-recorder.s3.us-west-1.amazonaws.com/images/watermarks/FB923C_standard.png\&wat_pad=908,115)

4\. 1. Add maintenance title. 2. Add maintenance description (optional). 3. Add affected components and their status, respectively (optional). 4. Set maintenance start, end date and time. 5. Click "Add Maintenance".

![](https://ajeuwbhvhr.cloudimg.io/https://colony-recorder.s3.amazonaws.com/files/2025-06-05/fbb6c146-be31-4916-8890-d64f5a06c298/ascreenshot.jpeg?tl_px=188,55\&br_px=2940,1594\&force_format=jpeg\&q=100\&width=1120.0\&wat=1\&wat_opacity=0.7\&wat_gravity=northwest\&wat_url=https://colony-recorder.s3.us-west-1.amazonaws.com/images/watermarks/FB923C_standard.png\&wat_pad=627,534)

5\. Maintenance notice added successfully!

![](https://ajeuwbhvhr.cloudimg.io/https://colony-recorder.s3.amazonaws.com/files/2025-06-05/a013c0dc-612e-4be4-8a97-abda5ab262b0/ascreenshot.jpeg?tl_px=414,15\&br_px=1943,870\&force_format=jpeg\&q=100\&width=1120.0\&wat=1\&wat_opacity=0.7\&wat_gravity=northwest\&wat_url=https://colony-recorder.s3.us-west-1.amazonaws.com/images/watermarks/FB923C_standard.png\&wat_pad=427,490)

[**Made with Scribe**](https://scribehow.com/shared/Creating_a_Maintenance_Notice__VFmzsPkzRZ-Lpg7egvWkQg)


---

[Next Page](/llms-full.txt/1)